

Changbp
-
Content Count
455 -
Joined
-
Last visited
-
Days Won
3
Posts posted by Changbp
-
-
Hello, what does the weekly house cleaning include?
I need helper to wash the toilets and clean kitchen only.
-
On 10/14/2018 at 7:26 PM, hdb4ever said:Finally wandered into this thread! Your DIY projects are truly inspiring! How is your washer pedestal with accompanying broom closet setup holding up after a year of use?
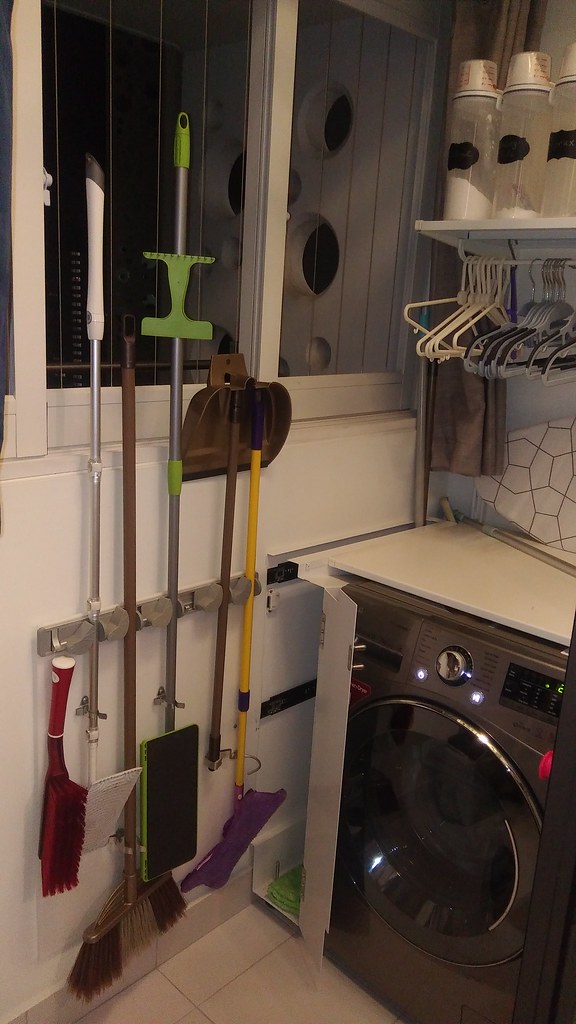
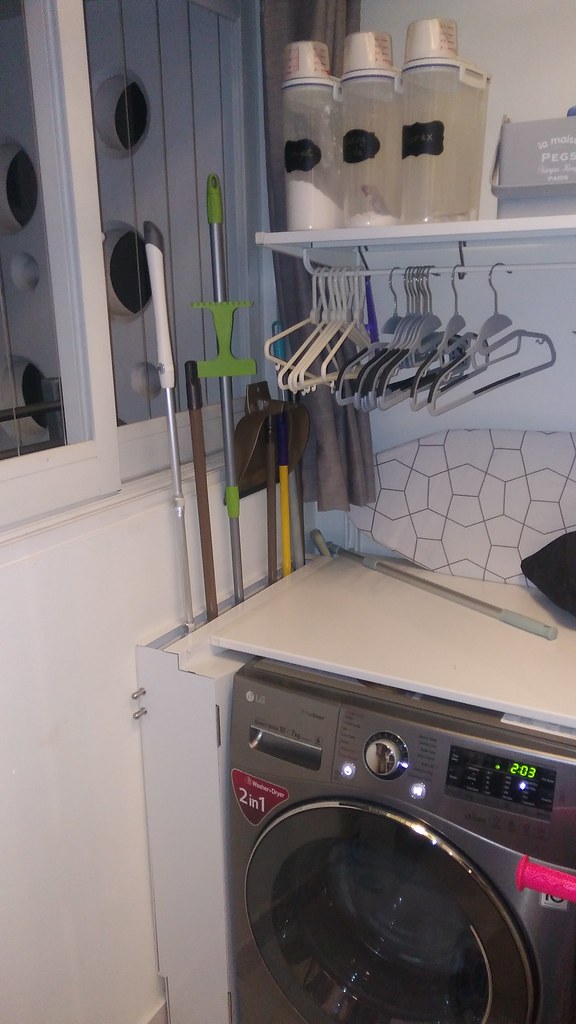
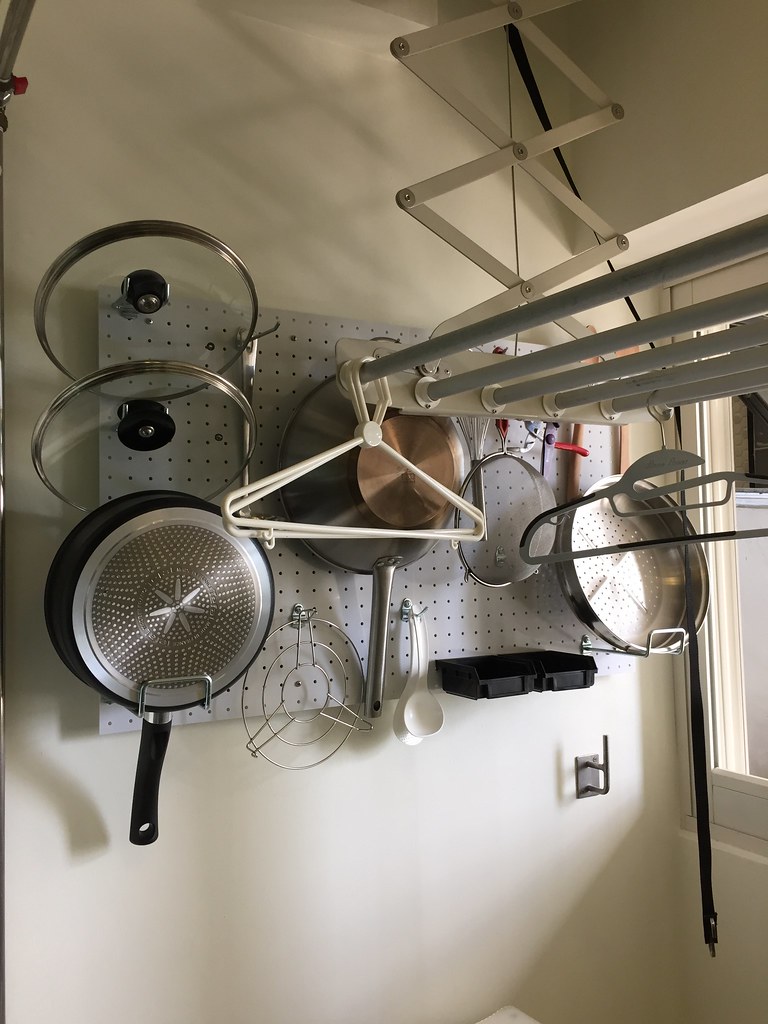
Washer pedestal was scrapped. Its not rigid enough during spin cycle it will walk.
Ive upgraded the broom closet by adding left over piece of acrylic behind it to prevent items brooms dirtying my wall when slid out. It works great. These 2 pics were just taken.
One of the most useful stuff.
-
 1
1
-
-
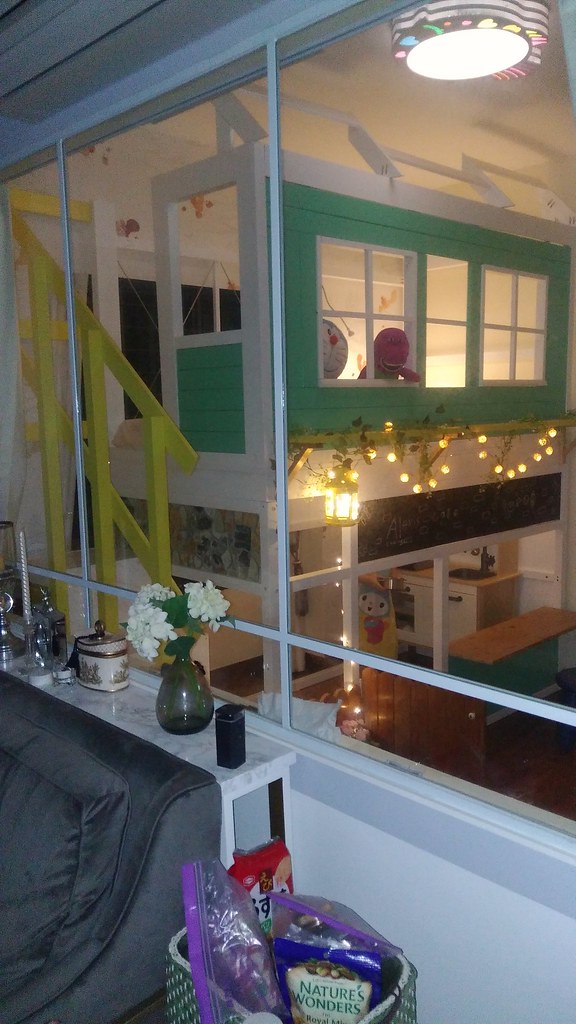
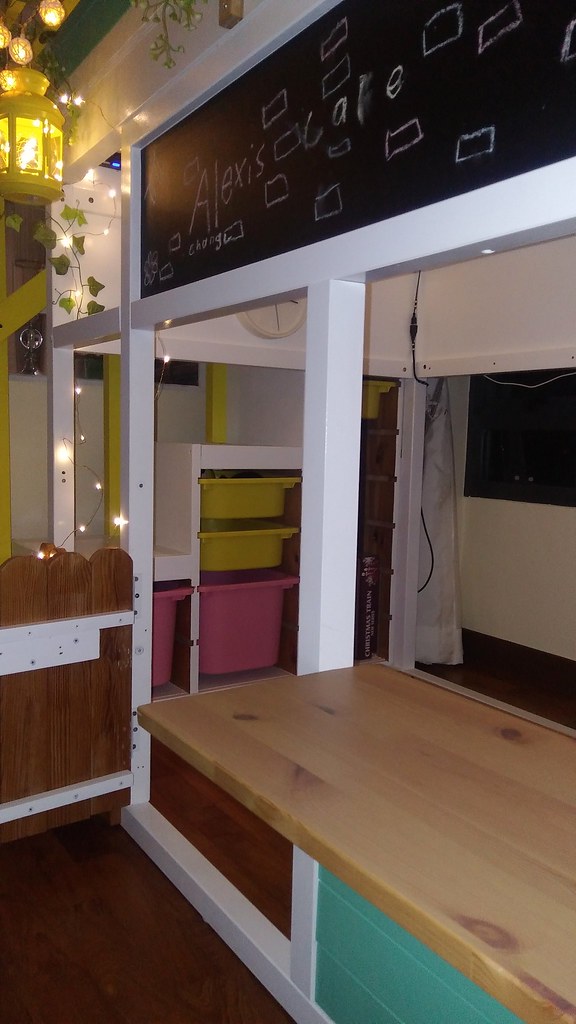
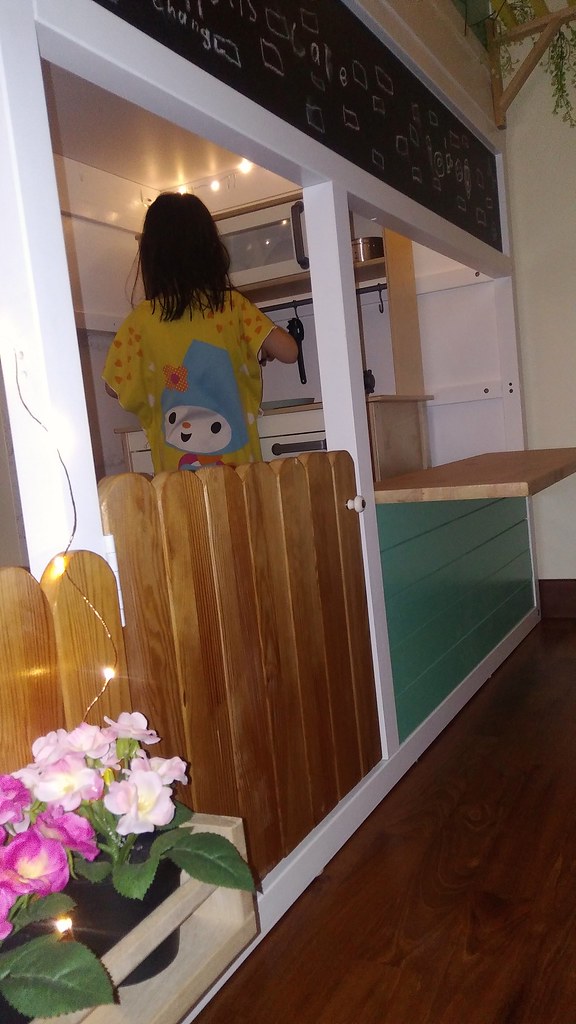
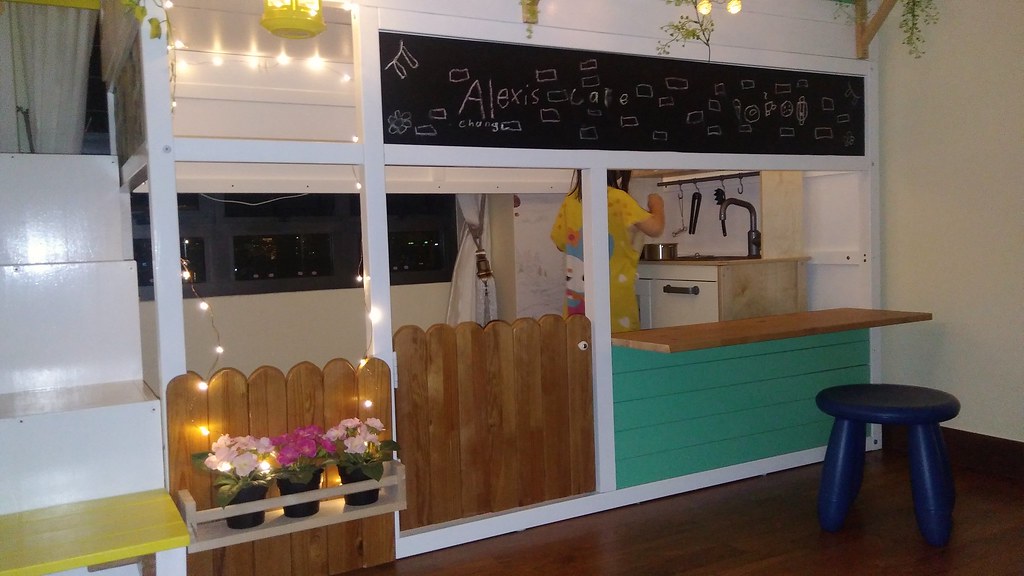
2 years after... complete the last piece which is my daughters room.
This is my largest DIY...Took too long time to complete. Like 4 months haha... Built her a double deck play house bed. It actually isnt complete(roof is missing shingles). I think I'll leave it as is. As the upper deck is the bed and could be stuffy.
View from outside
Front view.
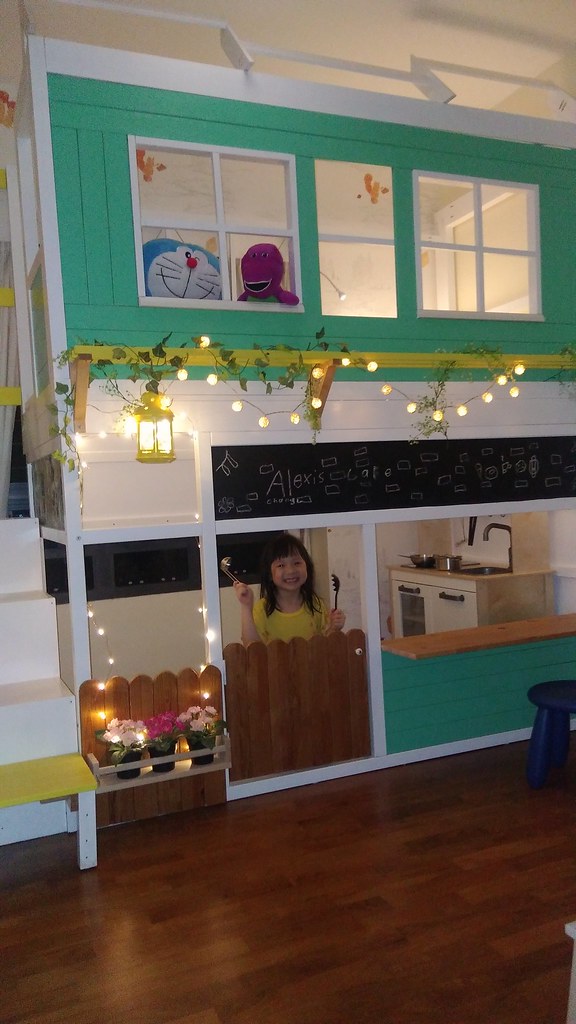
Under the stairs, with USB hub too..
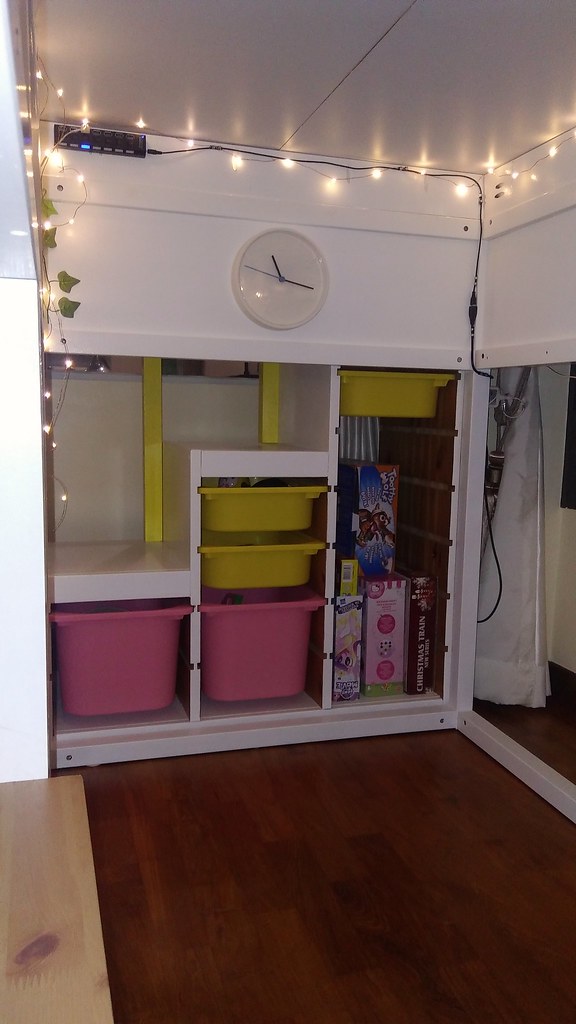
Other views
-
On 6/17/2018 at 10:22 AM, Yu Wei Tan said:Hi all,
Does anyone else face this problem where the Kraus sink cannot be shipped to Singapore. After clicking on the filter "Ship to Singapore", this item appeared on the list. However, upon checking out it says that the item does not ship to Singapore. I've spoken to a CSO on Amazon and she said that the item cannot be shipped. However, I've read it on the internet the there has been purchases of the Kraus Sink in the recent months. Just wanna know if anyone else faces this problem.
YuweiYou can try to use third party buyers with US postal addresses. Like Vpost and ezbuy.
Kraus sink depending on type can get from Singapore amazon prime now. I just bought one. Free shipping too.
-
Interested to know how’s your flushing system now? Since you relocated the bowl.
-
I like ur dining area. Very elegant. how much did the Reno cost you?
-
I have the same problem as well, although ur fly count is 10 times more than mine
 . Mines a Hitachi mini French door fridge.
Its a sealing issue. Don't just let the door close by itself, apply a bit of pressure more to seal it. That helps in my case.
-
On 17/07/2017 at 0:29 AM, purplegirafffe said:Thanks! Yup, carpentry work will cover up our chimney hood as per the design.
Yeah we initially thought may have to buy from overseas, but managed to find the tiles from An Huat, hopefully it'll achieve the look!
Yeah, I had exactly similar tile concept for my bathroom using the 2 tiles that you have pictured. Couldn't find the lower tile locally and it costs too much from amazon. So only framed with the upper tile that u pictured. Not as nice. If I've only known about this store earlier.
-
On 13/07/2017 at 3:10 PM, purplegirafffe said:The "ID"
Very broadly speaking, from what I've seen, a big difference between an ID and a contractor is that an ID provides the additional "value-add" by doing space planning and providing 3D renders. Basically, the creative/design side of things. Whereas a contractor just builds according to what you specify, but you have to be very clear about what you want and where you want it, cos you can't expect the contractor to be advising you on how to maximise your space or how your layout should be like.
In the midst of our eventually-fruitless ID hunt, I discovered a secret talent of my fiancé S. Seemingly overnight, he turned into a Sketchup pro, taking all my ideas of my dream kitchen (and eventually house) and turning them into fantastic designs! This was right about when we met up with our carpenter from CC as well, so that basically settled the issue once and for all of whether we needed to engage someone who could handle the design side of things.
[Sketchup is a free 3D modelling software available online. To me whose only experience with designing houses is in Sims, it’s pretty mind-blowing. S used to work with CAD software at work, so he was able to pick it up very quickly.]
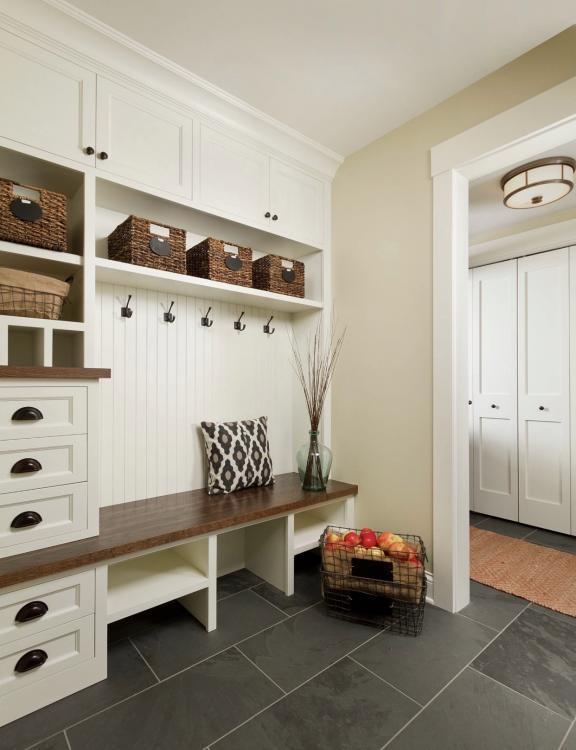
At our first meeting, F suggested the idea of a mudroom concept in what is originally designated as the dining room. Sort of a foyer area to kick off your shoes when you enter or where you can sit down and lace up your boots before leaving:
So after many many rounds of revision, S came up with this design:
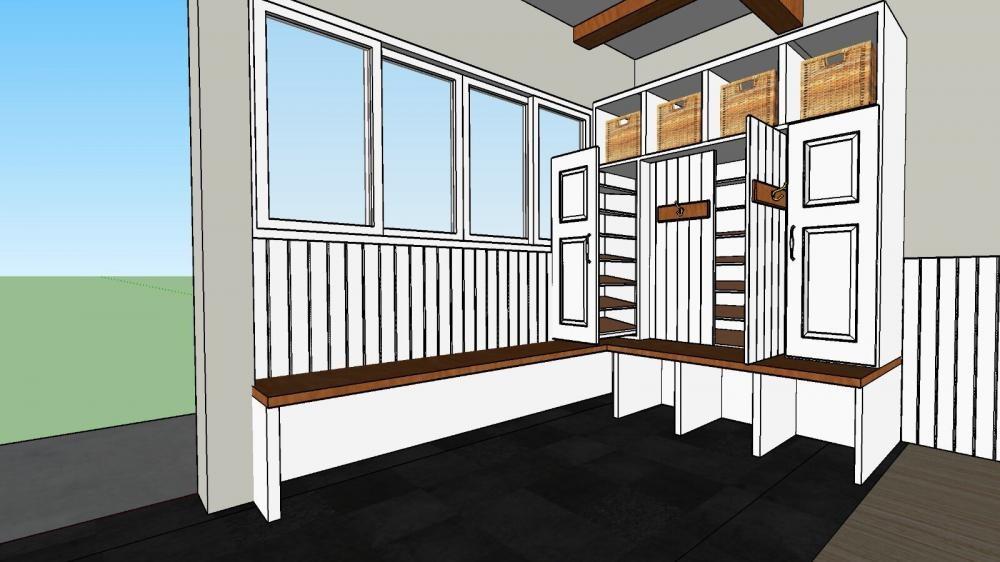
Seating on and storage below the benches, overhead cubbies for storing sports gear and other knick-knacks, and tall pull-out drawers for all my shoes!^^View from the mudroom: the "corridor" linking the entrance to the living area will be kept clear. Ooh and also rafters overhead spanning the whole of the first floor, to really give it that farmhouse look. Not purely for aesthetic purposes though, cos they'll also be used to house the wiring for ceiling fan/lights.
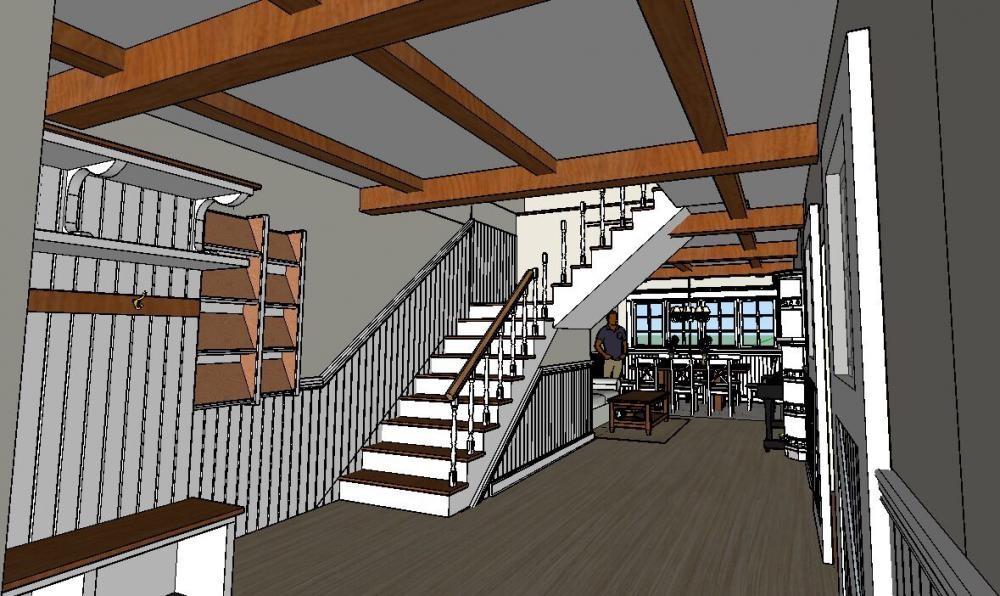
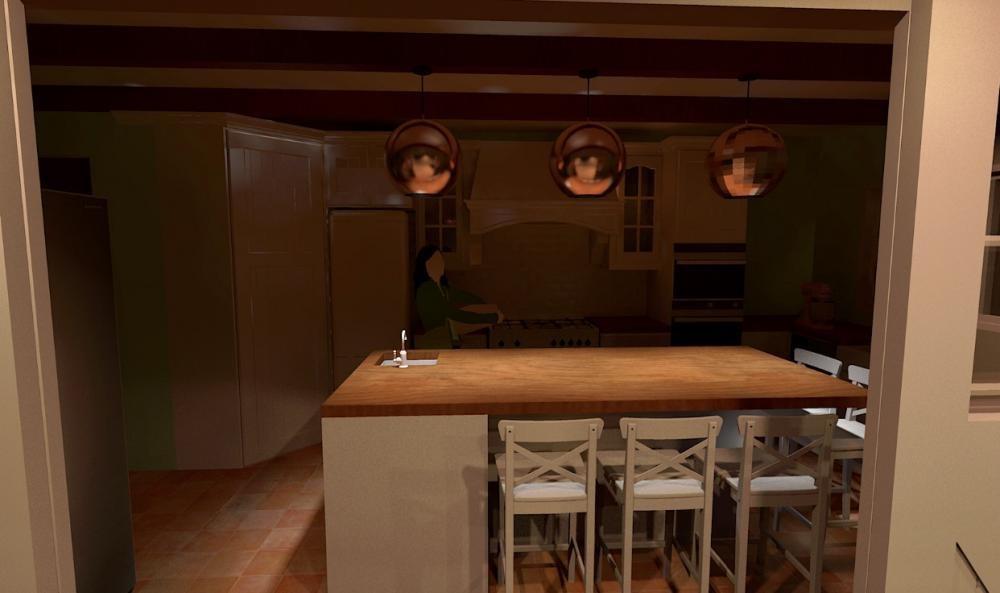
And here's a render of the living/dining room:
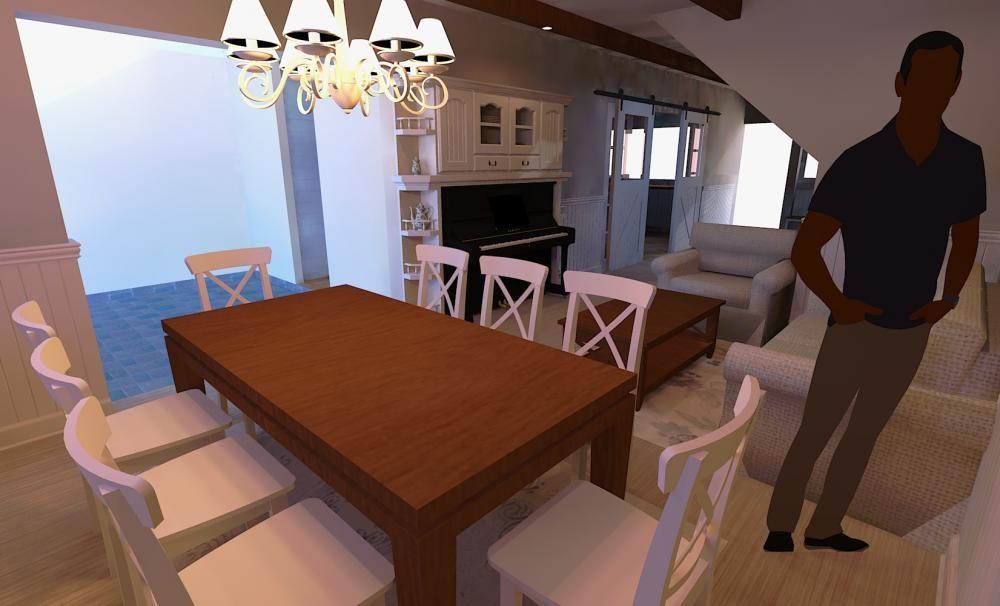
As we've decided we won't be having a telly, we'll just have a cosy living area with a 2-seater couch (ignore the armchair, it probably won't be there) and coffee table. The rest of the space will be given over to an 8-seater dining table, which is where we imagine most people will gather around anyways when we have family or guests over.
Also another wacky-cool idea that S dreamed up is our one-of-a-kind "piano hutch". I'd really wanted a buffet hutch somewhere in the dining or kitchen area, with nice glass display cabinets, something like this:
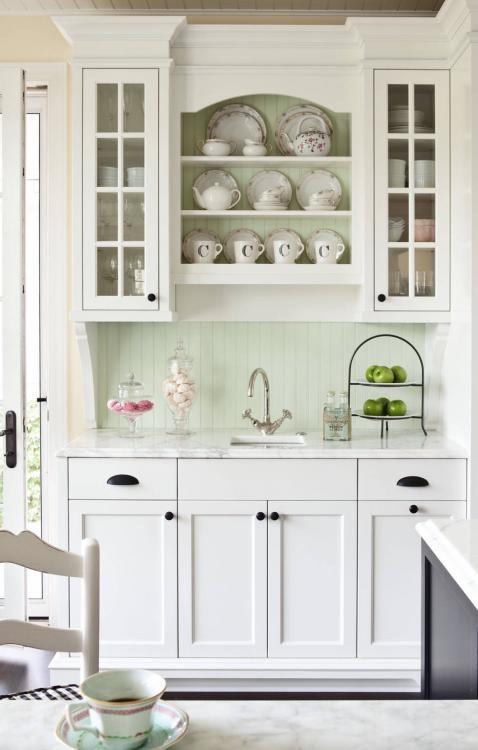
It was clear that it'd be too tight to fit it anywhere though, which is when S came up with the crazy idea of having the hutch double up as a piano bookshelf. We've been advised that it might make it a wee bit difficult to access the piano for tuning, but I guess we'll cross that bridge when we get there
Moving on to the kitchen, this is roughly the layout we've decided on, although the position of the fridge will be shifted to be beside the range cooker (with 1 cabinet space still in between), and the tall unit (housing oven and microwave) will be shifted to the corner on the right (where the coffee machine currently is).
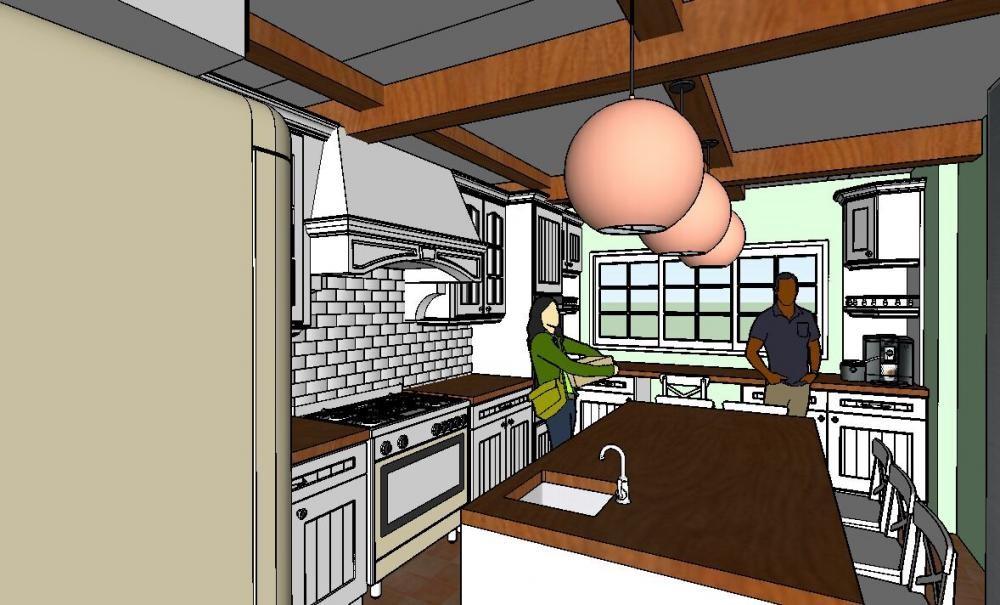
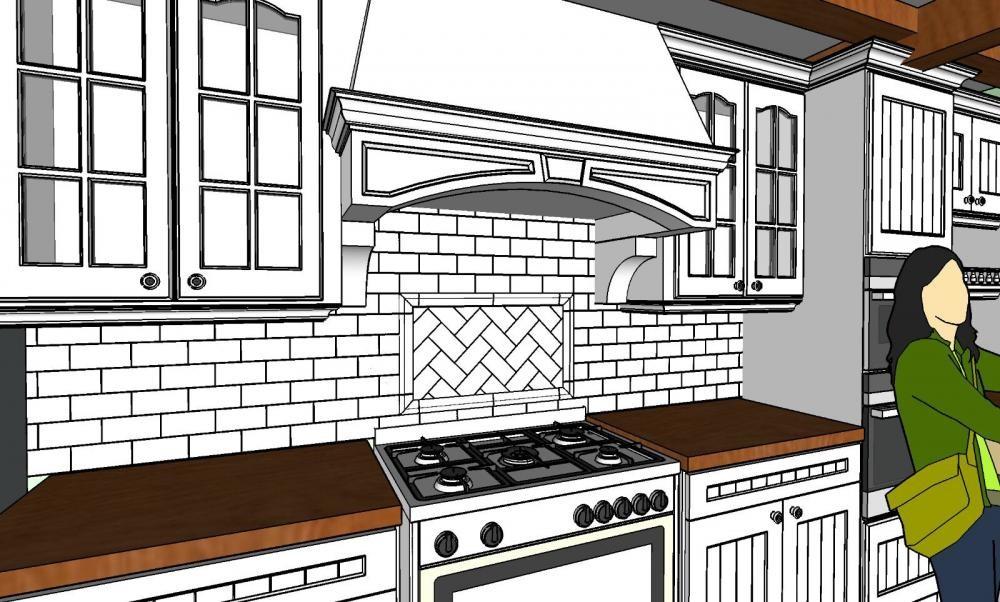
The stove backsplash is something which gave us quite a bit of headache, because we simply couldn't quite find the right tiles to give us the look we wanted. Eventually, S found the elusive tile trim at a tile shop recommended by J, An Huat near Great World City (all the other big tile shops don't seem to carry such stuff). Our design is quite closely based on this: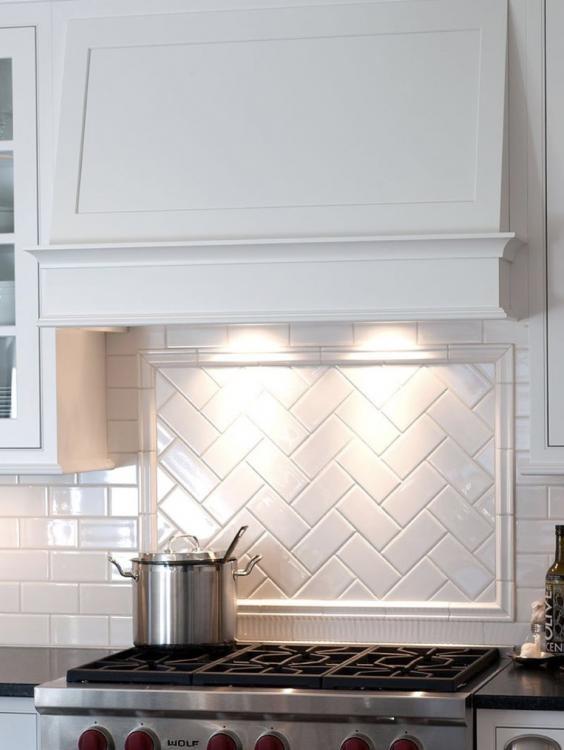
And here's a render of the kitchen...kinda dim cos the only light source currently comes from the pendant lights hehe. Here the fridge is in a more correct position. Also the island sink will be shifted over to the right side of the island, to be nearer the cooking/baking area!
nice, always a fan of farmhouse kitchen. Are u going to carpentry up the hood?
the stove backsplash: to really make it look nice, you need to "frame" it. You managed to find the framing tiles?
-
On 11/04/2017 at 0:52 AM, my3rmflat said:Yah, my wife always ask for a bigger kitchen, that is why my worktop is a U shape.
I extended to as much as I can, I even have a pull up worktop for extra space.
As for the dish dryer, it was the height that is out of proportion, the top space is useless.
I ask them to convert into an open shelve and will look better aesthetically.
You don't find it too ugly? Maybe I'm too fussy.
Not ugly but maybe too common. Yes I agree an open shelf would look better. But you need to have same size/color plates, bowls and glasses (theme) to "automatically decorate" it.
I didn't do a dish rack as I don't think the front swivel mechanism of the frosted panel can survive past 5 years if you use it daily.
That will be the most abused panel of all the cabinetry in the kitchen.
-
9 hours ago, my3rmflat said:Thanks for your compliment kobelala.
Is really not expensive, my reno is about $15K and my furnitures are all quite cheap.
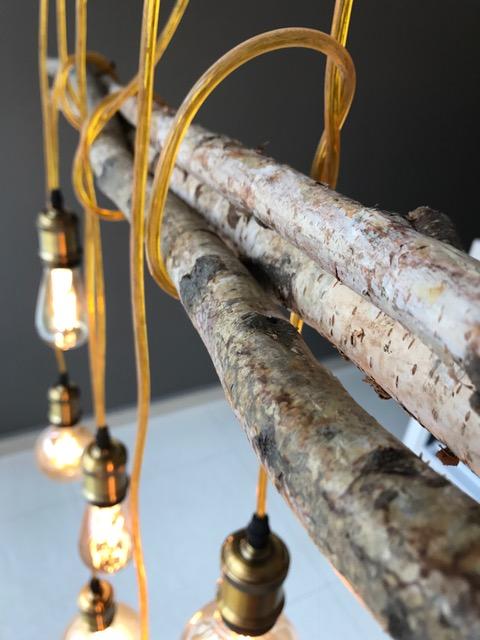
My DIY lights $110
My leather bar stool $115
My coffee table $145
My living room sofa, custom made $140 hahahaha
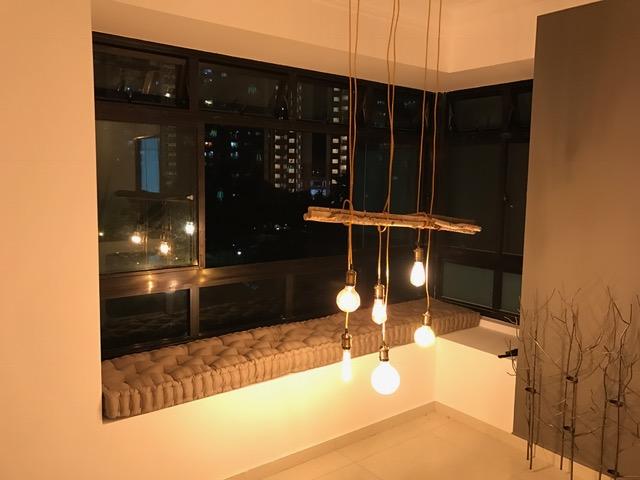
my Crate & Barrel rod, the most expensive part of the whole light set up. $45
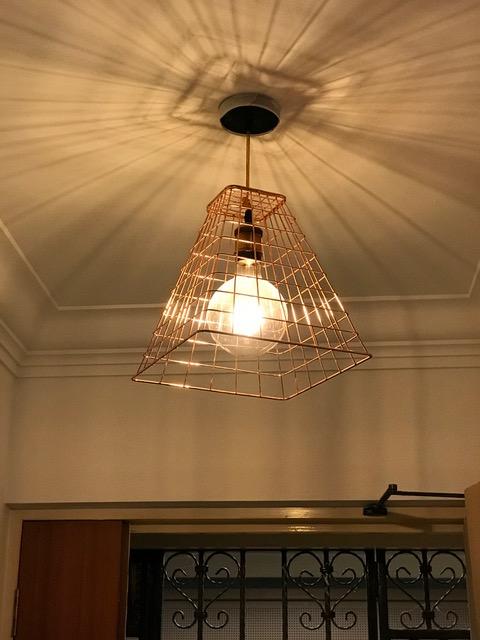
Foyer DIY light below $50
$45 for the crate and barrel... Can just DIY go chop some branches or something
FOC if not get caught.
-
10 hours ago, my3rmflat said:I'm Ok to have it lower, is easier to put up the dishes for drying.
Is too big and out of proportion.
Carpenter will cut down by 1/3 and convert the top part into empty shelf.
If you like to cook, you will appreciate it being big. Mine have to hang on wall
-
On 13/03/2017 at 0:35 AM, wirriam said:may i know where you got the rack(right side) from?
Ikea.
-
19 hours ago, renonoobmax said:Hello!
I recently came across the cafe - Luxe Singapore. And I love their Marble special effects painting wall. Just wondering if anyone knows how did the special effects for Luxe? Or have someone who can do the same for a reasonable price? Please refer to the picture for an idea of what I'm referring to. Picture credit to http://danielfooddiary.com.
TIA!
")
Laminate maybe? I suppose you were refering to the areas above the bottles. There have lights coming off from inside it so it's likely carpentry work finish with laminate.
formica has marble looking ones.
-
Depending on where the heater(storage or gas) is located. You may waste a bit of water that is seating in the pipes while waiting for the heated water to arrive. Mine is located at the service yard so it's quite a distance, I just use the initial running cold water to wash the toilet bowl and walls.
Was an instant heater user for over 30 years. Once I switched to storage, It's no going back for me.
-
On 06/02/2017 at 5:59 PM, Ken Lam said:Is this vento fino 2 still available?
Already sold.
-
On 05/01/2017 at 5:46 PM, Mushiii said:this one i got mix feelings.. cool idea but where's the thrash bin located? maybe its only me not so much into exposing these and not inside a cabinet..
It's not for display. It's for drying. Once dry they go into cabinets. My kitchen is only as big as a Mini Cooper and have no space to dry my cookware after washing. I used to hang my woks and ladles on the clothes rail to dry. Must have been an amusing site for my neighbors.
I have 3 bins which are covered ( I think I posted them earlier in my Amazon loot) . 1 is in the living room , 1 in the bathroom and 1 in the kitchen. If you were refering to the HDB supplied trash bin, it's outside the house in new hdbs.
Dust is a real concern though. I'm going minimize it with a roller blind or curtains Hah. Kinda unorthodox. Don't like glass Windows.
-
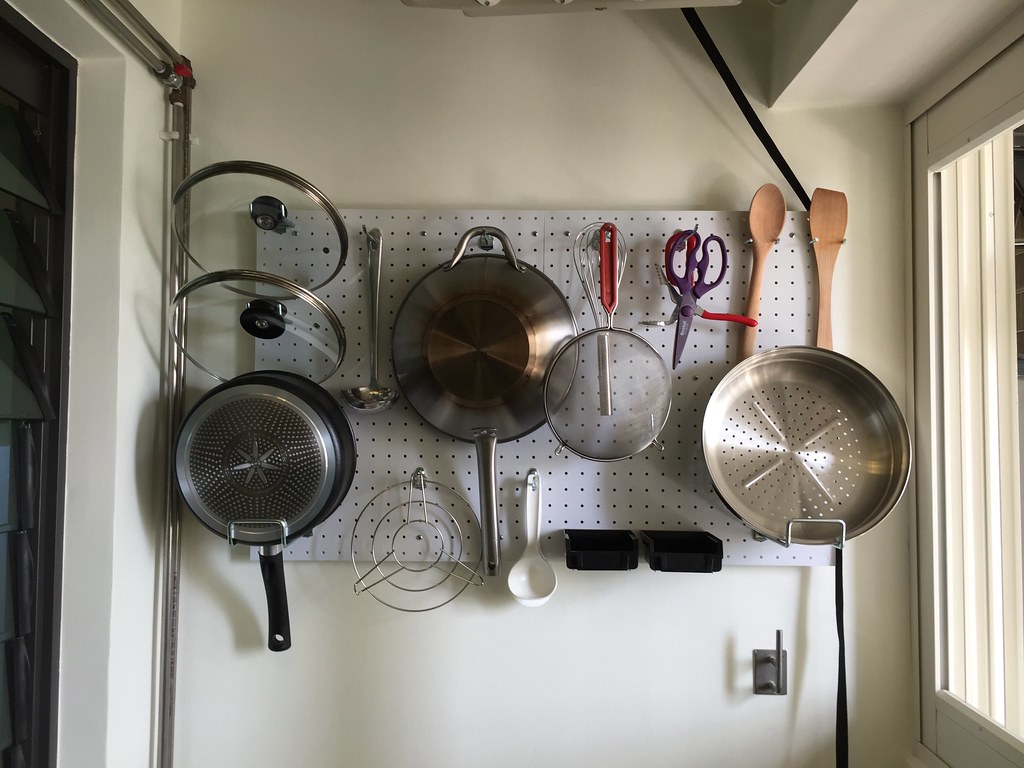
On 03/01/2017 at 1:03 PM, Yang Guo said:wow...like the idea of the peg board, where did you get it from?
Amazon. Kinda difficult to find in Sg if u only just want to get a piece. The local distributors ignoring me.
-
On 03/01/2017 at 10:21 AM, fifteenmay said:nice idea! where did u get the peg board fr?
From Amazon. Triton products. I got the plastic version as I use it for mainly to dry wet kitchenware.
-
On the other side of the service yard. Mounted up a pegboard wall so I can hang cookware after wash.
why a pegboard wall and not a cabinet?
It's unused wall space that has too little depth for a cabinet due to the clothesline.
-
Any sheet metal fabricator can do it if u pass them drawings.
Its not cheap since it is one off.
the 2mm thick sheet metal enclosure itself inclusive of white powder coating and flush mount screw inserts costs $190. plus some hardware (slider rails, hinges, feet) maybe another $30 bucks. So total about $220.
-
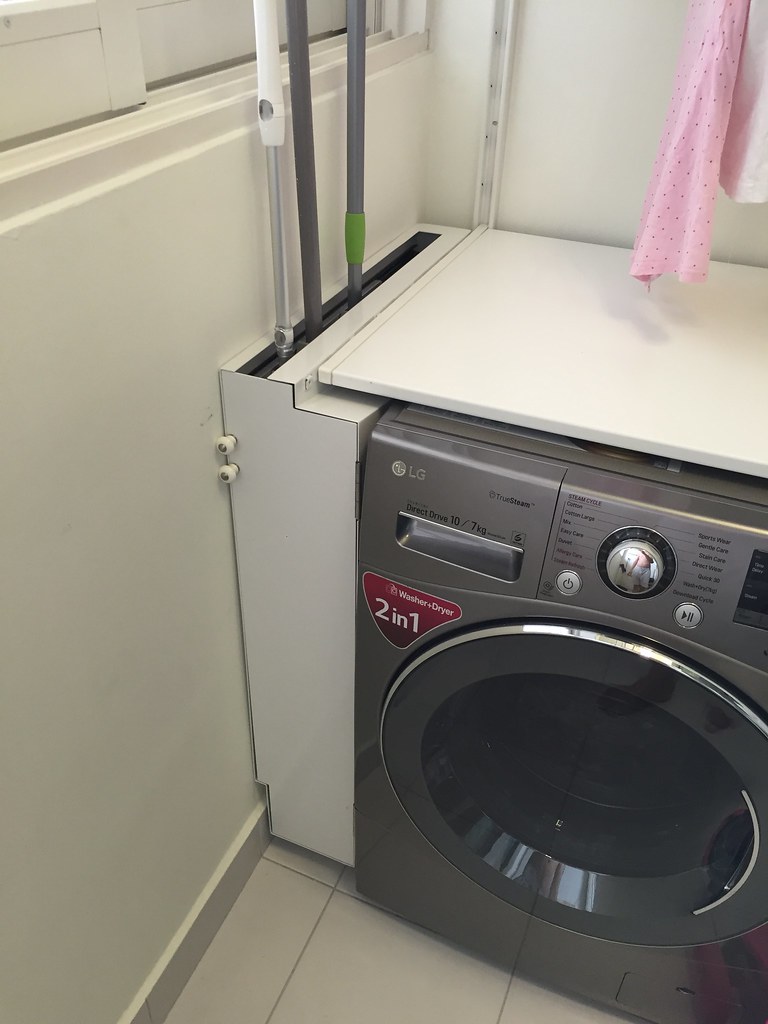
With that, I completed the right side (cleaning equipment side) of the service yard.
The earlier washer pedestal was removed as it weren't stable enough and I also wanted to use the area on top of the washer for ironing. Here's a peek. Very basic. I will likely be adding another custom enclosure on the right( hole where the pink scoot is) for storing cleaning rags and chemicals.
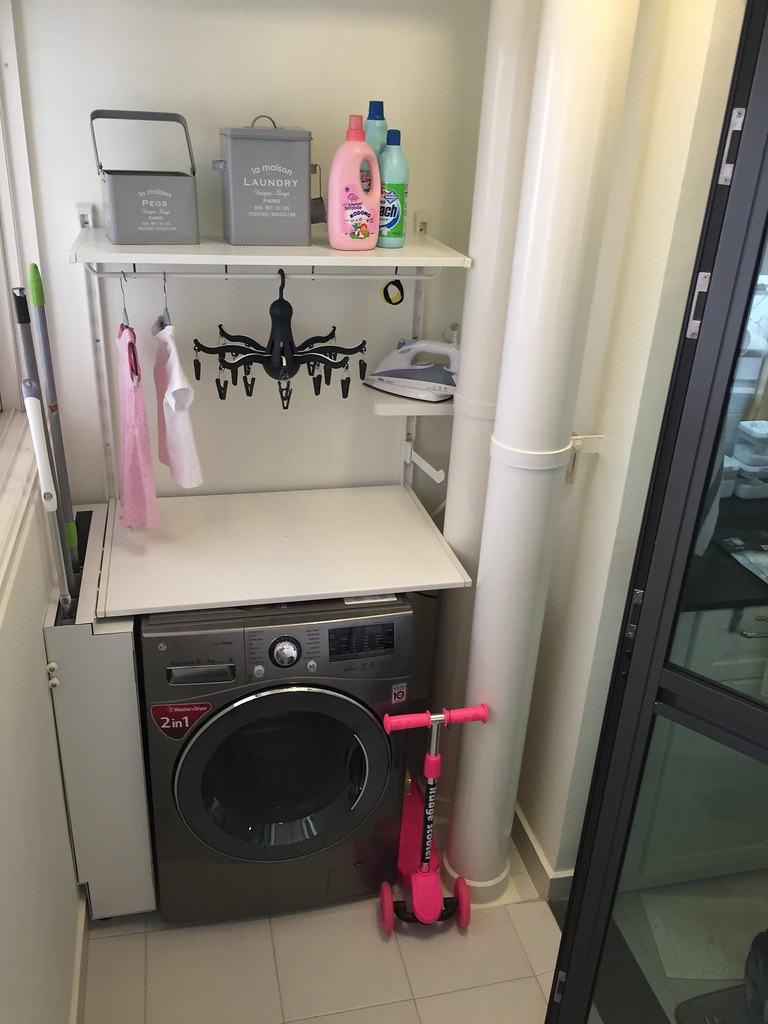
Left side is the pantry which I'm working on now. It will be pegboard and some Ikea hack kallax and butcher block countertop(if cheap)
-
Broom storage completed. Though with s slight screw up. Overlooked the protruding Ikea algot rail so can't fully push in the enclosure against the wall. It was initially designed to be flush with the algot shelve and hang on the algot bracket. Anyways... This still works.

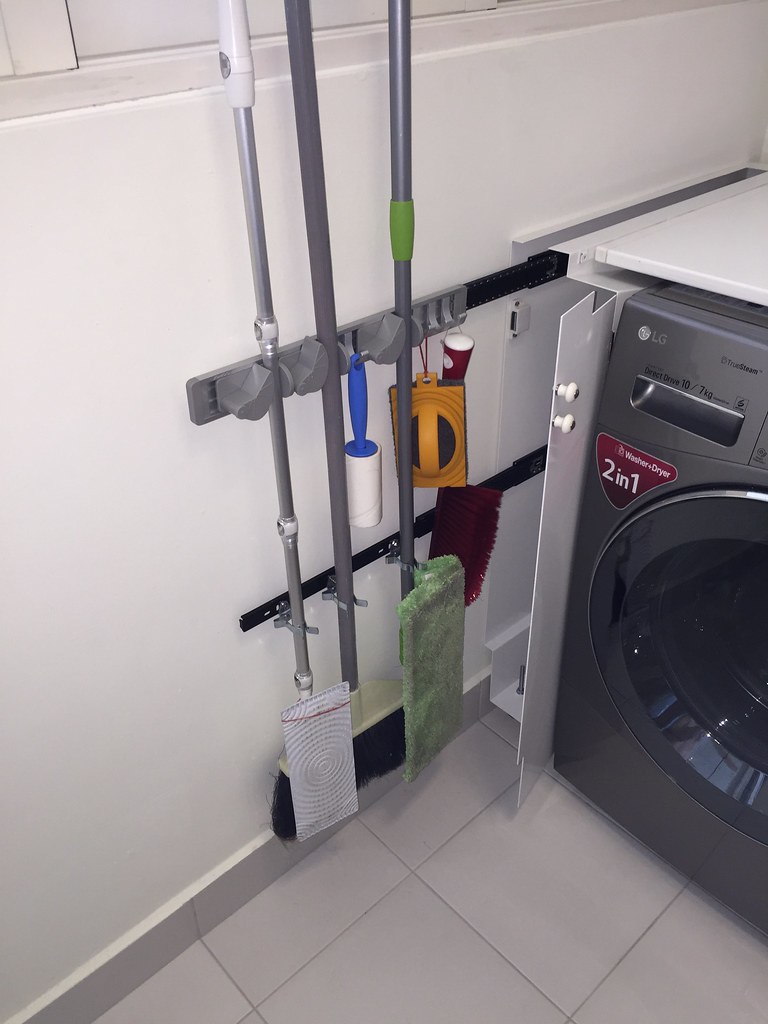
There is still space for 2 more broomsticks but the joomoo holder can only take 3 rods. So I'll be shopping around for a 5 rod version.
1 thing I did not anticipate. That is the wall may get dirty over time as the bristles do rub against the wall when slid out.
-
On 27 December 2016 at 9:41 PM, Yang Guo said:thanks!
 do u put the switches using 3M hook or using nails on wall?
The aircon/fan remotes have holders. The holders are drilled on the wall since I don't think I ever need to move it. Then just slot the remote into the holder.
if your remote does not have a holder. Find something that the remote can slide in snugly and 3M command picture tape the holder to the wall.
Just need to make sure that the position is still within the sensing range(line of sight in my case).
Velcro is an easy alternative though less lasting. They peel off and fur-ball up with use.

A Different 3 Rm Flat
in Reno t-Blog Chat - HDB BTO Interior Design and Renovation
Posted · Edited by Changbp
Thanks for the compliments.
Wanted to send u the ID details, but you can't receive PM though unfortunately. Its Dorothy, In Lookz home. HP: 94507007.