

arnold
-
Content Count
89 -
Joined
-
Last visited
Posts posted by arnold
-
-
hi, your blog is detailed and informative. Mind to share Boon's contact and his quotation? Thanks.
Hi kimi, I was unable to send you any messages. think ur mailbox is full
-
Hi,
May i know what is the length and width of the dressing table?
Length of dressing table is 3ft. didnt measure the depth of the table though
-
Hi Arnold, could you share contractor Boon's contacts and quotes? Thanks
Hi Arnold, sorry to trouble you..
would you be able to share boons contact?
Thanks!
Hello arnold!
I enjoyed reading your t-blog, it's very informative and detailed!
Is it possible if you can share Boon's contact with me please?
Thank you in advance!
I must say it is very detailed T-Blog explaining details and consideration. If you don't mind, do share his contacts. Thanks.
Hi,
Exactly what I wanted to do to my new house coming in june 2015. I have to meet up with Mr Boon, would you mind to PM me the contact. I had to create an account just for this post so please help.
Thank you.
Hello,
Can you PM me Boon's contact?
TIA.
Hi Arnold,
Appreciate if u can share ur contractor's contact. Pls pm me. Thanks!
Hi Arnold,
Can i get the contact of ur contractor as well. Thanks!
Hi can I have Boon contact and how much you spend in renovation ?
Hey guys! I am terribly sorry for the late reply. Was busy with work as well as searching for my furnitures! I have since sent the contacts to you guys via PM
-
I enjoyed reading your blog. Very detailed and I can see contractor Boon is really attentive to the needs of the occupiers of the house (ie. position of shower screen).
It's nice you got a good contractor! I especially enjoyed looking at your floor plan drawings complete with legends (suspiciously on Powerpoint).

Thanks for the encouragement. Agreed that Boon was attentive. And yes, the floor plan drawings were indeed done on PowerPoint! hahha!
-
Your house turn out really well! I just bought the same Fujioh hood and hob as you too..

thanks! I'm sure yours will turn out well too!
-
Hi Arnold, Please share your contractor's contacts:) thank you!
Hi, pls kindly pm me Boon contact. Thanks a lot
Hi Arnold, I enjoyed reading your t-blog. I have similar considerations as you and need to plan the layout for 2 toddlers. Am wondering if you can share Boon's contact with me? I'm also interested to see how much the carpentry work cost for your master bedroom - I really like the idea of a segregated dressing room area and sleeping area. Thank you!
Hi Arnold, your PC are like mine!May I have Boon's contact if you don't mind? Thank you!
Hi, can you share Contractor Boon's contact with me? Thanks!
Hi Arnold, could you please share Contractor Boon's contact? Thanks.
Hey guys, I was away for the past week on a holiday. I had forwarded Boon's contact to you guys in PM.
-
Hi tks for your reply. My consideration is whether my king size storage bed and mattress can go through. I am having a similar layout like this.
I'm no expert on this, but I would have used the following as considerations:
1. I will assume that the bed comes fully unassembled, and if so, what are the dimensions of the different parts of the bed?
2. Is the entrance of the toilet near the opening that we refer to? that is a possible space to exploit for the movement of the mattress and the parts of the bed
-
Hi when u open your MBR door, you will need to turn right into your platform area. Just wondering what is the width between wardrobe and wall u allocated to walk through. Is it 1 metre?
Apologies but I couldn't remember the exact dimensions. I will measure it and post it up here when I go up the next time.
However, the entrance to the platform area was discussed before with Boon and it was catered to our body width
-
Hi Armold,
Do you mind showing me how your bedroom wardrobe interior look like? I am thinking of doing the same. Can you pm me your contractor contact as well? Thanks!
Ah I didnt take a picture of it. will try to remember the next time i go up
-
Review of ContractorWhile providing reviews of the work, I thought it will be good to review the experience that I have with Boon.What He Did WellPersonalising Your HomeI liked the fact that he tries to personalise the home to the owner. I will be using the shoe cabinet as an example here. If you guys remember, I spoke about how he asked for our shoe sizes and the type of shoes that we wear. During one of the times I met him during the middle part of the renovation, I asked whether does he customise the shoe cabinets to small feet too. He said that there is a usual industry standard that is followed by most contractors. He uses the standards as a minimum. He tries to avoid going below this standard unless requested by the home owners. When asked why, he explained that you get the best price for carpentry when you follow the industrial norms. Any further customisation usually requires additional costs, as the carpenters will have to cater specially to your required dimension of wood.Some other areas that I did not mention were: (1) how he asked me to stand at my shower area with my hands stuck at my waist so that he can be sure that we have enough shower space after installing the shower screen; and (2) making sure that there were no tall people staying at my place. Why? You might ask. He explained that sliding screens will have a metal bar across the top of the screens, so it will be necessary to know the tallest person staying so that he can make sure that no one injures their head.Emphasis on Safety and HygieneOne of the example was given in the previous para.Some other examples were how he noted the potential danger of the position of the shower screen opening vs the position of the shower mixer, and also the reason why a floating shoe cabinet was not preferred. Honestly, I really appreciate him for providing us with this kind of input. As a new home owner, I am sure that many of us do not have the kind of experience to notice this. One of our family members might have been injured if we did not know about this before.Response TimeBoon was really quick to respond to any of our queries during the renovation. We read many horror stories about how the IDs or contractors will take days to reply to a msg after signing the deal. We were glad that Boon replied to our msgs within the hour. Truth be said, we were usually slower in responding to his clarifications and requests!TimelineAll in all, my renovation took about 3 months.Are you serious? 3 months with this scope of works and you say he did well?Actually, the cause of the long timeline was none other than myself! During the early stages, Boon already told us what and when he required us to provide him with (lights, fans, sanitary stuff etc). But because we were not in a hurry to move, plus it was the CNY period, we simply relaxed and took our own sweet time! He had to remind me many times about this before we finally got him the stuff that he needed. We took about a month to get him the lights and another 2 to 3 weeks for the rest of the stuff like sanitary ware and hob and hood. Considering this, our renovation could have been completed within 6 weeks if we did not delay the provision of items.We usually pop up to our place a couple of days after we provide him with the necessary stuff and works were already ongoing. Using the example of lights, he took less than a week to install them after we provided it to him!What Can Be ImprovedLack of Interior Design KnowledgeWhile he gives good suggestions on how you can do up your place, the truth is, he is not an interior designer. He doesn't have knowledge on the different themes like Scandinavian or Industrial. You can show him pictures to give him examples, but he might not be able to understand them fully. But well, he is a contractor after all, and this is to be expected right?Lack of Proper Project Management ToolsBoon managed my project quite well actually. However, all scheduled works were updated via verbal means, at most through whatsapp. There were no fancy project timeline charts like what you see in this picture.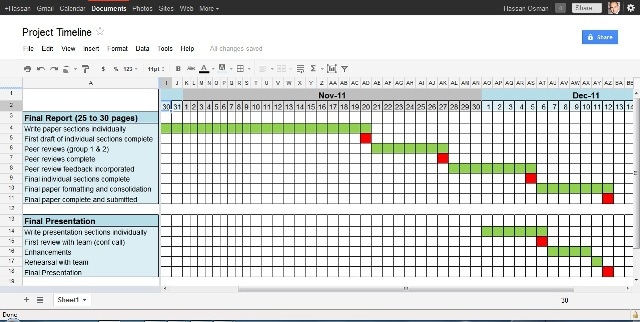 Coming from a work area where I was extremely used to having project timelines, I found it a bit worrying at first. I wasn't sure whether he really have the capacity to manage the different projects without the project management different tools. Things could get a bit tense sometimes if the understanding from both parties were not aligned. I am glad to say that I did not experience this very often.ConclusionSo there you have it, a short review on Boon. I will be happy to answer any further queries if there are any.
-
Review of Renovation Works
This post is close to a week overdue. The pictures you saw above were taken when we met up with Boon last week for the inspection of works. I have quite a few queries on the workmanship and my level of satisfaction. I decided since there were so many queries, might as well put up a post to share my views with everyone.
Scope of Works
In an earlier post, I put up a list of the scope of work that I engaged Boon to take care of. It seemed that the list that was put up was not a comprehensive one. To keep everyone updated, here is the full scope of works that was undertaken by Boon:
- Carpentry Works
- 5ft Wall Mounted TV Console
- 4.5ft Half-Height Shoe Cabinet
- 11ft Top and Bottom Kitchen Cabinet with KompacPlus Top
- 5ft Bottom Kitchen Cabinet with KompacPlus Top
- 3ft Wall Mounted Dressing Table
- 7ft Full Height Wardrobe with Storage Compartment
- 10ft x 8.5ft x 8" Platform Bed with Storage Compartment
- Vanity Top in MBR Toilet with KompacPlus Top
- Glass Works
- Sliding Glass Door at the Entrance of Kitchen
- Shower Screen with 2 Sliding Doors at MBR Toilet
- 11ft Glass Backsplash between Top and Bottom Kitchen Cabinet
- Ceiling Works
- L-Box **** Room
- Box-Up of Aircon Trunking (only **** Room)
- Box-Up of Kitchen Sliding Door Tracks
- Wet Works
- Fabricate Shower Kerb (MBR Toilet)
- Fabricate Cabinet Base (Kitchen)
- Fabricate Fridge Base (Kitchen)
- Doors and Windows
- 3 x Solid Veneer Doors with Lock and Magnetic Door Holder (MBR + 2 Common BR)
- 2 x Slide and Swing Door (2 Toilets)
- Sliding Windows with Powder Coated Grey Sills (Service Yard)
- Window Grills (Service Yard, Living Room, MBR and 2 Common BR)
- Installation Works
- 8 x LED Downlights (included in renovation costs)
- 13 x Ceiling Lights
- 2 x Dressing Table Lights
- 2 x Ceiling Fans
- Storage Water Heater
- All Toilet Accessories
- Hood and Hob
- Others
- Relocating of MBR Basin to Common Toilet
- Painting of Whole House
Review of Renovation Works
Carpentry Works
I was extremely satisfied with the carpentry works. Of course, the carpentry was not perfect. There were some small dents on the inside of the kitchen cabinet. However, I decided to let it go, as the dents were: (1) extremely small; (2) at the deep end of the cabinet. As long as the dents were not in an obvious position, I am fine with it. The results after scrutinising, I found ZERO scratches/dents on the visible parts of the carpentry!
Wah Lao! So Perfect Meh??
Of course not! While there were no scratches and dents, the silicon works weren't as perfect. There were some holes on the silicon works (the part which holds the carpentry to the wall). I expected the gaps between the carpentry and the walls to be fully filled up so that there are no cavities to attract creepy crawlies to nest in. I found a few areas which required filling and highlighted this to Boon. He agreed immediately without any questions. He later explained to me that the silicon, when used to fill the gaps, is in liquid state. Bubbles might form during the use of it in the liquid state. After solidifying, the bubbles will be seen as gaps.
Doors and Windows
The doors required some re-alignment as it does not close properly. Actually, this was told to me even before we started our checks, and it will be rectified. For the windows, I found a couple of scratches on 2 grills. When highlighted to him, he agreed to change it immediately too.
Installation Works
All lights and electrical points were working perfectly. Toilet accessories were also installed at the correct places. No issues with any of the installation works.
Conclusion
Overall, I was extremely pleased with the quality of work and the outcome of the renovation work. In previous pictures, it might seem that the house is a bit empty in comparison with many of the projects here. But I'm pretty much sure that the after the furnitures come in, the house will look much better!
- Carpentry Works
-
hehe, thanks for the speedy answer.

My qn 9 refers to the floor. Beneath the platform, did the contractor lay the vinyl? Since the platform is going to cover about two-third of the whole MBR, it seems redundant to lay the vinyl flooring.
Ah I think you refer to the parquets?
My place is a premium BTO. During the time when we applied for the flat, all premium BTOs come with the parquet and we cannot opt-out of it. So yes, the parquet is below the platform
-
Hi, pls see reply below in red.
Looks great!

Here come my list of questions...

- what is the width of the walkway (between wall and the wardrobe)?
The length of the dressing table is 3 ft - What is the length of the whole wardrobe?
7ft - Since your aircon unit is at the center of the room, ie, blowing towards your bed, do you feel stuffy at the walkway? might need to add a standing fan?
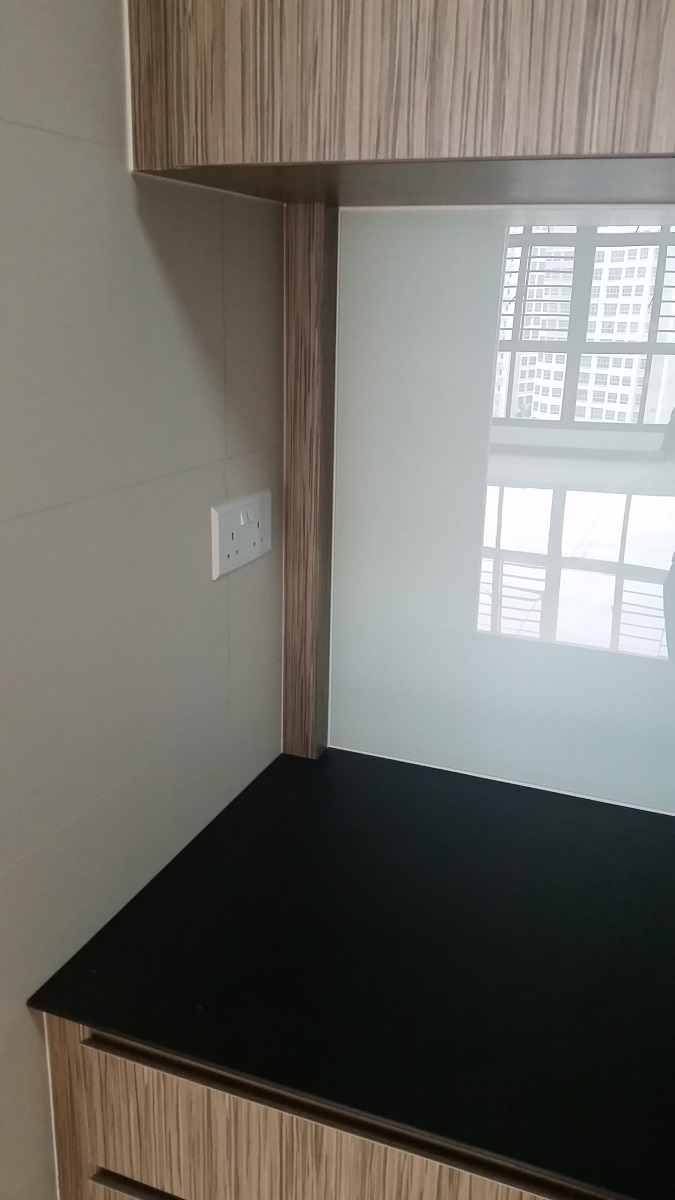
Yes it will be stuffy. However, it doesn't take too long to change, so a standing fan will not be necessary. I have a power outlet installed on the dressing table, which will be used to power a small fan so that the missus can stay cool while doing her make up. - I presume the white space at the platform fits exactly a queen size bed, what is the width from the foot of the bed to the wall?
Yes it is a queen size. Did not measure the length. I only gave the requirement that the sunken area is supposed to hold a queen size mattress - what is the width at both sides of the white to the wardrobe and window?
Didn't measure - Can you please take a close up picture of the grooves?
Will do so if I remember when I go up - Dust should not get into the storage area when it is closed right? But it will be collected at the gooves area... how?
Use a cloth and clean? Couldn't possibly use a broom right? - Do you plan to just place the mattress without any frame?
Yes - Does the contractor need to lay your MBR with all the vinyl and add the platform on top of the vinyl? if so, seems redundant?
Didn't quite understand this question. Can re-phrase? - Oh ya! almost forgot! the height of the platform?
Height is 8"
That is all for now...

- what is the width of the walkway (between wall and the wardrobe)?
-
Snapshot before Furnishings (Master Bedroom)
And now, the long awaited MBR pictures! I apologise for taking so long. Was busy last night and didn't manage to do this. Without further ado, here are the pictures!:
Wardrobe + Dressing Area
I apologise for this crappy picture. Yes the picture is grainy, and the lines don't seem straight. Rest assured that all these were due to the use of the panoramic mode of my phone. My phone simply cannot capture the entire space with its pathetic lens. But I trust that this should give a good overview of the area.
Next up, the pictures will give you a good idea on how the light effects show up in the area. On the left pic, the area is illuminated by only the ikea light, and on the right, it's illuminated by the track lights. Both options seem to be bright enough for us!

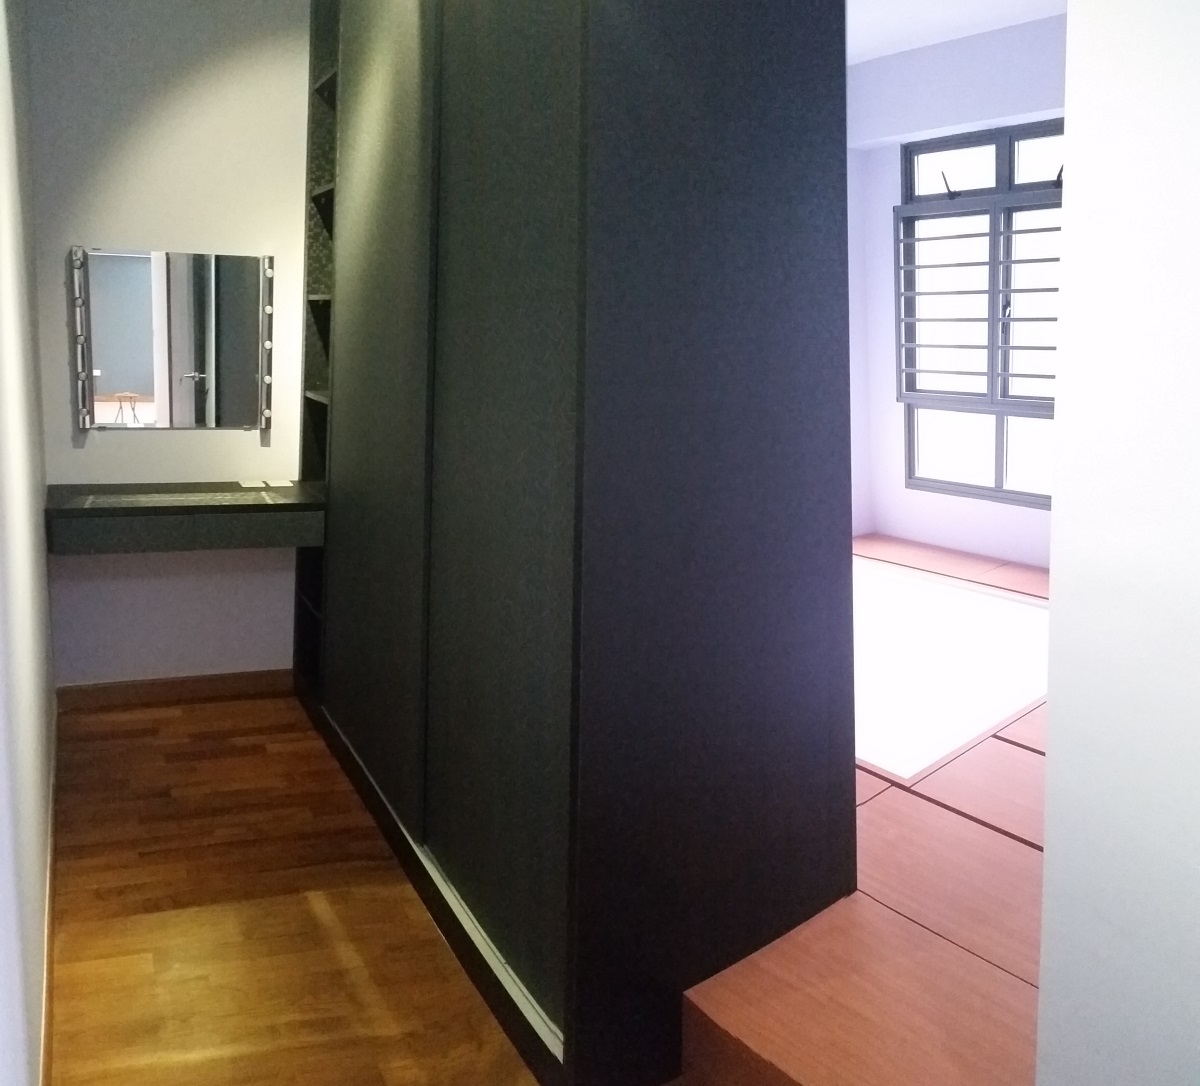
And now, for the favourite part that we want to boast about! The laminates! This is the open shelving that Boon suggested (detailed here). We were so pleased with the laminates we chose! To help you visualise, the grey laminates with lines are those of the wardrobe door and the drawers of the dressing table, and the rest of the carpentry are laminated with the checked ones. We thought that the two laminates simply complement each other perfectly! I regret to say that the below picture doesn't show this effect fully, and I hope that you can visualise it when you see this in totality.
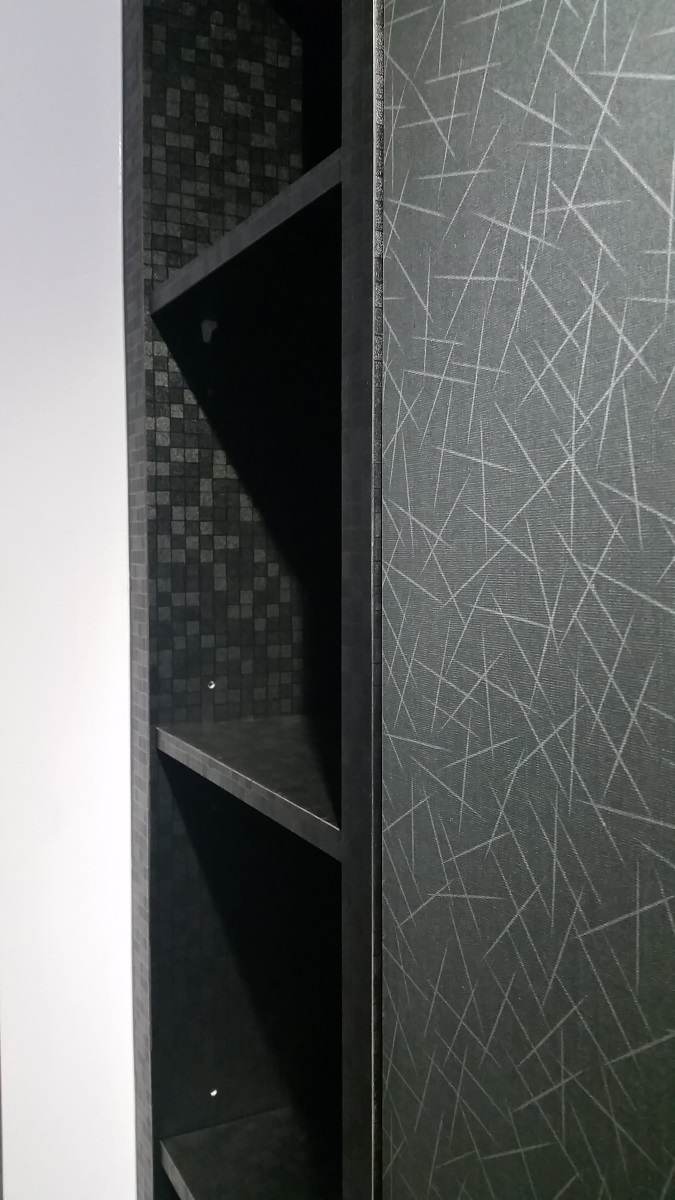
Platform Bed
Now this is what many of you have been waiting for.... The platform bed! Like the wardrobe overview picture, the below picture was also captured using the panoramic mode, and thus, have the same jagged lines. rest assured that the lines are perfectly straight. I was very pleased with the platform bed. The size of the storage areas were of decent size. I could easily fit a set of bedsheet with quilt cover, 4 pillow cases and 1 pillow case in each compartment. The grooves were big enough for our fingers to slot in easily, but yet does not cause any potential tripping issues.
-
That will be coming up next! Possibly tonight
-
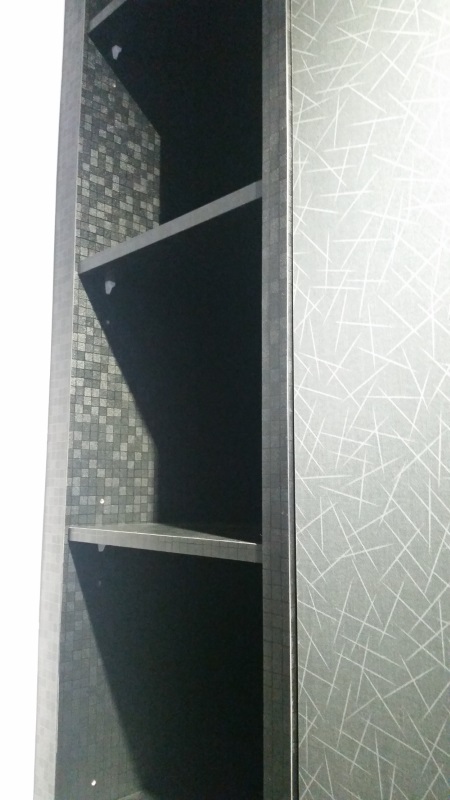
Snapshot Before Furnishing (Master Bedroom Toilet)
While there wasn't much work done at the MBR toilet, we thought it was necessary to show what was done here. We previously put up a post on some possible safety concerns regarding the shower screen. The following pictures show how it eventually looks like.
Overview
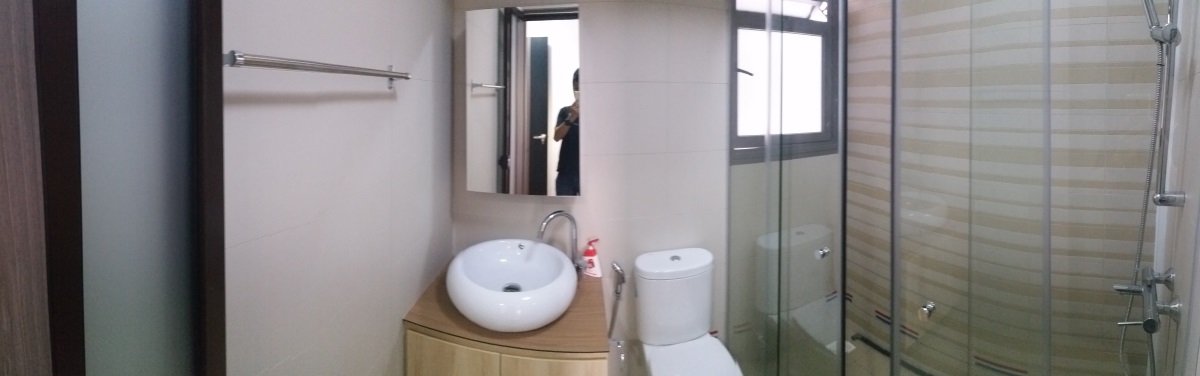
Since the picture is a panaromic one, tt takes a bit of adjusting of vision and imagination to visualise what I am exactly talking about. On the right side of the picture, you will see the position of the shower screen and the shower head. Considering that most people would have placed the entrance to the shower screen on the extreme right side, the first thing that meets you when you enter through will be the shower head and its mixers. Look at the position of the mixer. It probably coincides with the height of children from 3-5 years old. This was what we meant by the potential danger for children.
Shower Screen
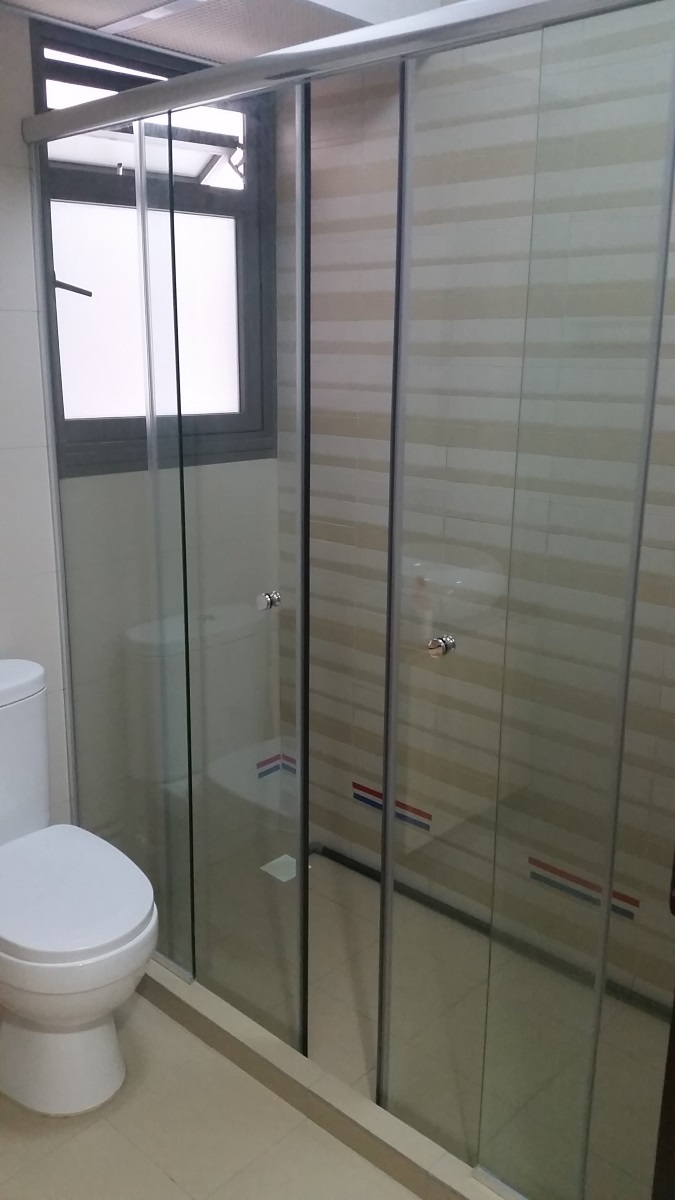
Therefore, we were pretty much pleased with the unconventional location of the entrance to the shower area. Of course, it might be a bit more inconvenient to open 2 doors instead of 1. But hey, for the safety of our children, we think this slight inconvenience is perfectly acceptable!
-
Snapshot Before Furnishings (Kitchen)
To recap, the scope of works fr the kitchen is as such:
- 11ft top and bottom cabinet on long side of kitchen
- 5ft bottom cabinet on short side of kitchen
- 11ft + 5ft of KompacPlus table top
- Glass panel between top and bottom cabinet
- Cabinet and Fridge Base
Overview
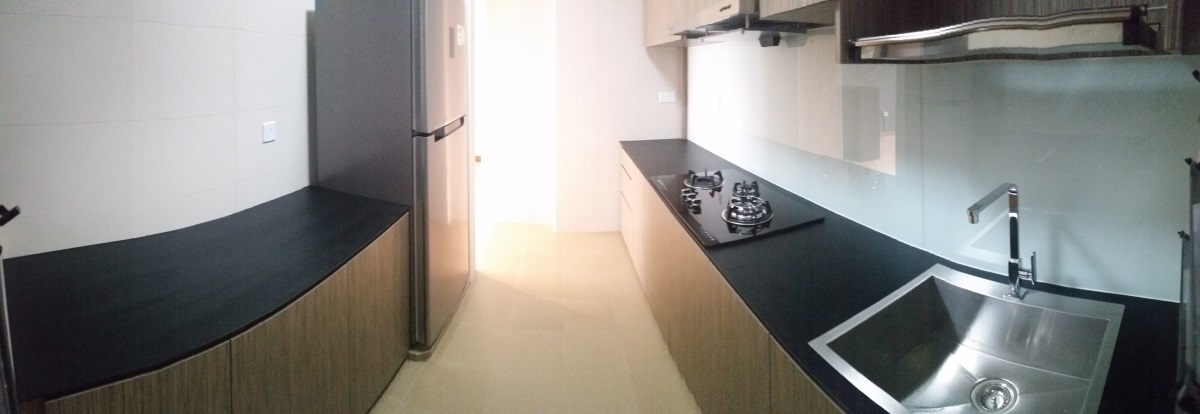
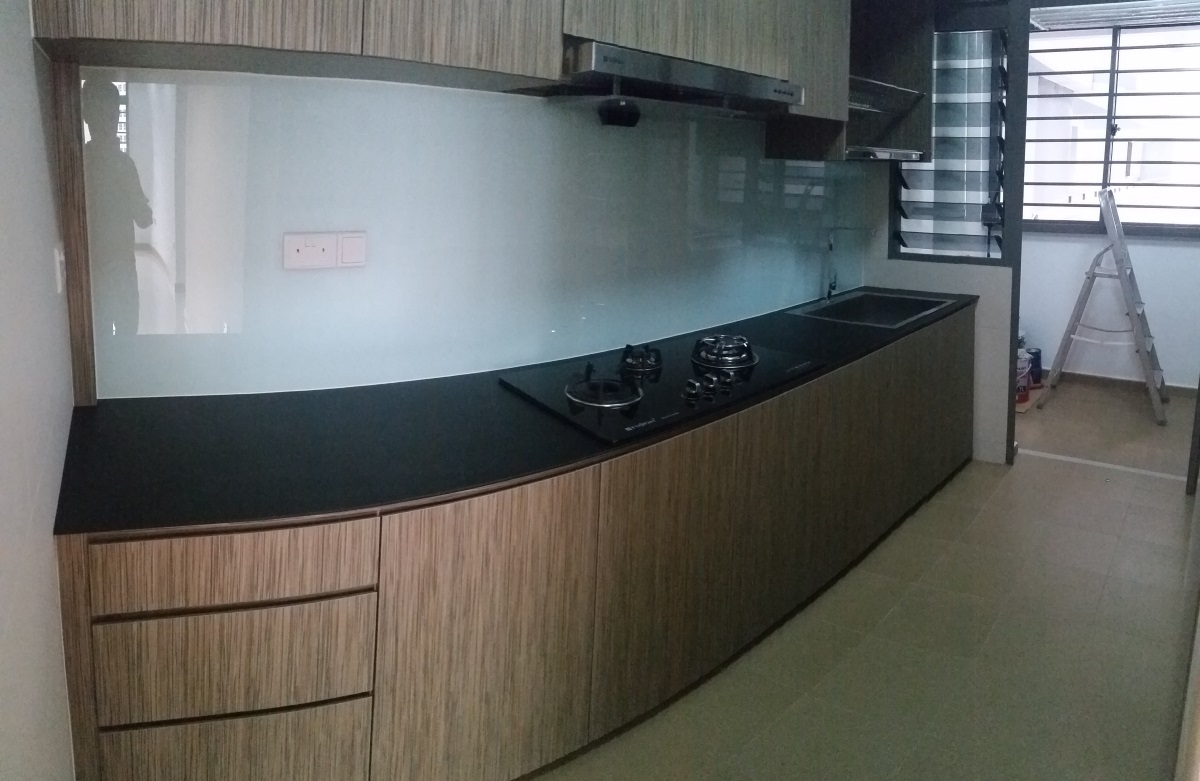
Dish Drying Area
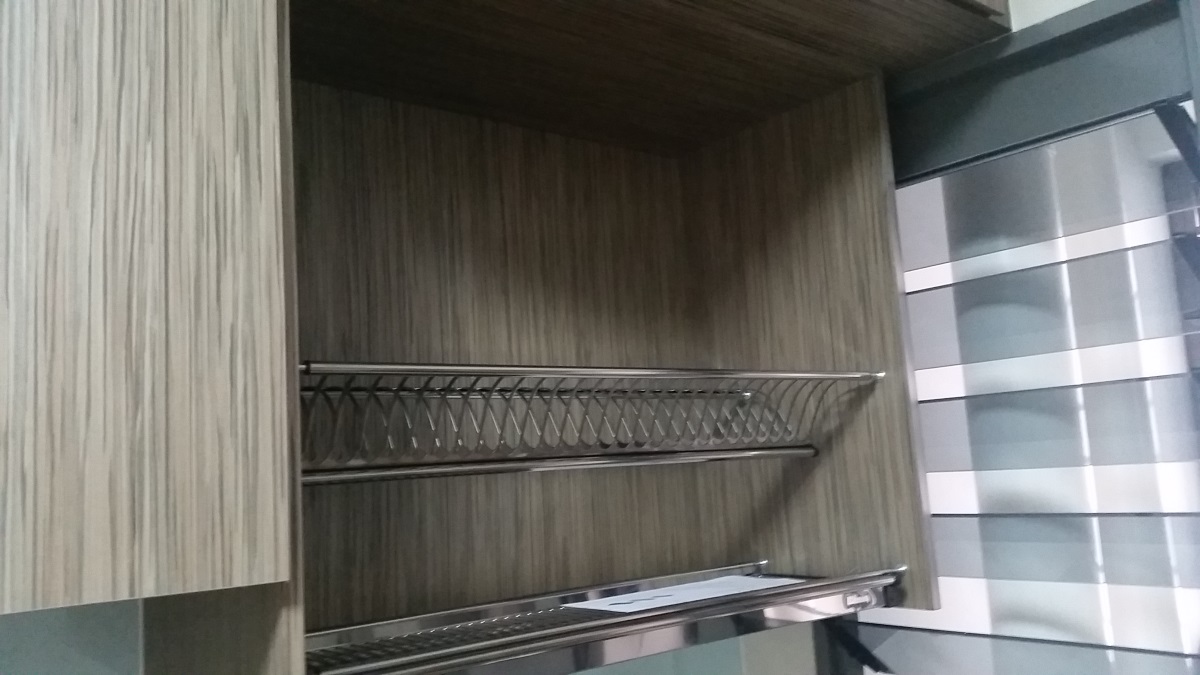
In a previous post, We mentioned that we did not want a cover for our dish drying area. We were wondering whether it was a right decision. After all, it goes against current norms of renovation today, and we couldn't find any pictures online that fully convinces us that this will be a good decision. After the works were done, we were glad to have stuck to this. In our opinion, the laminates of the wooden grain within this area fits in beautifully.
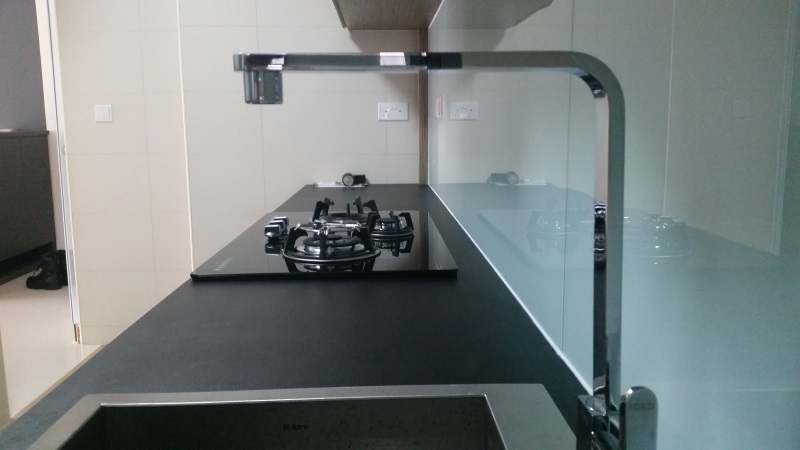
Cover Up for Gas Pipe
This was an initiative by Boon. During the installation of the gas pipes, we didn't realise that the pipes will be exposed. Knowing that we probably didn't want to see the exposed pipes, he took the initiative to cover this up. We thought this was a nice initiative. It seemed like he remembered our preference not to see these pipings during our initial conversations.
-
Snapshot Before Furnishings (Living Room)
We are pretty sure that after so many posts of planning and considerations, how will the works by Boon eventually turn out?
To recap, the scope of works for the living area is as such:
- 4.5ft Shoe Cabinet
- 5ft TV Console
- L-Box
- Kitchen Glass Door
Presenting to you: The Living Area!
Overview
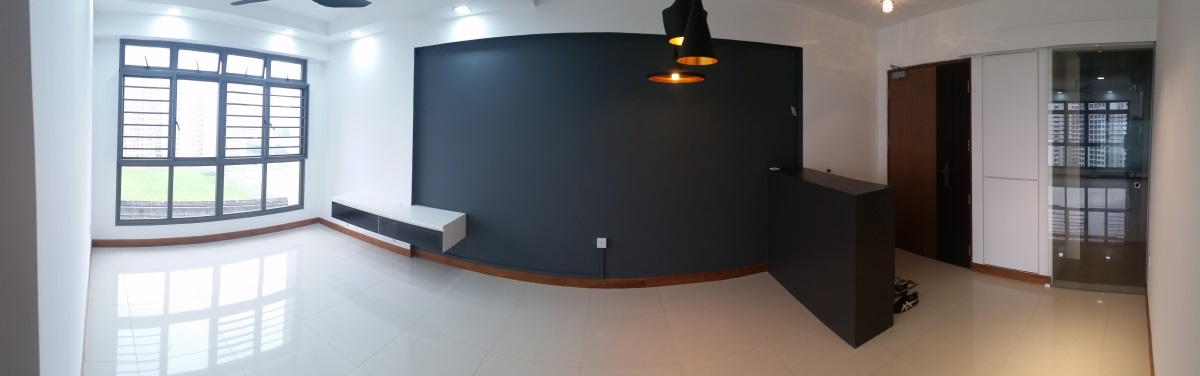

As you can see, 1 side of the wall comes with a recess area. Honestly, we initially kinda dislike this recess area. Just made everything look weird. We had the intention to box up the entire recess area. After considering that we do not have much design elements within the Living Room, we decided to keep the recess area, and at the same time, paint it dark grey to highlight it. The effect turned out quite good. It seemed that highlighting the irregularity reduces the monotony and the contrasting colours actually made the living area slightly more interesting.
Close Up of TV Console
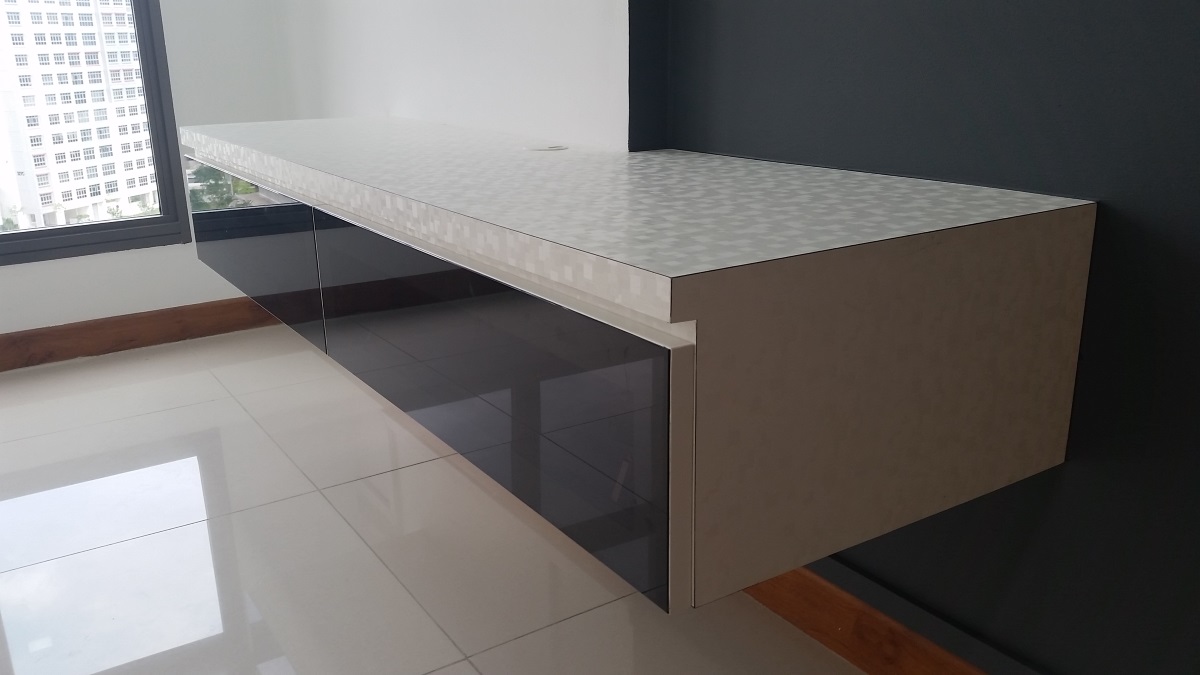
When choosing the laminates, we were deciding between a plain white or white with design. We eventually decided to go for a laminate with a subtle design so that it adds some texture to the living area.
Close Up of Shoe Cabinet
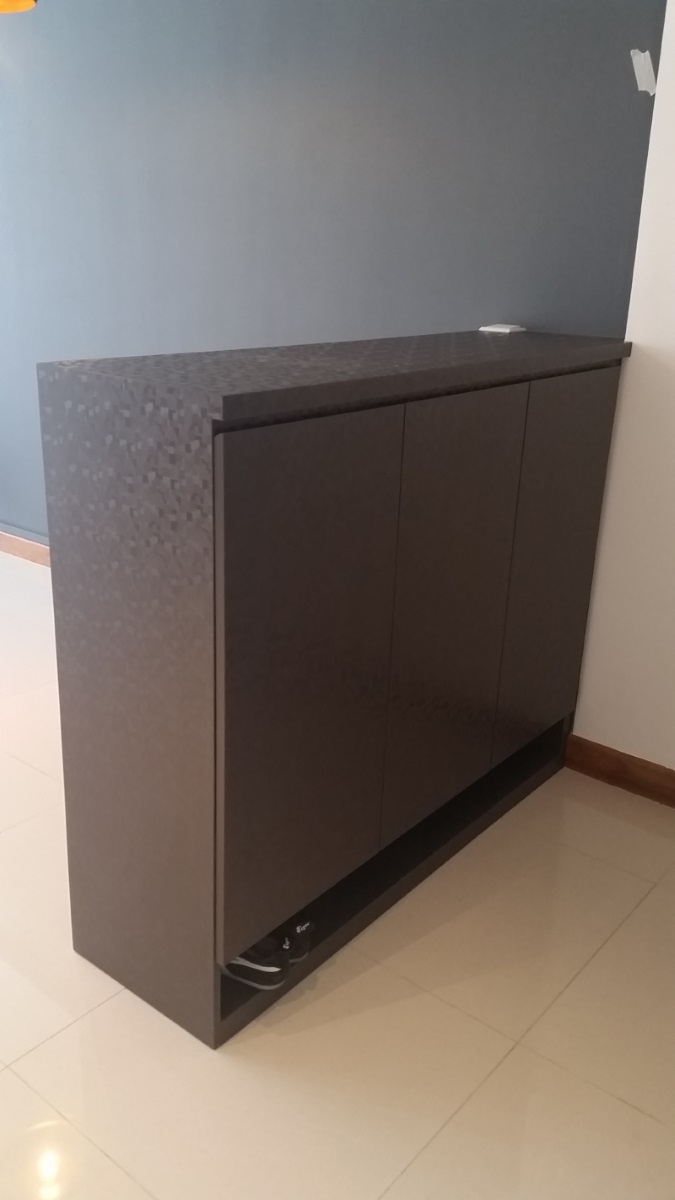
The laminates were of the same design as the TV console. While trying to add texture, we wanted to ensure there were some uniformity to the overall outlook. However, we thought that by just having white carpentry in the house will be extremely boring. We eventually went ahead with this. It said Gun Metal on the catalogue, but somehow it turned out to be pretty dark. But well, we have no complains about it. Considering that we have a grey wall, black might be a better contrast to the wall in comparison to Gun Metal.
We also want to share how much we are in love with the slot at the bottom of the shoe cabinet. The slot was suggested by Boon during the planning stages (as detailed here). I tried slotting in my shoes and it fitted perfectly (yes the shoes fit in fully, but we intentionally left it sticking out a bit so that we can emphasise that its usefulness). In case some of you are wondering why we did not construct a small chair at the side so that we can sit and wear our shoes, it was intentional as well. We couldn't imagine whether the eventual space between the wall and the chair will be too narrow. Boon had assured us that the space will be fine, but being the kiasi type, we decided to omit this and chose to buy a stool instead so that it can be removed if required.
-
The Silly Layout of the MBR Toilet and its Solutions
HDB really gets on our nerves sometimes! One of the pet peeves that we have is with the layout of the MBR toilet. Let us first take a look at the layout to understand how HDB designed the MBR toilet.
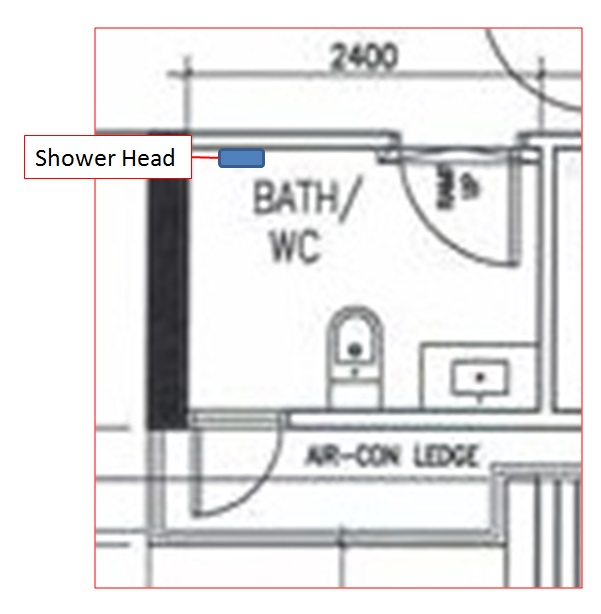
Problem
So what is exactly wrong with this? After putting in a shower screen, this could be a potential hazardous area! Why so? Let's now take a look at a typical shower screen set up.
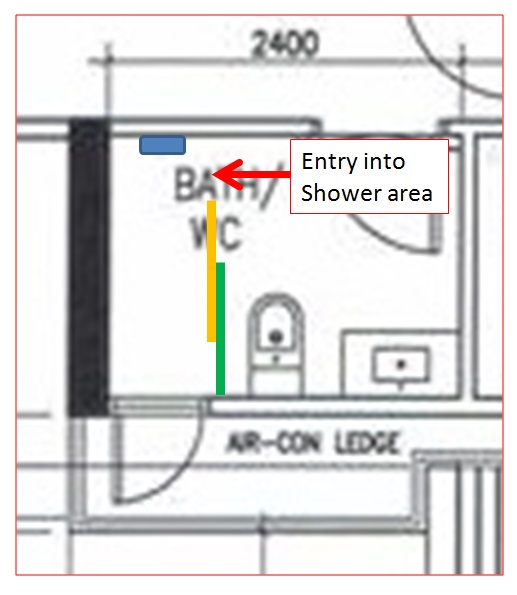
A typical shower screen set up usually consists of 2 pieces of glass: 1 fixed glass (green) and 1 moving glass (orange). The moving glass could be in the form of a sliding door or a casement door. In the example above, I used a sliding door as an example. Take a look at the entry into the shower area. The first thing when you go through the door will be the shower head with its mixers. To an adult, this will not be too big of a problem. However, things get a bit more complicated when you put a child into the equation. Young children usually don't quite see where they are going. When a child goes through the door, there is a high potential that he/she will knock into the mixer situated right in front of the door. For those who prefer casement doors, the position of the shower head and its mixers will mean that it will be even more hazardous during the opening of the door. The day when your muscles decides to show its potential could be the day that you smash your door.
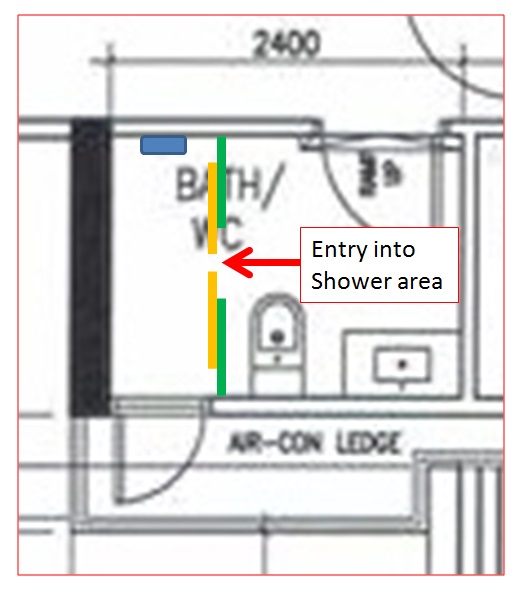
In all honest truth, as a first time home owner, we didn't foresee this. Thanks to Boon and his experience, he pointed this to us and suggested that we should consider putting out entrance to the shower area in the middle. This will eliminate the potential hazard that was described above. We gladly took his suggestion and our shower screen will look like this:
Another issue that we have will be the location of towel hangers. A typical towel hanger is about 60cm. After putting in the shower screen, the only space available to put the towel hanger will be above the toilet bowl, or at the wall on the opposite side of the shower screen. The shower screen was created to ensure that the toilet remained dry outside of the shower area. With the 2 potential locations of the towel hanger, you will either have a very wet toilet bowl after you shower, or you will have a wet toilet after you walk across the toilet dripping wet to access your towels.
This was a relatively easy to solve problem. We decided to install the towel hanger on the wall opposite the shower screen. At the same time, we installed 2 hooks at the wall between the shower screen and the door. During bath time, we will hang our clothes and towel on the hook. After drying ourselves, the towels will be hanged on the towel hanger for drying and airing.
-
Electrical Appliances
In this post, we will talk about some of the big ticket electrical appliances. We decided to forgo talking about some of the smaller ones like iron or vacuum cleaner as we did not spend too much on them.
Hob and Hood
This was one of the first items that we shopped for and bought. We were extremely inclined to Fujioh line of hoods. The main reason that attracted us to it is the technical specifications. Before you think that I am a full-time chef who knows exactly what kind of hob and hood is best suited, I regret to say that is not the case. In all the specifications that we saw, it seemed like only Fujioh showed the specifications for the absorption of oil fumes. Most other brands only showed the airflow rate of the hood.
So what? Considering that most HDB kitchens hoods uses recirculation of air instead of piping out through exhaust, oil fumes absorption rate becomes important. A hood with a high airflow rate with low oil absorption capabilities will only mean that the oil will eventually end up on your floor and cabinets. I found it a bit tricky that the other brands did not put this specification upfront. (feels like buying something without knowing the specs). With this as the main consideration, we decided to get from Fujioh, the SLM900-R (Hood) and the FG3773SCGL


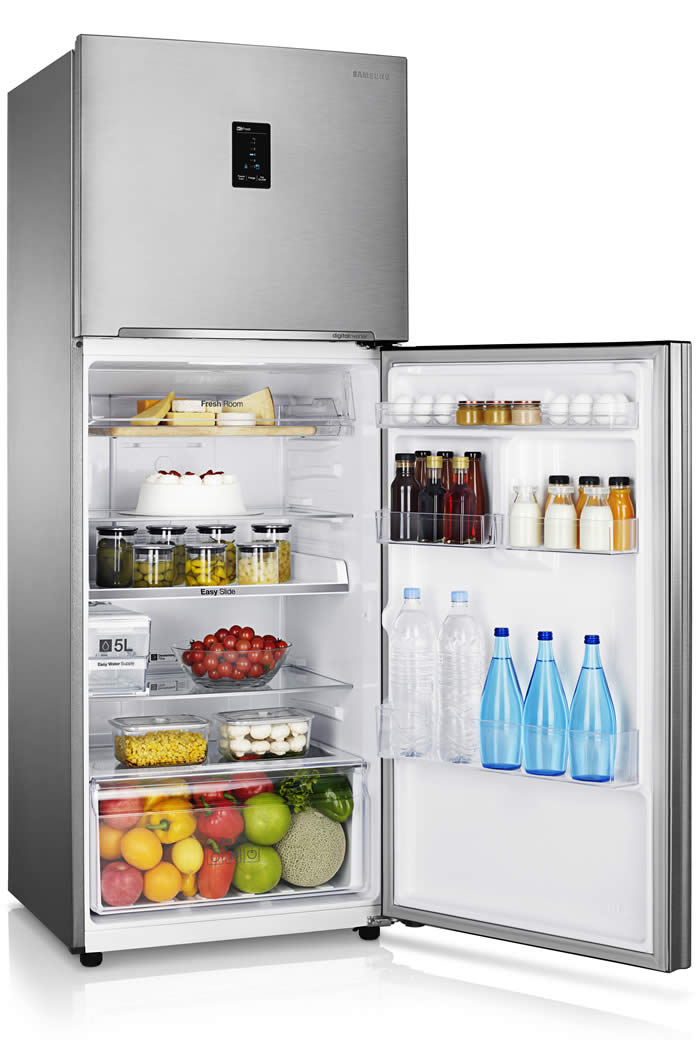
Refrigerator and Washing Machine
For the fridge and washing machine, we decided to shop for it at the big electronics store at the shopping centres, and at the same time, talk to different sales people for their opinions.
Washing Machine
We had no idea how to go about choosing this. By talking to different sales people, we figured out that 8kg should be good enough for our lifestyle. We have a small family of only 2 adults and 2 young children, so daily laundry shouldn't be quite light. However, we wanted something that can manage the washing of bedsheets and curtains. Most sales people recommended an 8-8.5kg washing machine to manage this requirement. We figured that 8kg is probably enough, and therefore, we went around looking at the best looking 8kg that doesn't burn a hole in our pocket! We ended up with the Samsung RT35FDACDSL.

Refrigerator
We didn't do any homework for this! We just went around and see which one we liked and shortlisted accordingly! We eventually ended up with the Samsung RT35FDACDSL.
Air-conditioner
We tried doing homework for this. But the crunching of numbers and different terms sent us into a massive headache! What with BTU, kW, thickness of gas copper pipes, drainage pipes and insulation! Eventually we decided to take the lazy way out. My sister had the exact same layout as mine! (she stays at the blk just across the playground!) and since they had completed their purchase of aircon, we decided to just buy whatever they bought! We we so lazy that we didn't even know what they put in our trunkings and the model of the aircon! We only knew that it was from Daikin. =X
Audio and Visual
We were lucky that we didn't need to buy any sound system as my sister won one in a lucky draw and she decided to give it to us! It's sitting somewhere in my storeroom now! For television, we decided to go simple: Non-smart Full HD LED. We haven't done any purchase though. We intend to buy it after we finish furnishing our house.
Aiyoh! Why save so hard? An ultra-HD smart TV desn't cost that much mah!
Well, we were very clear of a few things:
- We will not be watching any BluRay or downloading movies of that quality.
- We will not surf the Internet nor search for contents from the TV (we have our iPads and computers to do that)
Since we were clear on this 2 points, why will we need to spend that couple of hundred more dollars for something that we do not use? The extra few hundred dollars can be used to buy us a few good dinners!
Ending Note
So, how much did we spend on the above items? $5832.10!
-
-
If storage area has to leave empty.. defeat the purpose. Might as well just get a bed frame then spending the carpentry cost. BTW, how much did your contractor quote you for the platform and the size?
Yes it indeed defeats the purpose. It was a mistake that I made without checking. To follow HDB's ruling, the only way is to leave it empty
-
Hi Arnold, I saw from some links that platform with storage is not allowed in HDB. Did you get confirmation from HDB on this?
http://www.hdb.gov.sg/fi10/fi10324p.nsf/w/HomeRenoGuidelinesBuilding?OpenDocument#FloorFinishes
Subject to the Following Guidelines/ Conditions
Installation of hardwood platform on floor No Recommended room height to be minimum of 2.4 metres.
The void between timber joists beneath platform must not be sealed with cement/other materials.
No storage is allowed in the void within the platform and floor.
The side of the platform must be sealed.
To maintain a minimum 1 metre safety barrier height from top of platform to window sill/parapet.
Thanks for pointing this out. In all honesty, I did not know of this requirement. Seem like the storage area will remain empty then.
-
And Let There Be Lights!
To recap, here is my lighting plan:
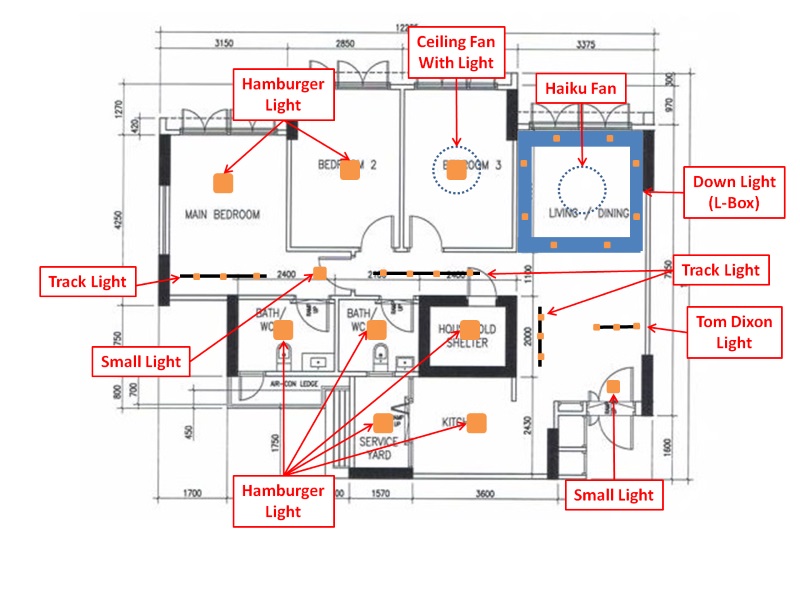
One of the first installations to our place were the lights! In this post, I will show you some of the lights that were installed. I did not include the places where I installed the hamburger lights though. After all, the hamburger lights are really there for functional purposes and I did not think anyone will be interested to see them. In case anyone would like to see those lights too, feel free to drop me a message and I will post them up. Without further ado, I present to you, the lights installed!
Living Room Lights

The lightings in the living room are generally split into 2 main areas. The main living area (highlighted in blue) will be illuminated with white lights, while the rest of the living area (highlighted in red) will be illuminated with warm lights.
Bedroom Lights
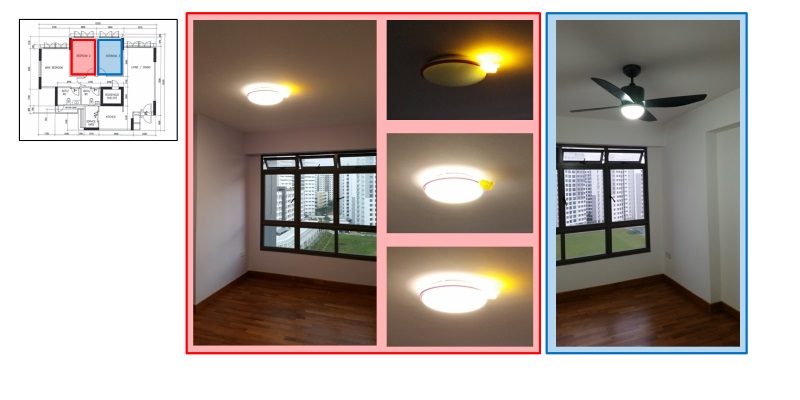
"Oh!! So nice! Lights so nice!" These were the words that my 2 year old little rascal uttered when I showed her the lights to her room (highlighted in red). She got so excited that she kept repeating this throughout her time spent in the house. Was so glad that she liked the lights, and hopefully, the nightlight embedded within will be put into good use in future!
We opted to have a ceiling fan with integrated light in the extra room (highlighted in blue). The intended use for the room will be a study room for the adults. However, both the missus and myself don't quite do any serious work at home (we prefer not to bring work home), the study room might very well double up as a children's play room.
Ending Note For Lighting
In case some of you were wondering why we did not have any pictures of the Master Bedroom lights, we decided to leave it towards the end with the carpentry pictures in together! We believe that the lights will best stand out with the wardrobe in so that the track lights and dressing table lights can be seen to prove its worth!

4 Room Bto Simple Home
in Reno t-Blog Chat - HDB BTO Interior Design and Renovation
Posted
Hey there! Good to know that you met him. All the best to your reno! and hopefully, we could see your place on renotalks too!