

RyanYTH
-
Content Count
378 -
Joined
-
Last visited
-
Days Won
31
Posts posted by RyanYTH
-
-
Blog Entry Date: 26th November 2018 Monday
Click Here to go back to Page 1 - Table of Contents
One Year Retrospective 1/5 - Walk-In Wardrobe
If you have been following this blog, you would have known that I have converted my existing HDB Bomb Shelter into a Walk-In Wardrobe.
One year later, it is still working beautifully and I personally do not regret my decision converting it.")

My Thoughts after 1 year:
- If you are a little open-minded and don't mind a little stuffiness, I would still highly recommend anyone
(Especially 35sqm owners) who need extra space to do this. Do keep the door open for better ventilation.- Converting a Storeroom to a Walk-In Wardrobe will of course mean you will have less space to store larger items.
Do take note of this if item storage is a higher priority for you. Although personally, I feel this allows me to declutter better.- I have mentioned it in my earlier blog entry already but if your Bomb Shelter is near your Main Door like mine is, simply opening the door will block 80%
of the view giving you more privacy if you decide to open your Main Door for better ventilation. You wont need to build any additional partition.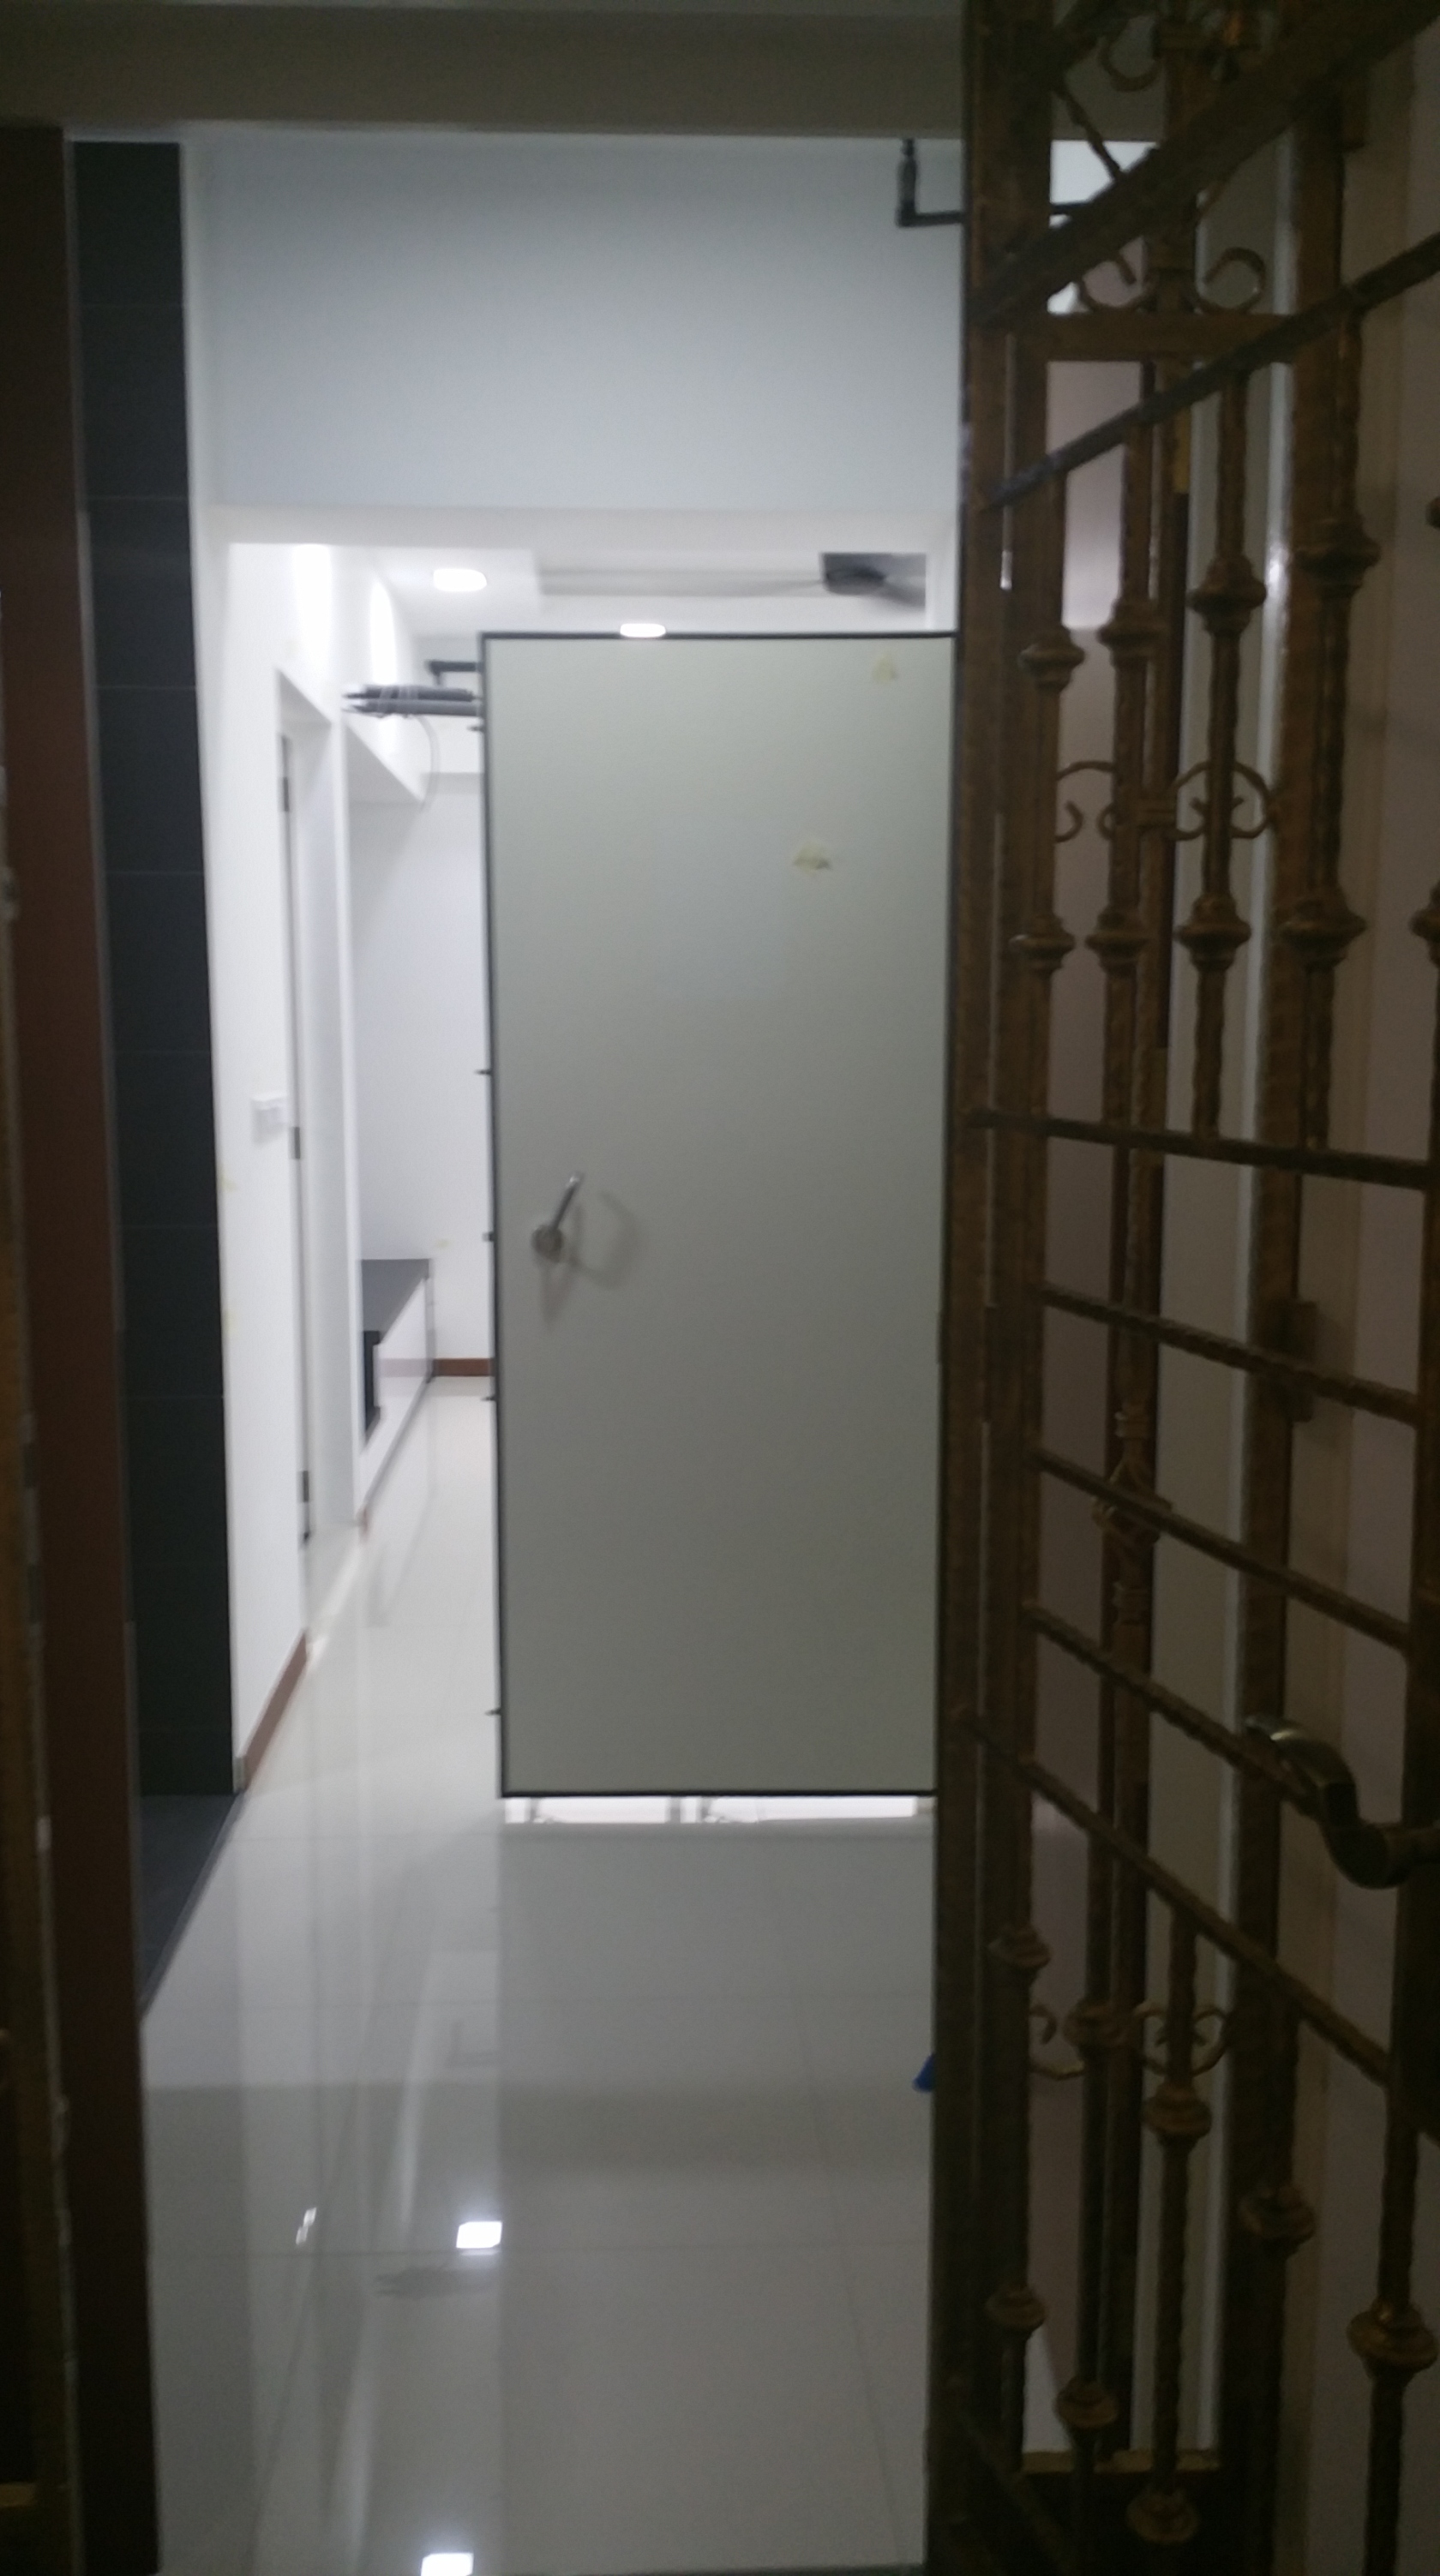
- In addition to the Walk-In Wardrobe, I also installed the Slidearm Door Holder for my Main Entrance Door and
I'm happy to report that it still works very well after 1 year. No issues encountered whatsoever, and I also highly
recommend installing this if you don't mind spending abit of money for a more elegant door stopper.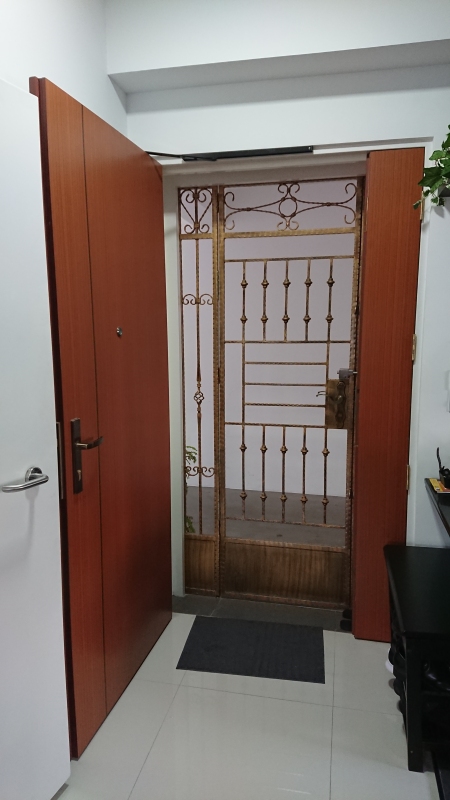
One Life Hack I've noted for the HDB Main Door:
If your Main Door is using this model, you can get your Pizza from the delivery man without opening your Main Gate thru this slot.
LOL! Someone at HDB must like Pizza enough to include such a feature

This concludes my thoughts and views for my Walk-In Wardrobe after using it for 1 year.
I hope this information helps you in planning for yours.
Click Here for the Next Blog Entry:
One Year Retrospective 2/5 - Kitchen-
 1
1
-
-
Blog Entry Date: 20th November 2018 Tuesday
Click Here to go back to Page 1 - Table of Contents
A little Curtain Experiment - Part 3 / 3
Hahahaha SURPRISE!!!
Guess what everyone, I finally located the lost photos I took for Part 3 of the Ikea Curtain guide!
Fancy finally located them on exactly the day I first moved in 1 year ago!! Talk about coincidence huh?
I really don't know what to say....but hey at least its better to be late than never right? LOL!!
So without further delay, I present to you the final part of the IKEA Curtain Experiment!
Please forgive me if I missed out some details.
Before even measuring the Curtain Rods, you will need to set up this L-Bracket
which consists of 1 x BETYDLIG Box and 1 x BETYDLIG Non-Box Packet
Here is how they look like when removed from their package.
Left are the contents of the BETYDLIG BOX
Right side are the contents of the BETYDLIG NON-BOX Packet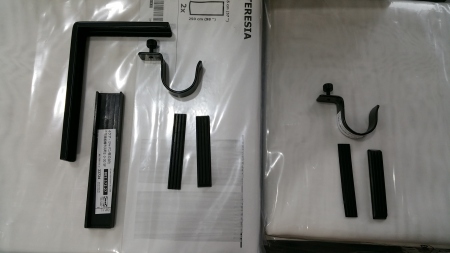
Here is how 1 L-Bracket will look like when assembled.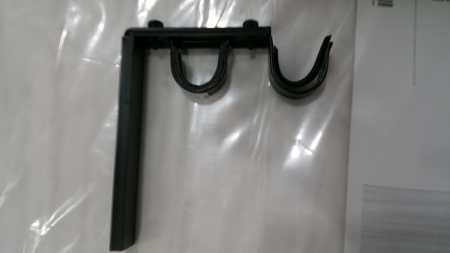
I used 4 assembled L-Brackets per Window, and because I have 2 windows,
one in the Living Room and one in the Bedroom, a total of 8 Brackets were assembled: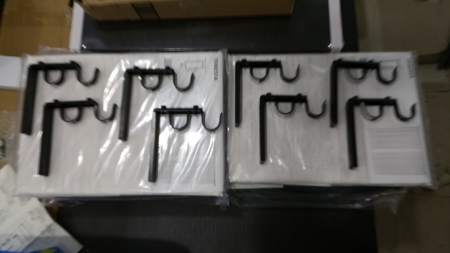
Below pictures were taken when the plumbers helped installed my Curtain Rods.
They were especially careful when doing the measurements to ensure it was aligned nicely.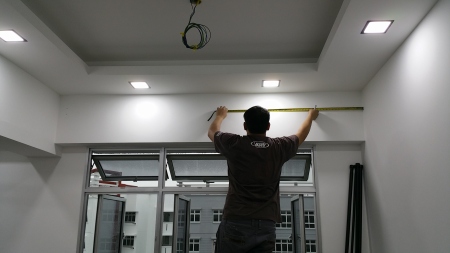
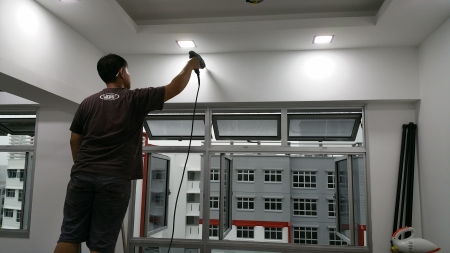
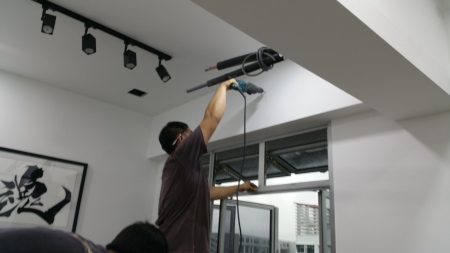
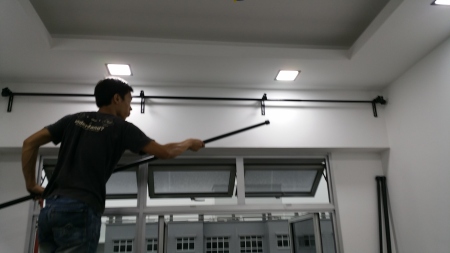
Curtain Rod Assembly installed and aligned nicely at the Living Room Area: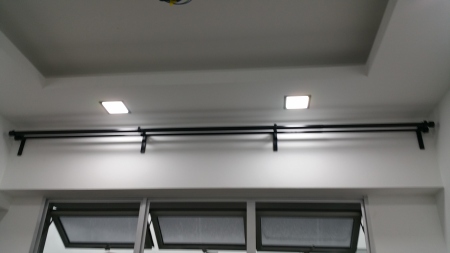
Curtain Rod Assembly installed and aligned nicely at the Bedroom Area: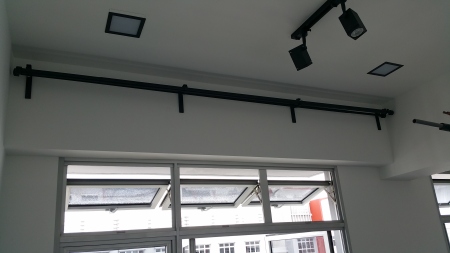
So now that the curtain rods are installed, the next part is easy because we only need to
install both the MAJGULL Blackout Curtain and the TERESIA thin mesh curtain.
Step 1:
Loop the TERESIA Light Mesh curtain thru the Thin RACKA Rod
Step 2:
Hang the Thin RACKA Rod in the Inner Loop of the L-Bracket as shown: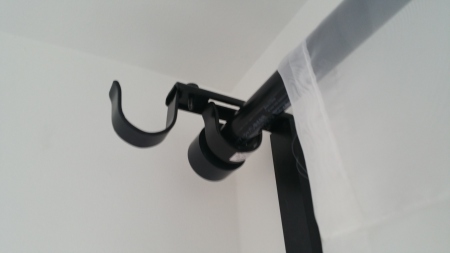
Step 3:
This is what it should look like when the TERESIA Mesh Curtain is completed.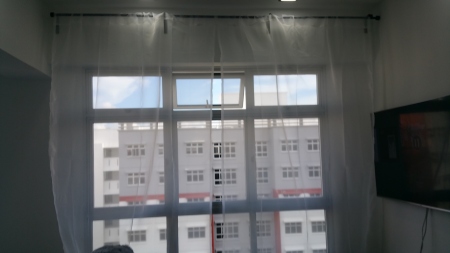
And now that the TERESIA mesh curtain is completed, we will continue with the MAJGULL Blackout Curtain.
Loop the MAJGULL Curtain through the Thick HUGAD Rod as Shown.
Once done, hang the HUGAD Rod on the Outer Loop of the L-Bracket.
Once completed, this was how they looked like:
Curtains Completed at the Living Room: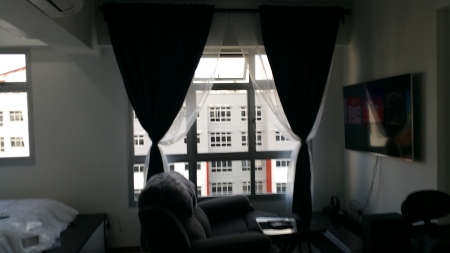
Curtains Completed at Bedroom:
And so we have finally come to the conclusion of the IKEA Curtain Guide.
I'm so sorry this took so long!!
I would like to provide my observations and comments for the IKEA Curtains now that I've used them for 1 year:
- The IKEA Curtains still hold up pretty well after 1 year. Hanging them up by myself wasn't very difficult at all.- Due to how I installed the curtain poles, and how heavy the MAJGULL Blackout curtains are, it would not be easy to draw them open.
If you are the sort that like to draw curtains frequently, I would recommend installing Curtain Tracks instead of Curtain Poles like me.
That said, if you were to choose a lightweight curtain instead of MAJGULL, you may still be able to draw curtains easily even if you used Curtain Poles.
The disadvantage of Curtain Tracks however is that they would be more prone to trapping dust and not as easy to clean as a Curtain Pole.
And because they are movable, I suspect they might not be as durable as hanging on a static Curtain Pole.
If you are interested in Curtain Tracks, IKEA sells them under the name VIDGA and it looks something like the below image.
So you will need to decide whether which one you would prefer.
In conclusion, having IKEA Curtains installed were a BIG SAVINGS on my renovation budget and they proved durable.
The blackout curtains were also very good and worked well in blocking out light.However, there were factors I faced originally such as difficulty in transporting the long poles, and needing to know what parts to buy.
Not only that, you will also need to engage someone to help you install the poles. If you prefer a hassle free experience,
I would recommend to spend the extra money to get an external vendor do it for you. Again, this would be up to your preference.
And with that, the IKEA Curtain Guide is finally concluded! Yay!!——————————————————————————————
Time really flies huh?
It has already been 1 year since I moved in to my new home.
I believe by this time most of you would have gotten your keys and some may even have
already completed your renovation. I hope everything goes well for you.I thought I'd make an updated post to discuss on my reflected thoughts, comments and experiences for this 1 year.
Starting from the next Blog Entry, there will be a 5 Part Series and each series will be dedicated to a specific section
of my apartment where I will also provide my updated pictures for them.The Sections I will cover are:
- Walk-In Wardrobe
- Kitchen
- Bathroom
- Living Room
- BedroomEach week, I will post 1 New Blog Entry for each of the section.
Don't worry, I will not take too long to post them this time. (I Hope!)
These will probably be the Final Blog Entries as I finally draw a close for this Blog.
Do keep a lookout for them coming soon!
Click Here for the Next Blog Entry:
One Year Retrospective 1/5 - Walk-In Wardrobe
Click Here to go back to Page 1 - Table of Contents-
 1
1
-
1
-
-
On 10/8/2018 at 8:55 PM, hdb4ever said:Your walk-in-wardrobe looks very tidy!!

But how do you cope with being unable to use the store room for storage?
Thank you
Actually I do still use the bomb shelter partly as storage for some non clothing stuffs. If i need more storage, I put some stuffs at the topmost cabinets in my kitchen cabinets.
My platform bed itself has a couple of deep drawers too to keep stuffs
Most importantly, i try to develop a minimalist mindset, not to buy too much unnecessary stuffs so as not to create clutter. From time to time, I actually go thru the list of stuffs that I have, and see if I can donate, give them away, or throw away. I enjoy coming home to a very de-cluttered home, feeling is like very relaxed lol.
-
1
-
-
-
On 9/23/2018 at 10:49 PM, daztan89 said:Hi TS,
Can I ask how's the wardrobe now? I'm interested in asking them to build me a similar one, but want to ask your experience with the wardrobe first.
Oh hey, yea its still holding up fine. tbh I'm proud of my bomb shelter having such a unique feature.
As i mentioned previously, if you are open minded and don't mind just a little bit of stuffiness,
a walk-in wardrobe in the bomb shelter can really free up alot of space for you.
Your bomb shelter will than become a well utilized part of your home instead of just being another typical storeroom to gather junk.
However, If you are the type that die die need a traditional wardrobe to keep your clothes than it will not be suitable for you.
Honestly I feel a bomb shelter wardrobe is a very good idea for folks who got a 37sqm unit.
Hope this helps!

-
2 minutes ago, MiniBean said:Hello, I will like to know is there any holes drilling in the bomb shelter which you installed WIW?
thanks
Nope, no holes drilled. Cannot drill also.
-
5 minutes ago, CaseBlue said:Hi @ryanyth
Did the installer for the side arm say anything about having enough GAP to install the side arm? Another blogger, with the same colour door as mine, had to hack a bit of the GAP to install the side arm (uniarm) ...
Will there be "A little curtain experiment" part 3/3?
Mmmm now that you mentioned about it, i vaguely remembered him saying "Lucky my door was just nice can install slidearm."
As for curtain experiment part 3, i'm not sure if i'll be able to finish it as i lost a couple of photos already.
I'll try my best to see if i can still do the post tho. -
5 hours ago, SuperZ said:@ryanyth, wow 18k BTU for 2 room unit? That's very powerful!
Only one word to describe: Shiok!
-
22 hours ago, Ankle said:BTU is relative to room size.
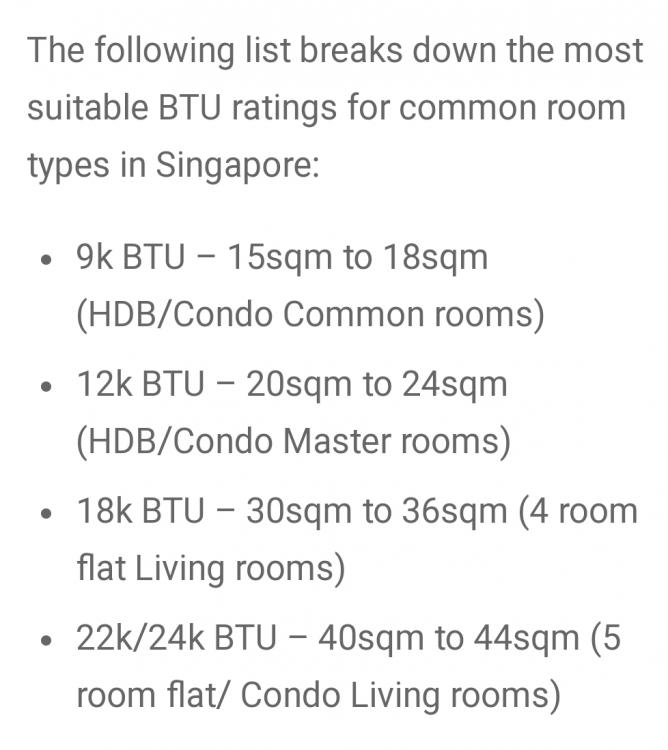
Nice guide. Would be a great reference when I went to select my Air-Con.
Love my 18k BTU aircon at the living room can cool down my whole house lol.
House may be smaller, but it means easier to cool
-
11 hours ago, Kelvin Cheng said:Tks for the info. May I know the position of ur aircon and the btu of each unit?
My Air-Con is Daikin 5 Ticks Smile Series System 2
The one in the Bedroom is 9000BTU,
The one in the Living Room is 18000BTU.
This link should show you where I positioned the aircons
https://www.renotalk.com/forum/topic/78056-my-modern-zen-2-room-35sqm-type-1-hdb-bto-apartment-renovation-journey/?page=17&tab=comments#comment-964617
-
9 hours ago, Kelvin Cheng said:Hi,
been quietly following ur blog for a while now and will be gettin my keys soon.
May I know does hacking away the living room wall impact ur aircon coldness? Meaning do u have to turn on both aircon just to cool a single room as the air can now escape to kitchen side?
Thank you for your support
Hacking away that living room wall didn't seem to have any impact so far.
If i need aircon in bedroom, i just turn on the bedroom aircon.
If i need Living Room or whole house coolness, I just need to turn on my Living Room Aircon. -
3 minutes ago, CaseBlue said:Ah thanks. Opps haha how can i miss that whole post... thankssss
i quite like the trolley... ok i already have 2 normal trolley. But if my kitchen can still fit in, am planning to get that... seems like i need more space XD
your console is really nice too... is the 55" tv just nice? I was thinking of getting only 49"....
Thanks. Ya i also like my kitchen trolley. Its expensive, but the marble top adds that little bit of classiness.
And its very functional too, been using it to do my food photography, utensils storage.
55" TV for me is just nice. Not too big, not too small.
Which ever tv size you choose, try to ensure there is still a wall border spacing of at least 15cm all around it.
This will make it look like a picture frame without it looking too unwieldy. -
1 hour ago, CaseBlue said:@ryanyth I scanned through your blog again but I cant find how much you paid for the kitchen trolley. Can share again? Thanks in advance.
Oh hey, its the Leo Marble Trolley from V-Hive. Price was $199
https://www.renotalk.com/forum/topic/78056-my-modern-zen-2-room-35sqm-type-1-hdb-bto-apartment-renovation-journey/?page=13 -
On 6/8/2018 at 8:58 AM, CaseBlue said:Heartache seriously... oh why must get BSC to remove? Will they do that for us?
BTW, any comments of your flat after staying for months liao?
Depends on the BSC. Just let them know got defect and need to remove.
Do note, the wait might be very long as the BSC need to tend to every residents in your project.
If not, you will need to get your contractor to remove.
Actually i've been in my new place for half a year already. Time pass so fast.
So far so good ba, nothing broken or spoil thank god. I'm interested in seeing
how Rufus58's reno is coming along. I think by now should be done already i guess. -
7 hours ago, CaseBlue said:I managed to look inside the false ceiling, as i suspected, the tiles are incomplete and cement exposing raw ... sigh ... should be false ceiling to conceal rush work ...
Wow i'm sorry to see that. The raw cement really looks like a rush job. I'd expect them to at least screed properly.
The way I see it, you have 2 choices to rectify this:
1) Get BSC to do a proper patch up.
2) Get BSC to remove the false ceiling, and pay contractor to do a nicer looking ceiling. -
35 minutes ago, CaseBlue said:some people just do without thinking of long term ....

Well, i guess its HDB way of covering up the bathroom sanitary pipes I guess.
Another good point I realized when living highest floor is that there are no such pipes in my bathroom. -
5 hours ago, CaseBlue said:Hi @mmoh,
As you can see the different from your toilet ceiling. The height become quite intimidating but it is quite solid. But I am just afraid of mickey mouse and xiao qiang hiding in there or the pipes leaking but cannot see.
Interesting new design nowadays.
I agree over time, it may rot or have pests living inside. -
On 5/20/2018 at 1:47 AM, CaseBlue said:Ah noted on the great tips for healthy eating!! Thanks so much!!
BTW i realised from the few blogs i can see the real ceiling of the toilets ... mine has a false ceiling ... the height is so intimidating! Dun understand why a false ceiling made of wood in the toilet. I wonder if i can remove those false ceilings? The 5-year warranty against leaking, should be for the real ceiling?
Hahahah no worries, just sharing what I eat only. Old already, cannot yolo and anyhow eat liao.
Mmmm...false ceiling in toilet. I'm guessing this is used to conceal the sanitary pipes that usually run in the toilet.
If i'm not wrong, you should also be seeing a plastic mesh sort of thing so you can sorta see the pipes right?
My friend's newer styled 2-room flat has this too. I suppose you can remove them, but the tradeoff is that
those sanitary pipes would be exposed like how 80s styled hdb toilet is. Please do correct me if i'm wrong. -
5 hours ago, MiniBean said:Oh, City Gas piping are already laid in kitchen? I am a bit confused as i thought we have to get them to install the piping if you wanna use gas.
Ya. For my case, there was already a copper piping already. If you want to use gas, I guess they will add more things to that pipe.
If you dun use gas, you can just ignore it lor. Same as that "U-Shaped" Storage Heater pipe in the bathroom. If you dun use storage heater,
the pipe will also just stick there. -
44 minutes ago, mmoh said:i have to agree having your own haven makes u wanna cook more... cos dun feel like going out liao so gotta ownself settle and after awhile, instant noodle lost its appeal... lol!
btw, i used to boiled broccoli too but read somewhere that the mineral are all lost in the water. steam is actually a better way to cook broccoli so now I use steamer instead. just sharing.
Hanor hanor, me also used to eat so much instant noodles.
Now that i'm older its very unhealthy lol. Interesting point on using steamer for veggies. Noted.34 minutes ago, Studio45 said:Hi @ryanyth, just to check with you, must we remove City Gas Piping from Kitchen if we do not intend to use gas, just use induction hob and electric instant water heater?
I
 your nice, informative and delicious looking T-Blog. Thanks.
Hihi. If you don't intend to use City Gas, it is not compulsory to remove that gas piping,
you can just leave it as it is. I removed it because it looked ugly to see a gas pipe popping out of nowhere.
(Very expensive though, cost $70 just to remove that stupid pipe *faints*) -
8 hours ago, CaseBlue said:Thanks for replying on the cost of 3D drawing, need an estimate cos looking for an ID to draw 3D drawings only. Already got my contractor but he need some drawings.
Wah randomly reading your convos and saw you talking about grant... guess not all are eligible ... i only got a $2.5k grant, haha just be grateful lah.
I realised cos you already have an idea of what you want so it becomes easier to accustom if there are difficulties. I got my keys but not started any renov cos been busy with other things. Anyway there are still defects to be rectified and after that i have to do cement smoothing as ididnt opt for tiles. Plus i think there will be some delay with hdb assigning a contractor to me. Anyway, my headache is the toilet with 2 doors and shower area right in the middle... in front of the wc... sigh don't know how so only can think of shower curtain.
on a happy side, i already thinking of what to (learn to) cook once i have ny own kitchen and also interested in knowing more of how u prepare for your lunch on sunday to bring to office during weekday? Maybe the food blog can continue at your wordpress page? Haha let us know if you do.
i will need to re read your whole blog as well as adatang and mmoh (?) ones ... steal ideas haha ... so thankful...
Your contractor need some drawings? Isn't the contractor supposed to be the one producing drawings?

Actually the grant is also not really grant lah, just to offset the extra amount that singles need to pay.
I must thank the 3D drawing program I used for the ideas. Initially I also had no idea especially the bedroom. The more i fiddled with it,
the more ideas it came to me. It definitely helps to browse thru Renotalk and other renovation forums to get more ideas.
Oh for my weekday lunch preps, I tend to try to eat healthier.
I don't use any sugar or salt. The only oil i use is Olive Oil and even that i use it quite sparingly.
Here's my daily meal prep recipe. Feel free to copy lol.
1) Cook enough brown rice / red rice for 5 days.
2) Boil Veggies in plain water (mostly use broccoli / cauliflower)
3) Marinate chicken using Lemon Juice and Black Pepper and than pan fry them in olive oil.
4) Sometimes if supermarket got a good deal, or if price is cheap enough, i'll add salmon / fish.
5) Once everything is done, i'll portion and pack them in microwavable containers and freeze them. One day before I eat them,
i'll transfer the container from freezer to refridgerator and when I'm in the office, its just a matter of microwaving them.
This brings each meal to about $2.50+ which is definitely alot cheaper (and healthier) than buying from outside.
I never used to do this in my old place, but somehow having my own home makes me want to cook more lol
-
1
-
-
On 22/04/2018 at 1:20 AM, swatcL said:Hi Guys,
A couple of questions to ask, please share your thinking on these.
1) Selection of bathroom basin & Taps - I do not intend to install storage tank, no need for hot & cold water at the tap. What kind of basin (for bathroom) & tap should I consider? I saw from another forum, there are some taps that are mount onto the basin, and some tap (taller ones) are mounted on the counter top. Any pros & cons?
Storage tank not only because of the Hot & Cold Water.
If you are concern about Water Pressure, Storage Tank would be much more stronger than Instant Heater.
Basin and Tap is quite subjective. Is up to your preference honestly. As long as your ID say the tap you want is ok to install, just go ahead.2) Instant water heater for shower - Any brands to recommend? Anything to lookout for? I know it is good to get those with copper tank instead of plastic tank.
No comment for Instant Water Tank, but my initial thought was getting 707 brand because is old and trusted brand i guess.3) Gas hob for cooking - I intend to get a single hob. What do I need to look out for? Any brand to recommend? OR Shall I go for ceramic heating coil? Going forward, I would like to cook dinner on weekends and sometimes invite friends over for a meal.
thanks alot!
Would you consider an induction cooker? It uses electricity and it looks very modern.
Usage wise to reach boiling point is very fast. Very easy to clean also, just need to wipe clean with cloth will do.
I've been regularly cooking on induction so far, and I really enjoy it. Downside is Induction Bill cost more than Gas I think. -
On 21/04/2018 at 12:15 AM, Studio45 said:Thank you ryanyth
, I've read your entire T-blog, very informative for a newbie like me, even got pizza, cheeseburgers and char kway teow for more inspiration . Very nice Modern Zen indeed. Will be camping around RenoTalk when free to lookout for more ideas as I still have time before my project T.O.P.
Hahhaha thanks for your support
Yea same as me, i was camping around for ideas too.
Do feel free to ask anything you need. We will try our best to help. -
15 hours ago, Studio45 said: Hi mmoh and all forumers here, newbie here.
I've been following renotalk for a while and love the sharing community here,
thanks everyone.
Hello and welcome
Good to see another fellow 2 roomer!

My Modern Zen 2-Room 35sqm (Type 1) HDB BTO Apartment Renovation Journey
in Reno t-Blog Chat - HDB BTO Interior Design and Renovation
Posted · Edited by ryanyth
Blog Entry Date: 3rd December 2018 Monday


Click Here to go back to Page 1 - Table of Contents
One Year Retrospective 2/5 - Kitchen
My Kitchen is one of the sections that I'm MOST PROUD of in my apartment.
To see it transform from its original dull HDB look to its current form was really amazing.
Sorry abit messy yah
It may be very small compared to most other HDB kitchens, but being an avid cook myself,
I find it very well equipped enough to deal with most cooking tasks that I throw at it.
Below are just some of the dishes I've made using this small kitchen. (Shameless Plug)
OMG I love my kitchen so much!!
My Thoughts after 1 year:
- After extensively cooking for 1 year, I still feel that a Cooking Exhaust Hood is not necessary.
Unless you have very specific or special needs, I don't recommend installing one in my opinion.
- The integrated Dining Table not only works as a Dining Table, it is also very useful when I need to put down my groceries
to lock the Main Door when I return from the Supermarket. If you are designing for your own home, I would recommend
to install something similar near your Main Door if you do grocery shopping.
- One thing I wished I done was to somehow design my Kitchen so that my cooking area is right next to my Kitchen Sink.
Anyone who cooks will know it is very important to have the sink at an easy reach to wash while cooking.
My current design needs me to turn around instead. Its not that bad, just a mild inconvenience for me.
- Having an Induction Cooktop is a very good idea. Its safe, easy to clean, and looks very nice.")
The only drawback is that I cannot cook Claypot Dishes or dishes that need open flame. Also, unless you are
cooking for alot of people and need to juggle multiple dishes at once, 2 Cooktop Rings are good enough.
- For anyone who has an interest in cooking, an Oven is a very good investment if you have the space.

You can do so many interesting dishes with it. If you do buy one though, try to plan your oven positioning so that you can open
it while standing up instead of having the Oven on the ground like how I did where I have to squat down just to take my dish.
- Don't buy an Oven however if you don't see yourself using it often. One disadvantage of installing an Oven for a small kitchen
like mine is that you have to sacrifice storage space. Luckily I work around this issue by having a Kitchen Trolley which can both
act as extra storage and extra workspace. In fact, a Kitchen Trolley is so useful, I feel every Kitchen should have one!
- Some people may feel that the area I have in the Kitchen for storing my Bicycle is a waste of space that I can utilize for
more storage, but I feel otherwise. I like how it adds an additional design element to my Kitchen and give it a more
interesting look. Plus, its really convenient to just park it there whenever I come back from riding as its so near the Main Door.
Of course its up to your preference whether this suits you or not.
- Having a Top-Loading Washing Machine was very good for me. While it may use more water than a
Front-Loading one, I don't have to squat down to get my laundry. Still, this is a personal preference.
- The default HDB Laundry Rack is very functional, you don't have to spend extra money
to get any other fancy laundry racks. Indoor Drying works perfectly fine, at least for me.
- Instead of permanent shelves, look online for alternate ways and methods for storage.
You will be amazed at how many varieties there are and how much cheaper they can be.
- Don't rush off and buy shelves to install just because they look nice. Buy only what you need.
If you cook, you yourself will know where are the best placements for shelves. If you don't cook
but is just buying shelves for decoration, feel free to splurge.
- If your kitchen cabinets do not reach all the way to the ceiling, you will need to take the time
")
to wipe clean to prevent dust from settling. On the plus side, this area can be used for some decoration.
This concludes my thoughts and views for my Kitchen after using it for 1 year.
I hope this information helps you in planning for yours.
Click Here for the Next Blog Entry:
One Year Retrospective 3/5 - Bathroom
Click Here to go back to Page 1 - Table of Contents