

RyanYTH
-
Content Count
378 -
Joined
-
Last visited
-
Days Won
31
Posts posted by RyanYTH
-
-
Blog Entry Date: 14th November 2017 Sunday
Click Here to go back to Page 1 - Table of Contents
9th Week after Key Collection - Electrical Issues are ALL FINALLY RESOLVEDYet another short, but important update.
As my renovation comes to a close, it looks like the updates are getting shorter and shorter lol.
Also good lah, I hope I don’t get anymore nasty surprises LOL.
---------------------------------------------------------------------------------------------
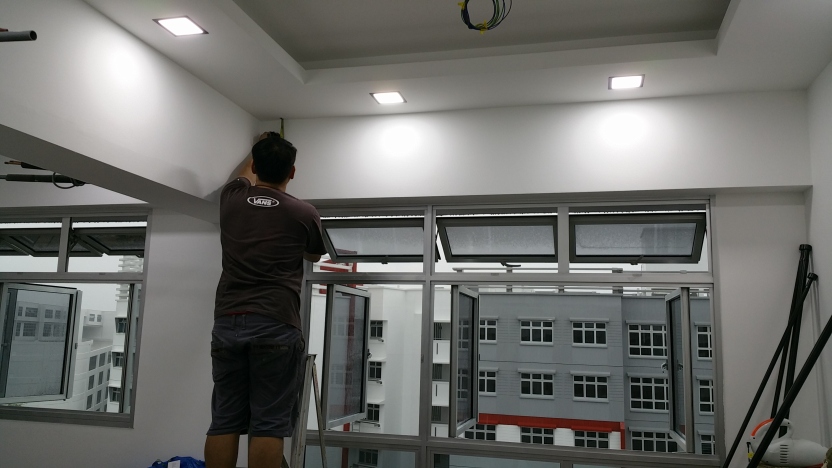
First up, remember that the Electricians couldn’t fit my downlight into my Dining Table because the Downlight was too thick? Turns out the way to resolve it, was to make a larger opening at the top and get the Carpenter do a box-up to hide the Electrical Components. Very Clever, because the dining table roof is high, it helps obscure this box-up, and I don’t spoil the overall look.Here’s a Before and After Look
I specifically chose a Downlight with a Glass Border around it so there is a soft "layering" contrast between the wooden laminate and the black border. Also as you can see later, it helps with giving a nice reflective border when it is lighted up too.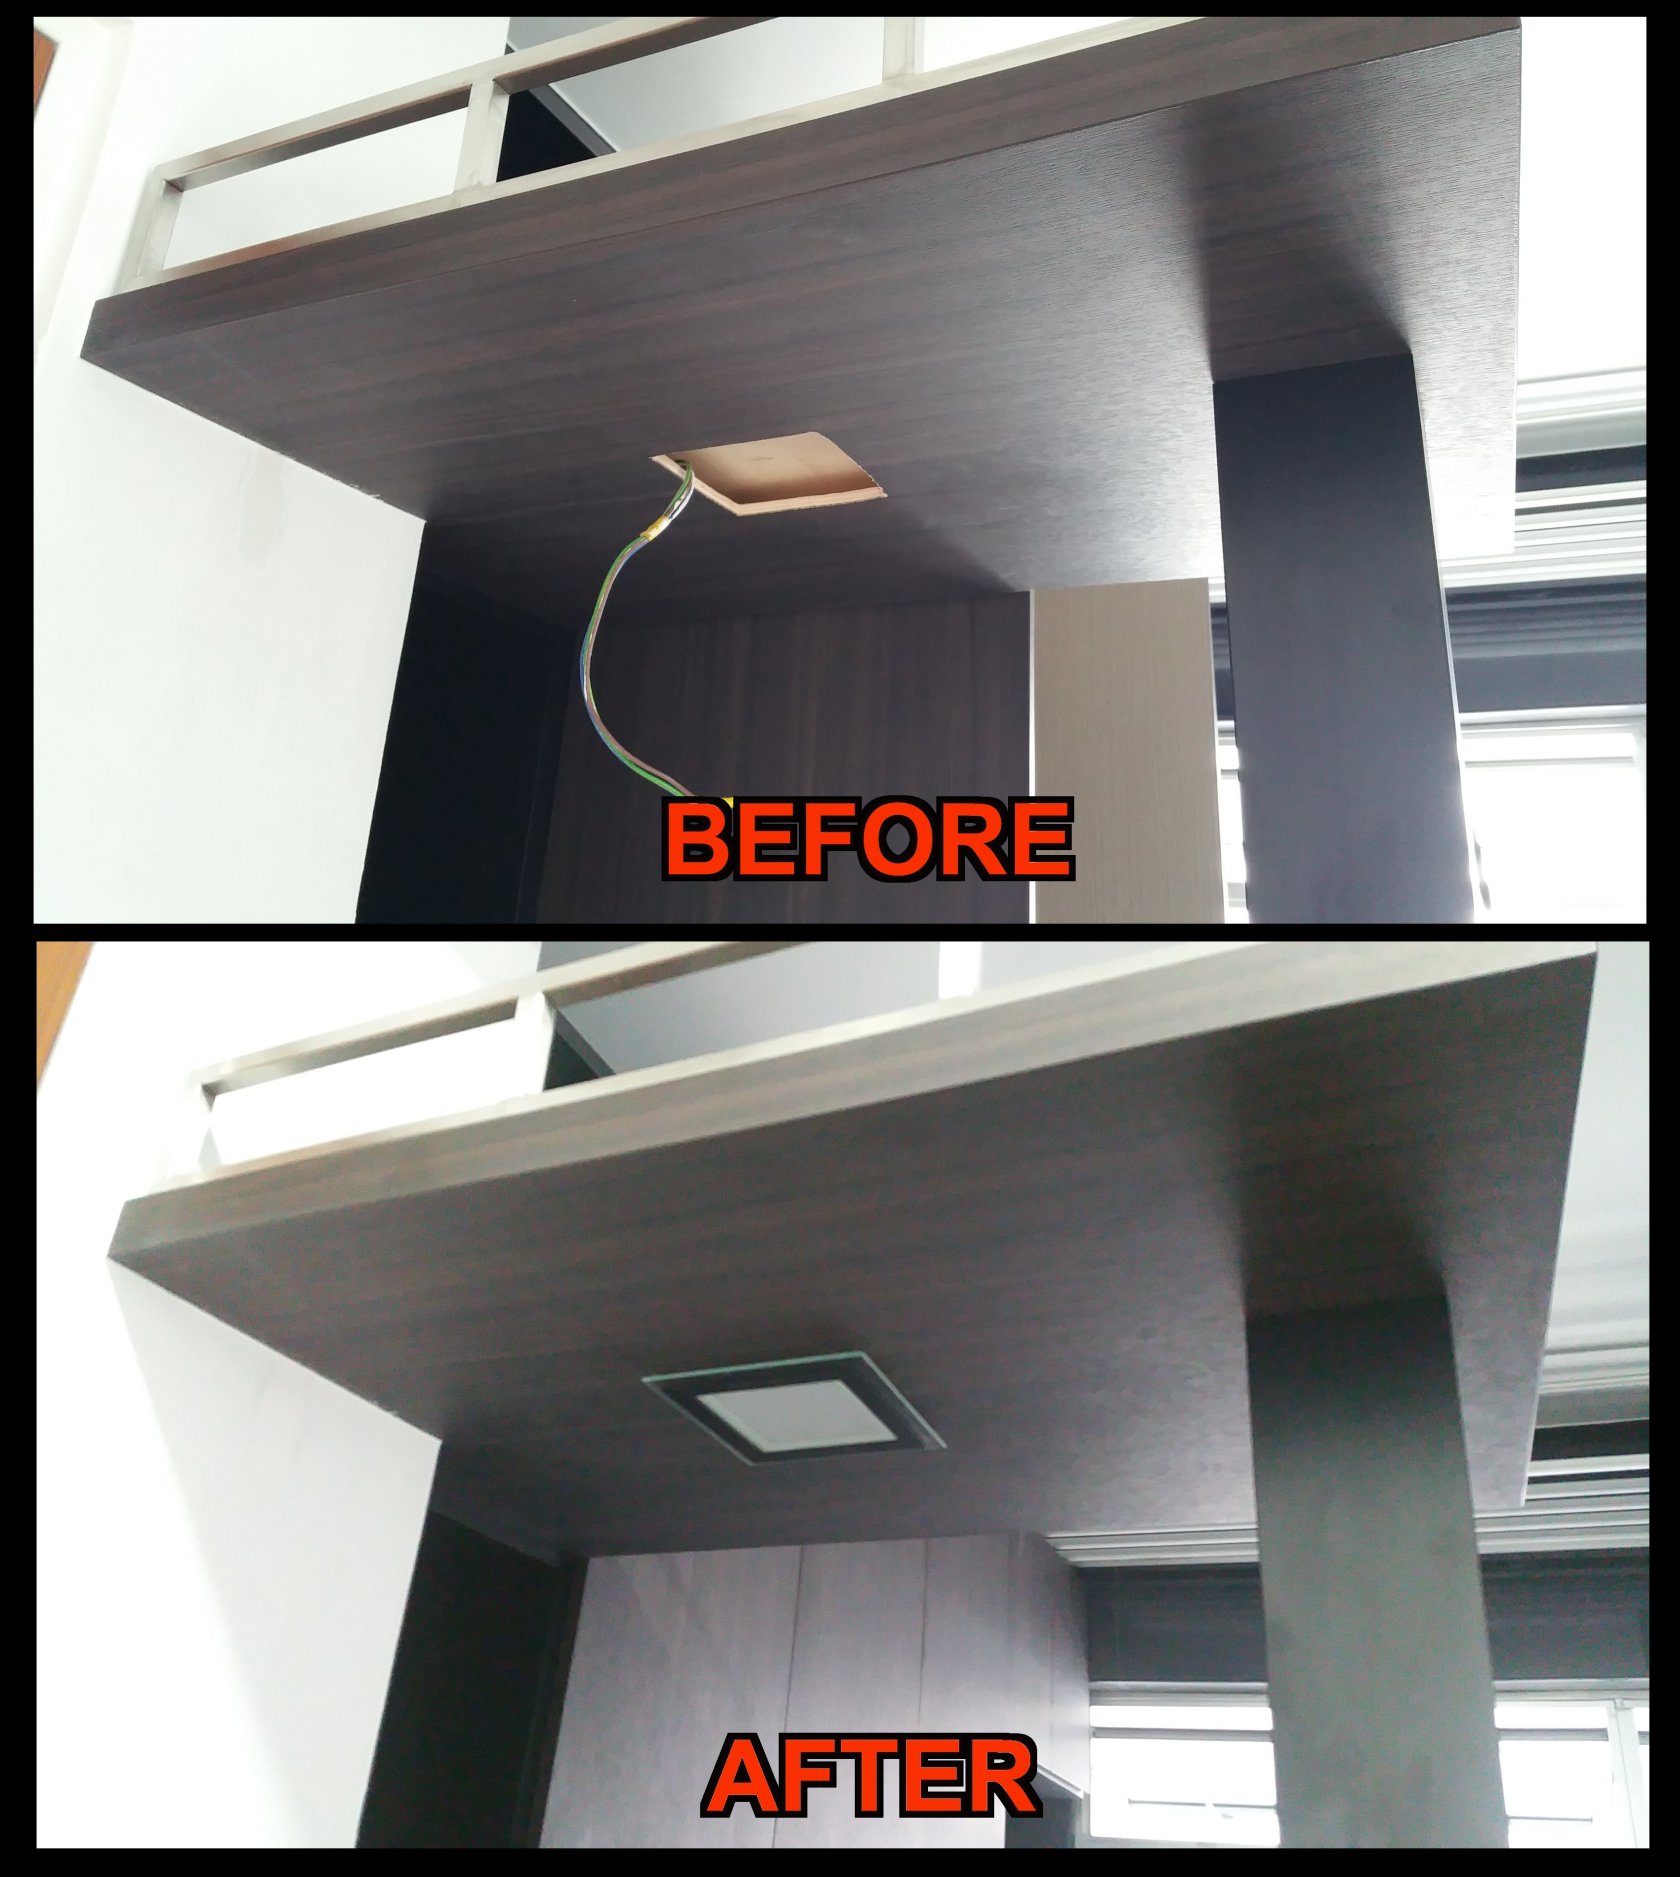
Here’s how the top part looks like.
(It’ll be covered with the Box-Up later)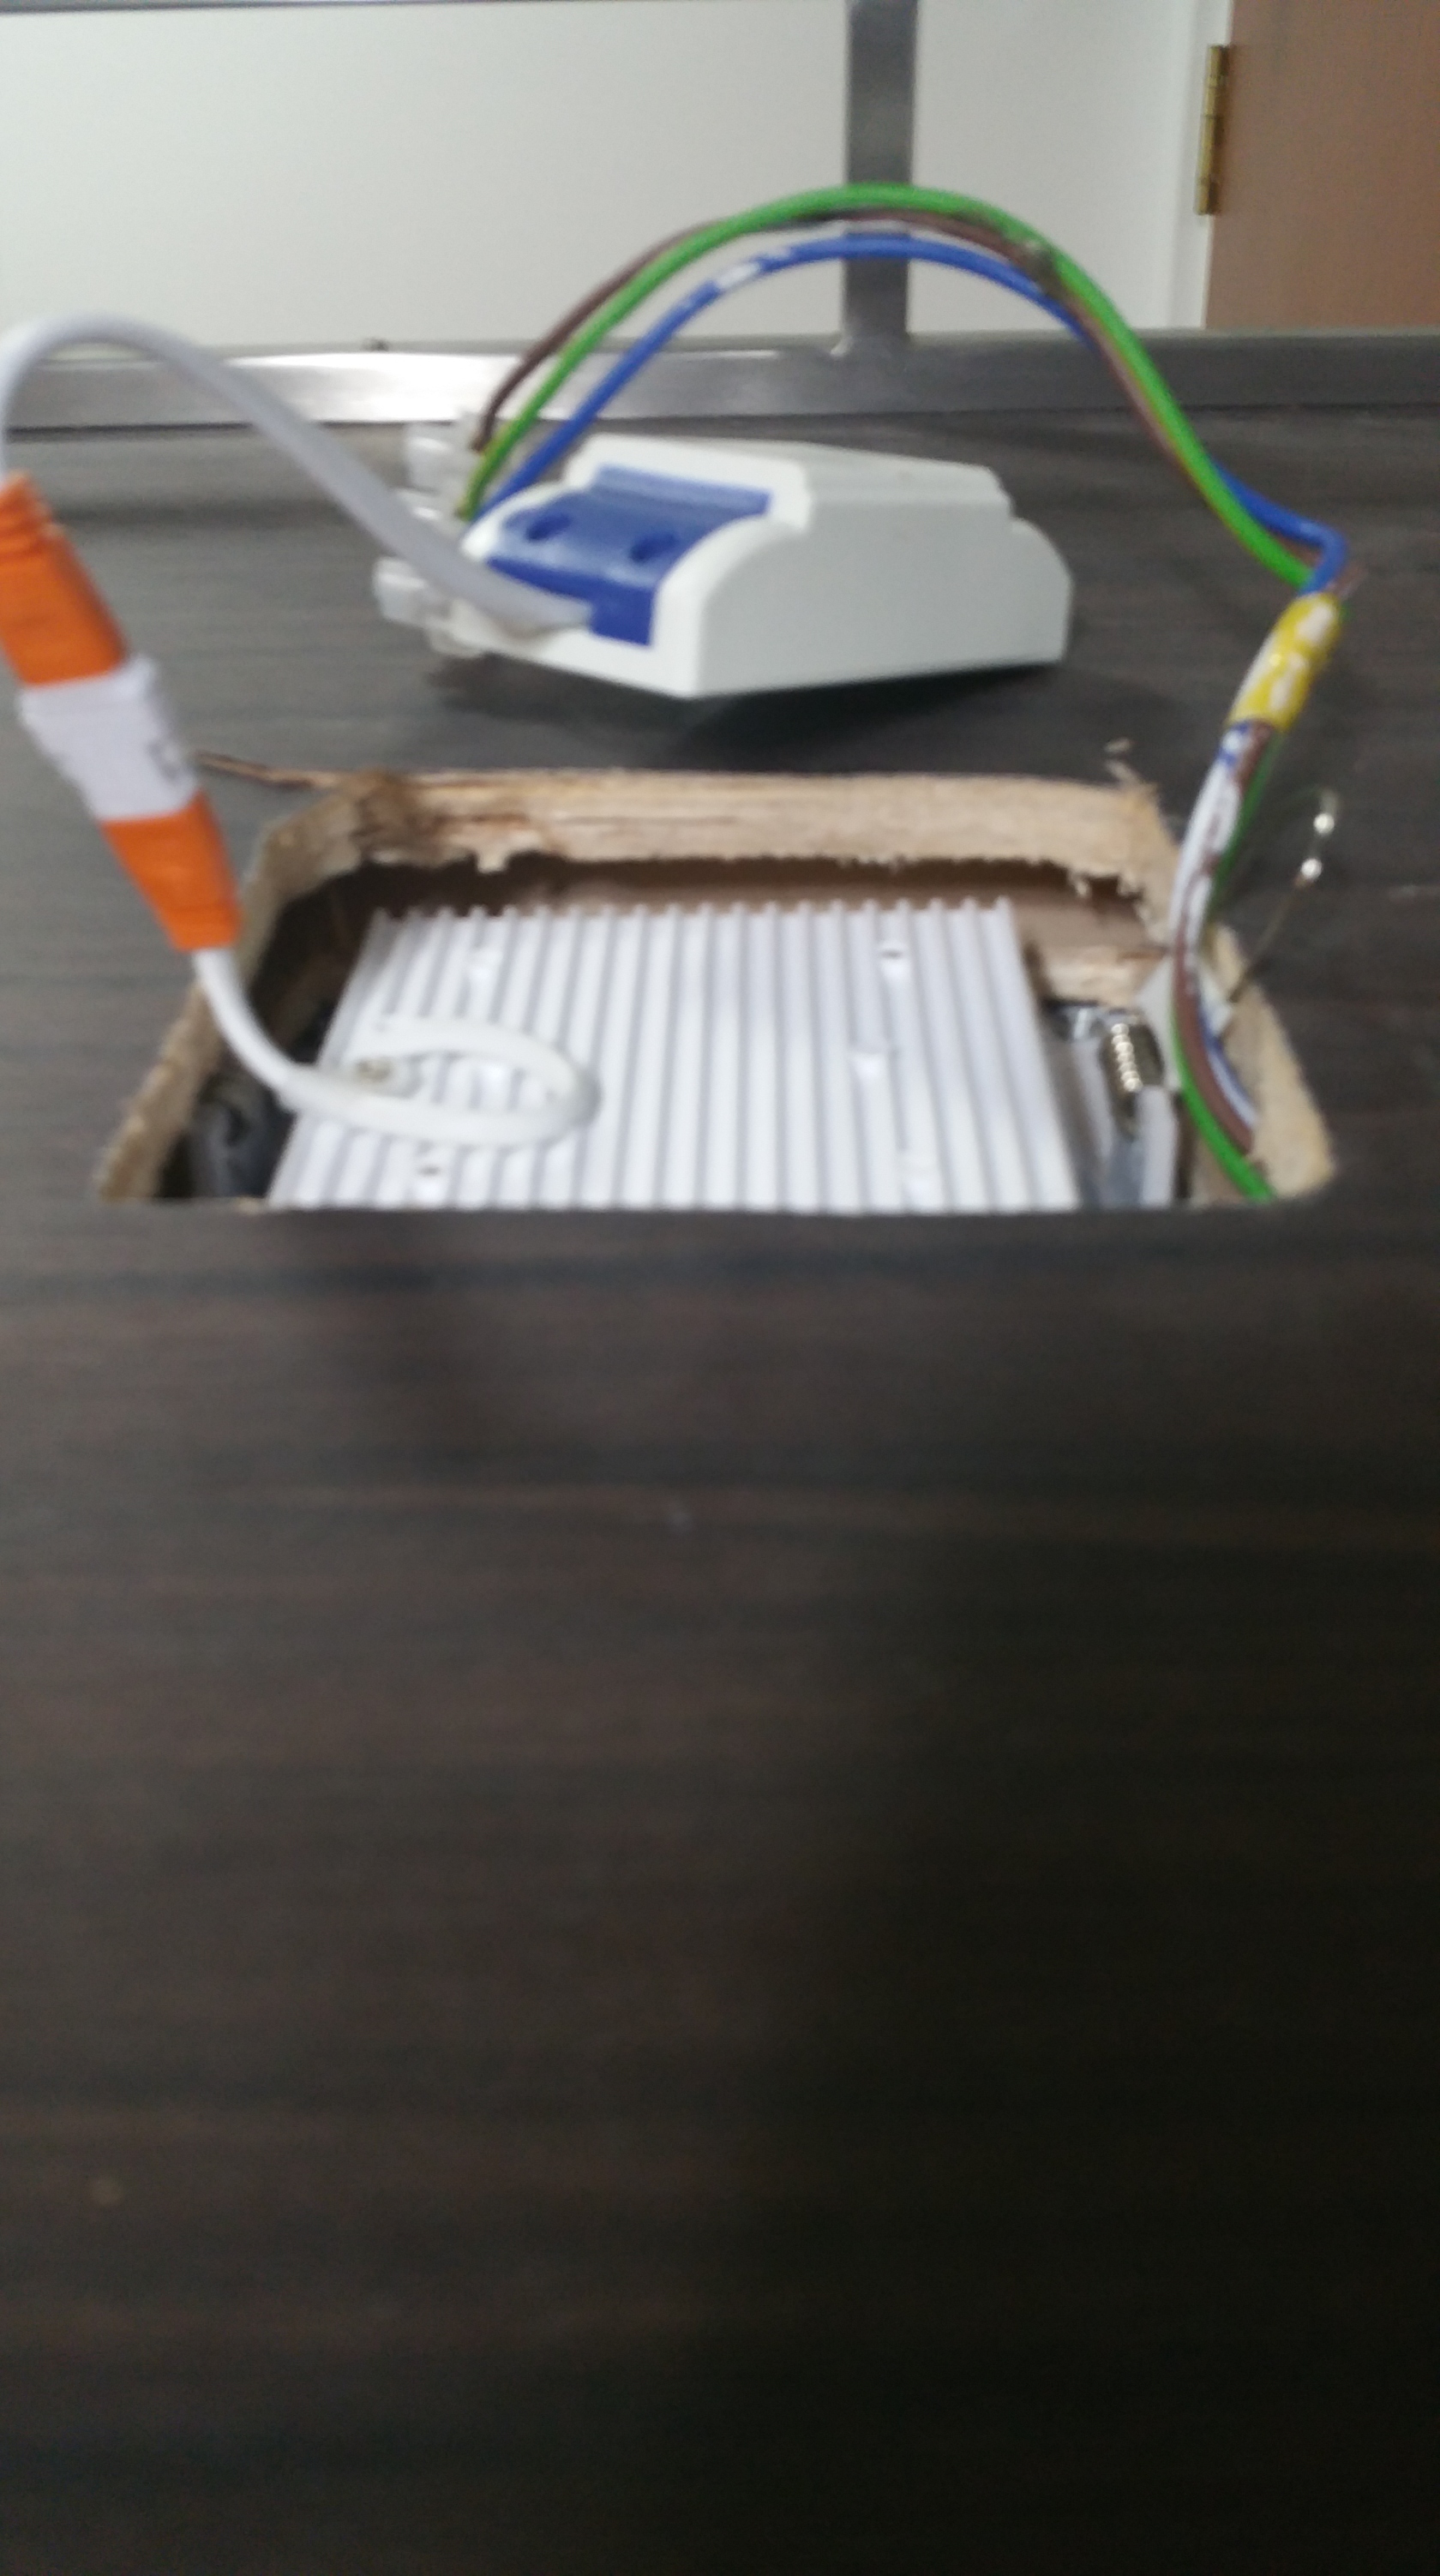
Here’s how it looks like lighted up.
I chose Cool White because I find the light more comfortable to my eyes.
Some people may choose Warm White instead to get a more “Romantic” cozy look.
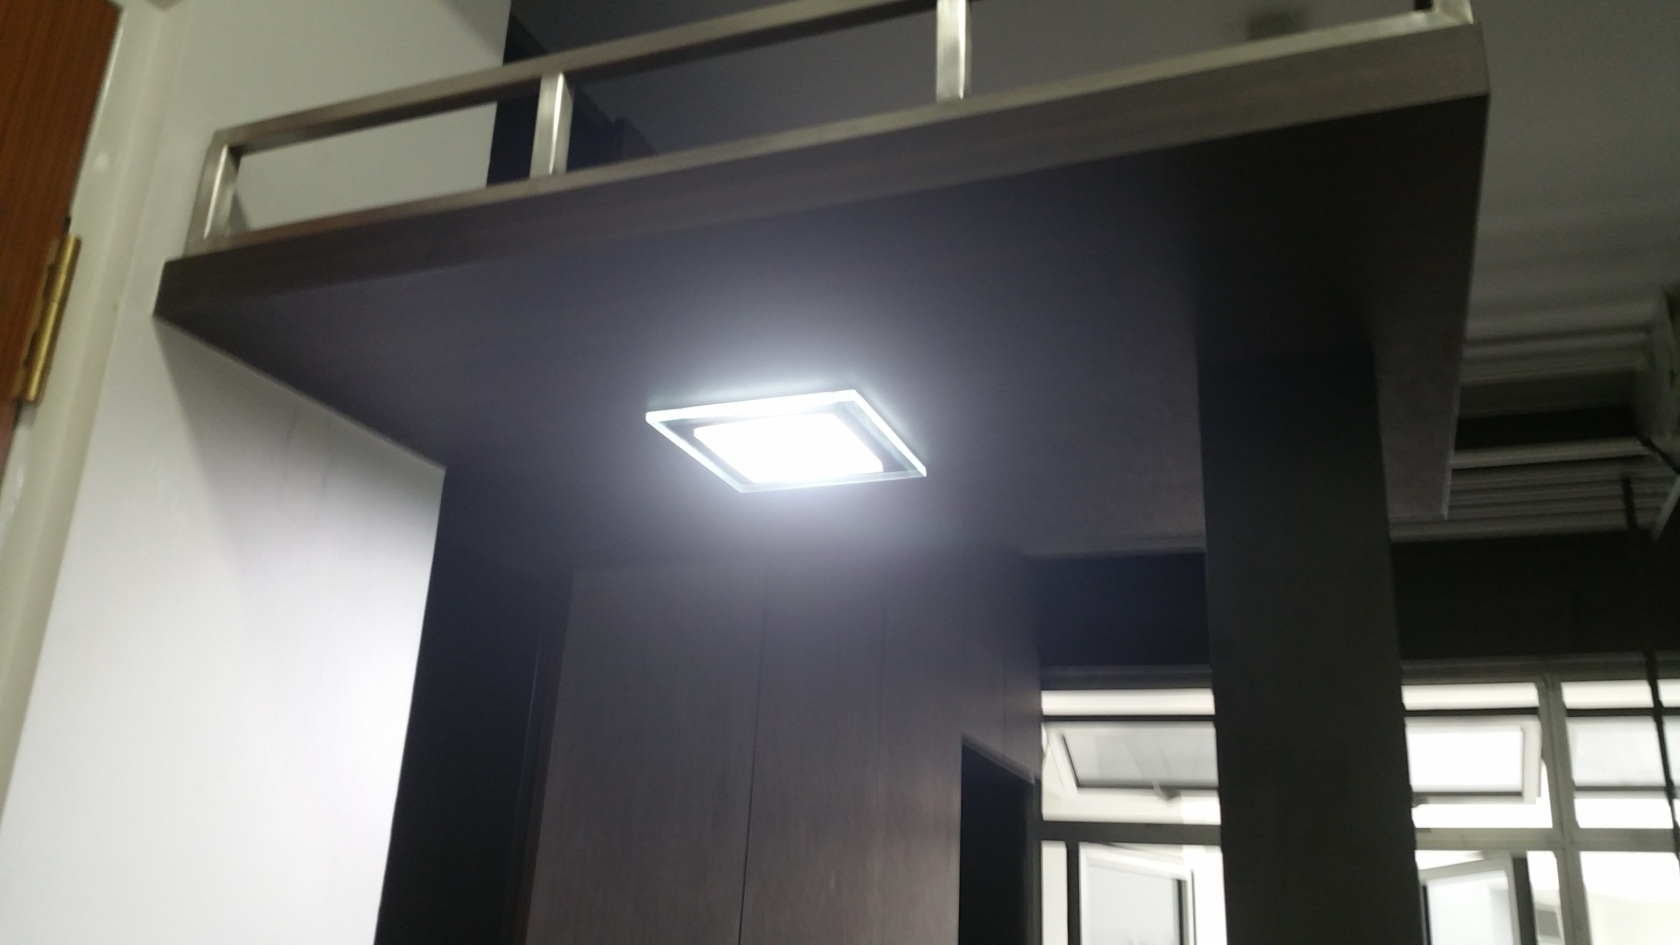
Another view of the Dining Table Light illuminating the area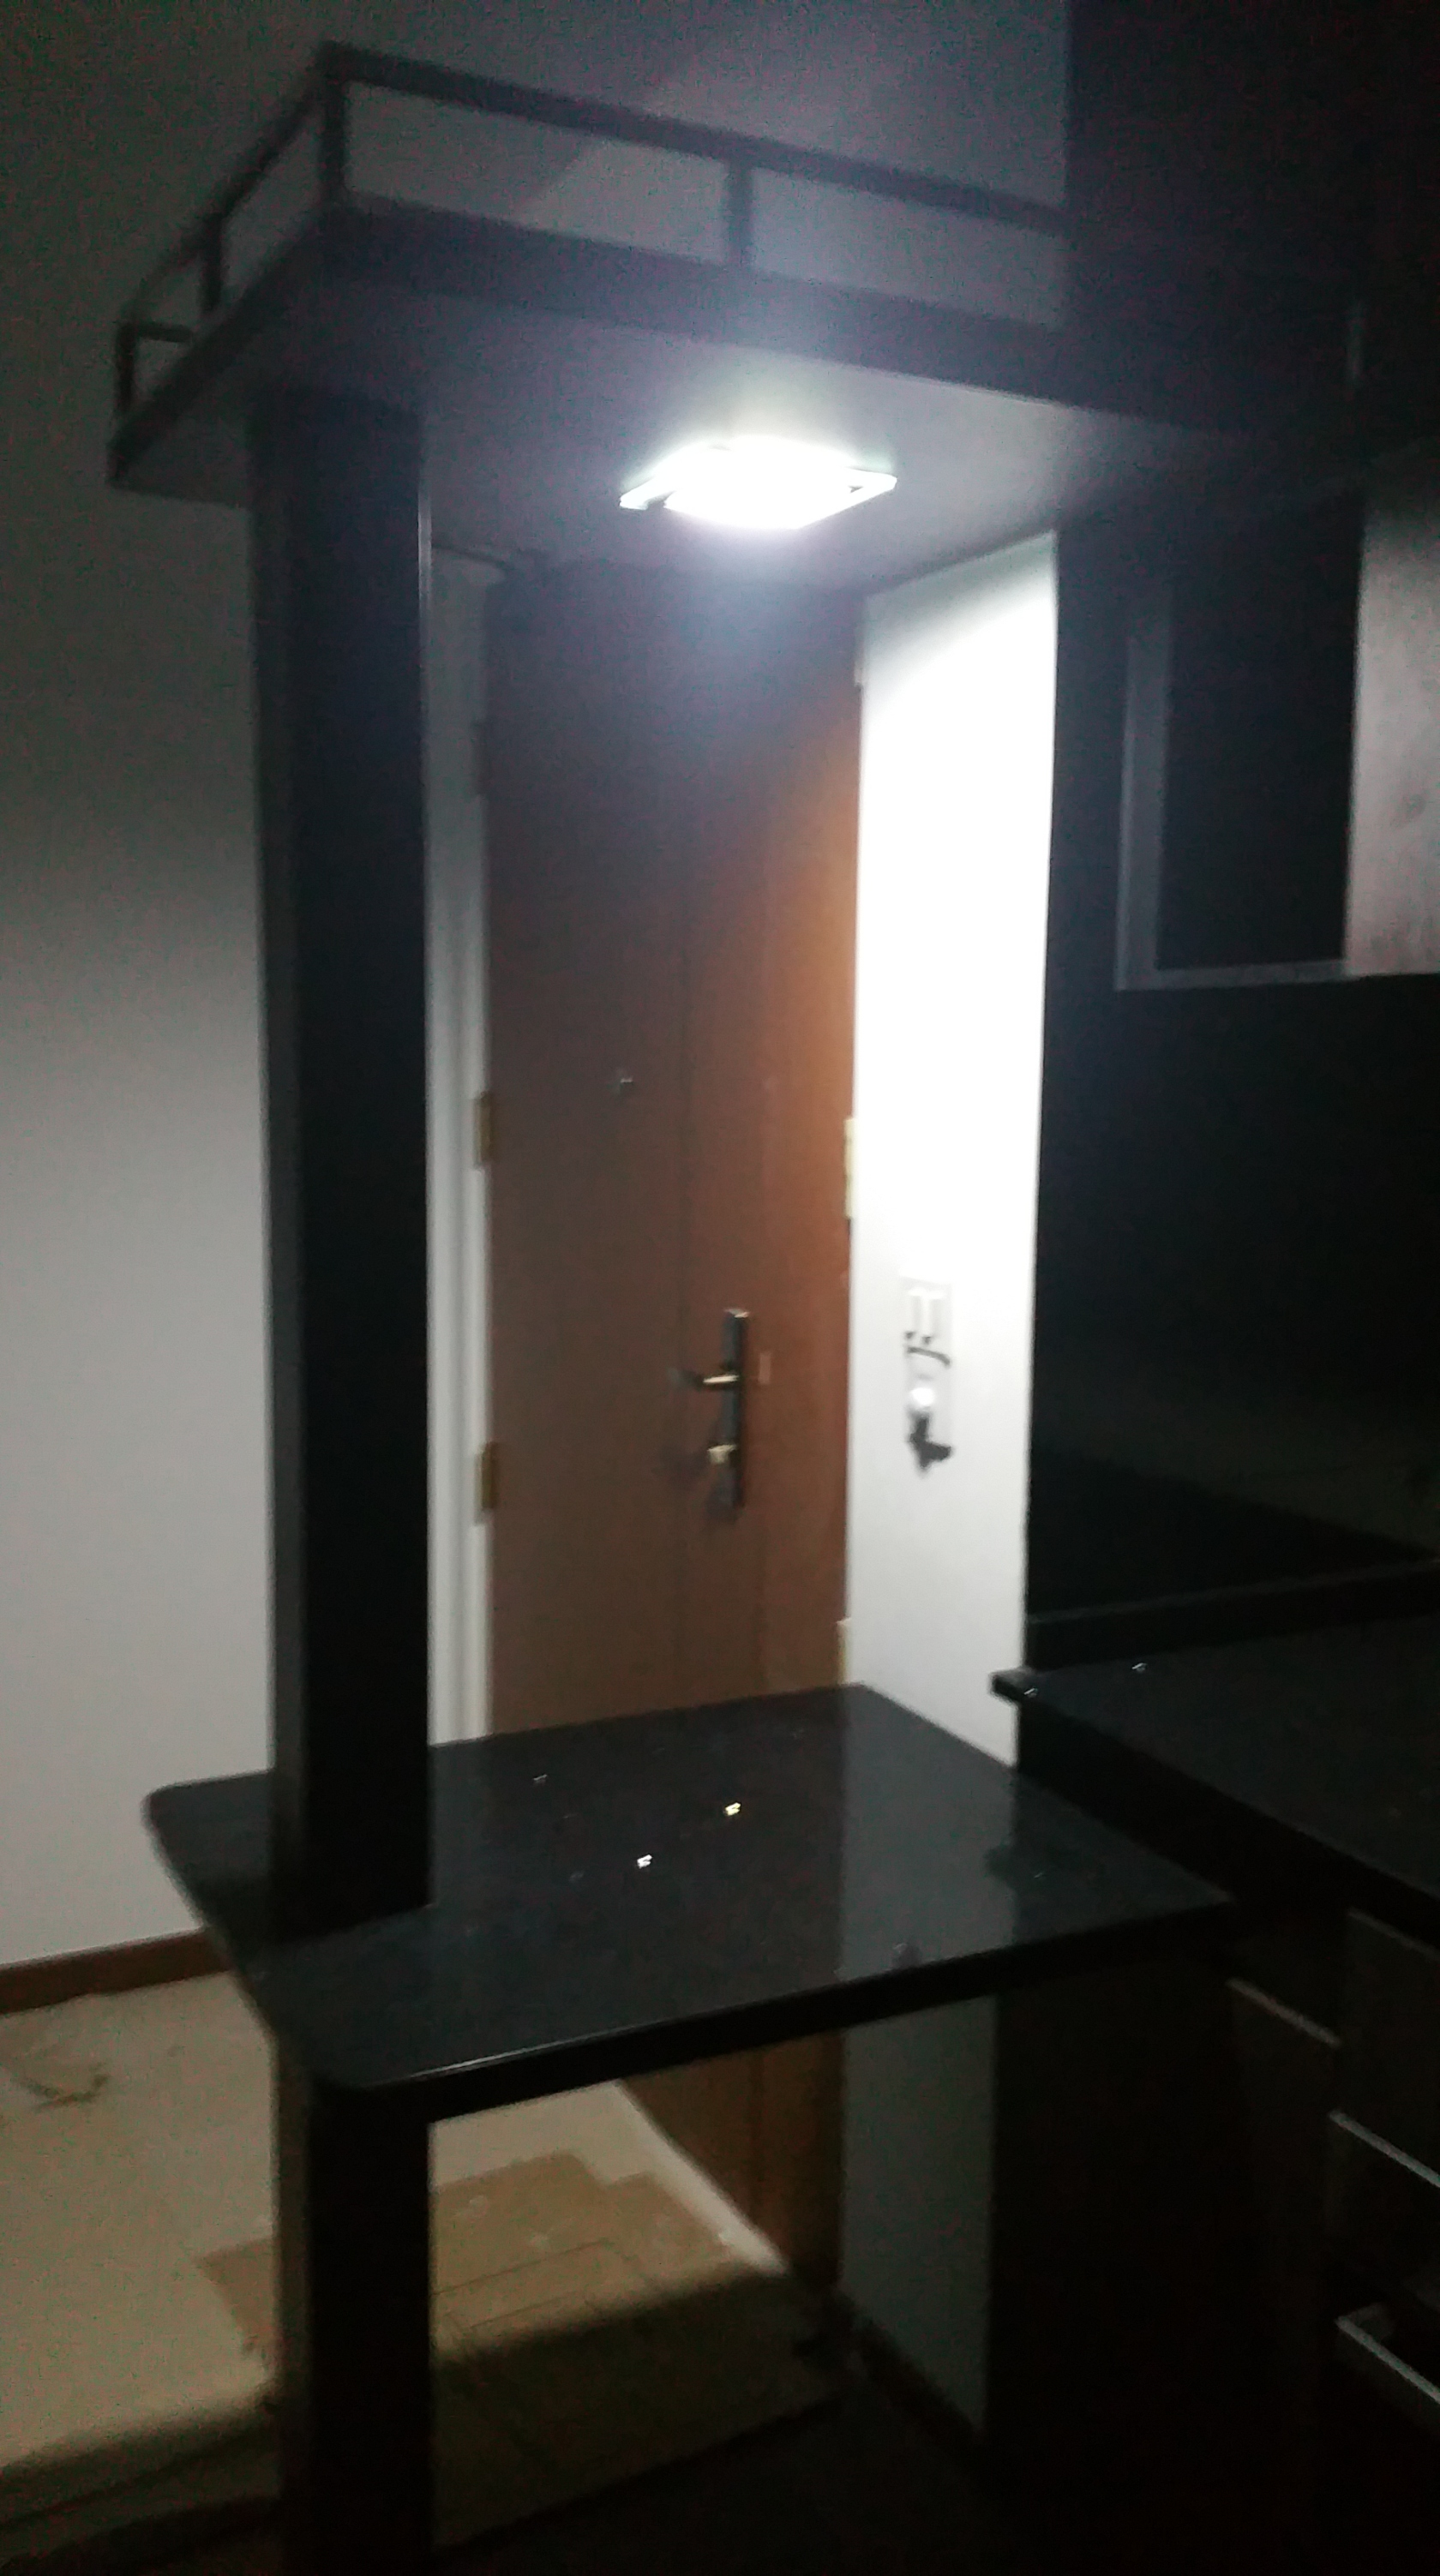
---------------------------------------------------------------------------------------------
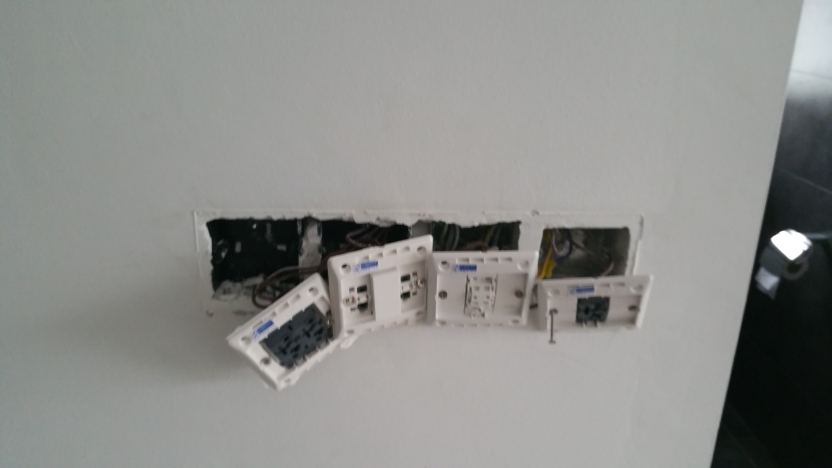
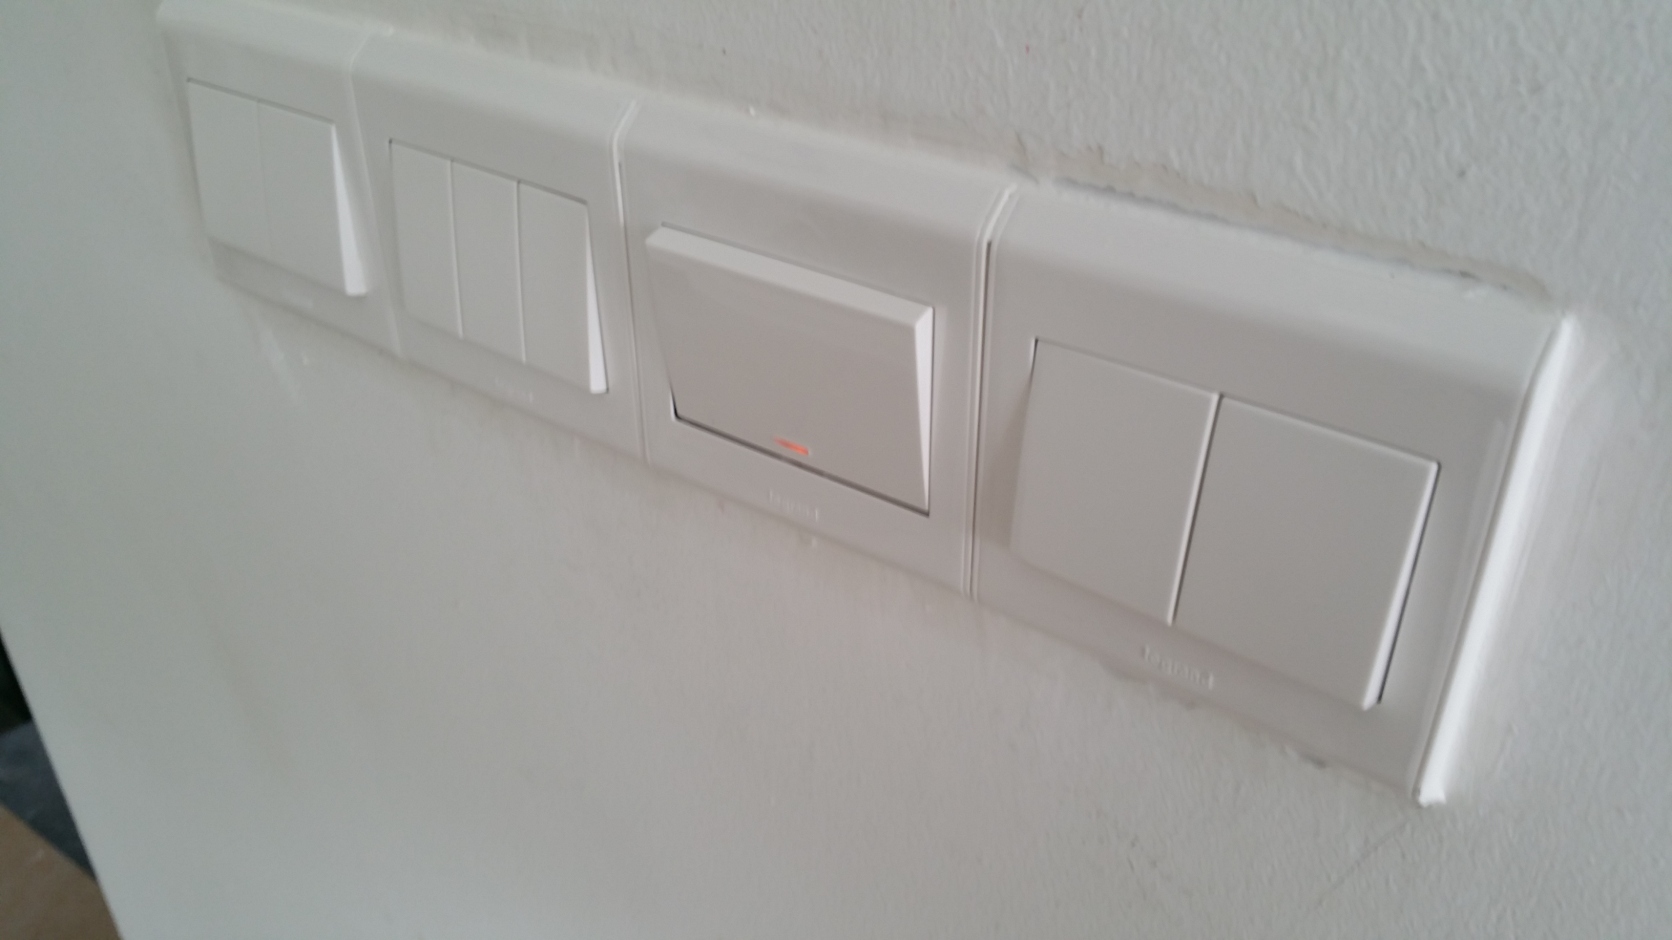
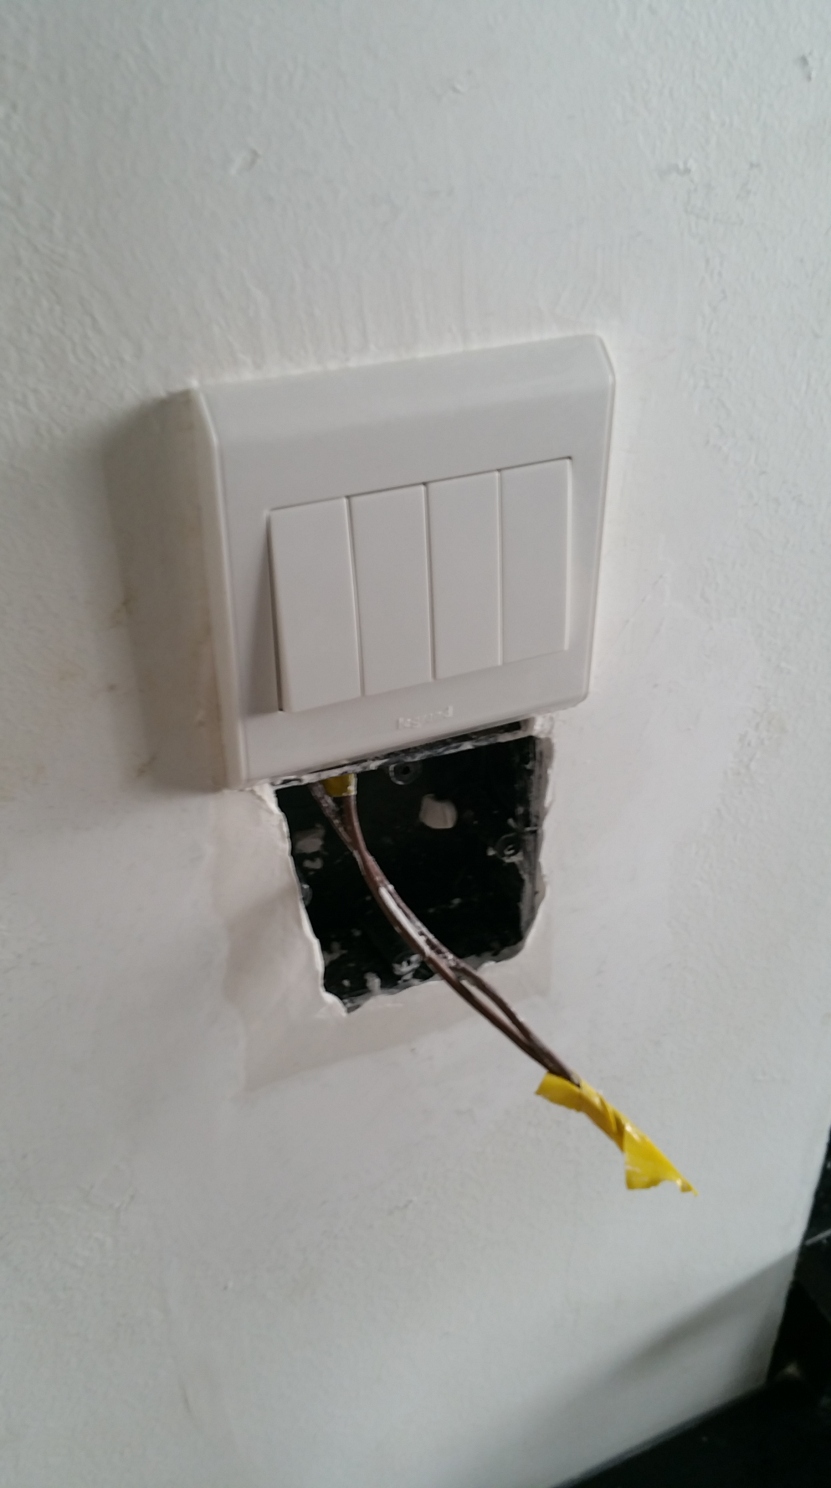
Next up, the switches are all aligned properly and look much nicer now.
This issue had been bugging me for the longest time, and I’m glad that it is finally resolved!! Hooray!!!
Switches are finally properly aligned
(Just need Painters to do some touch-ups at the edges)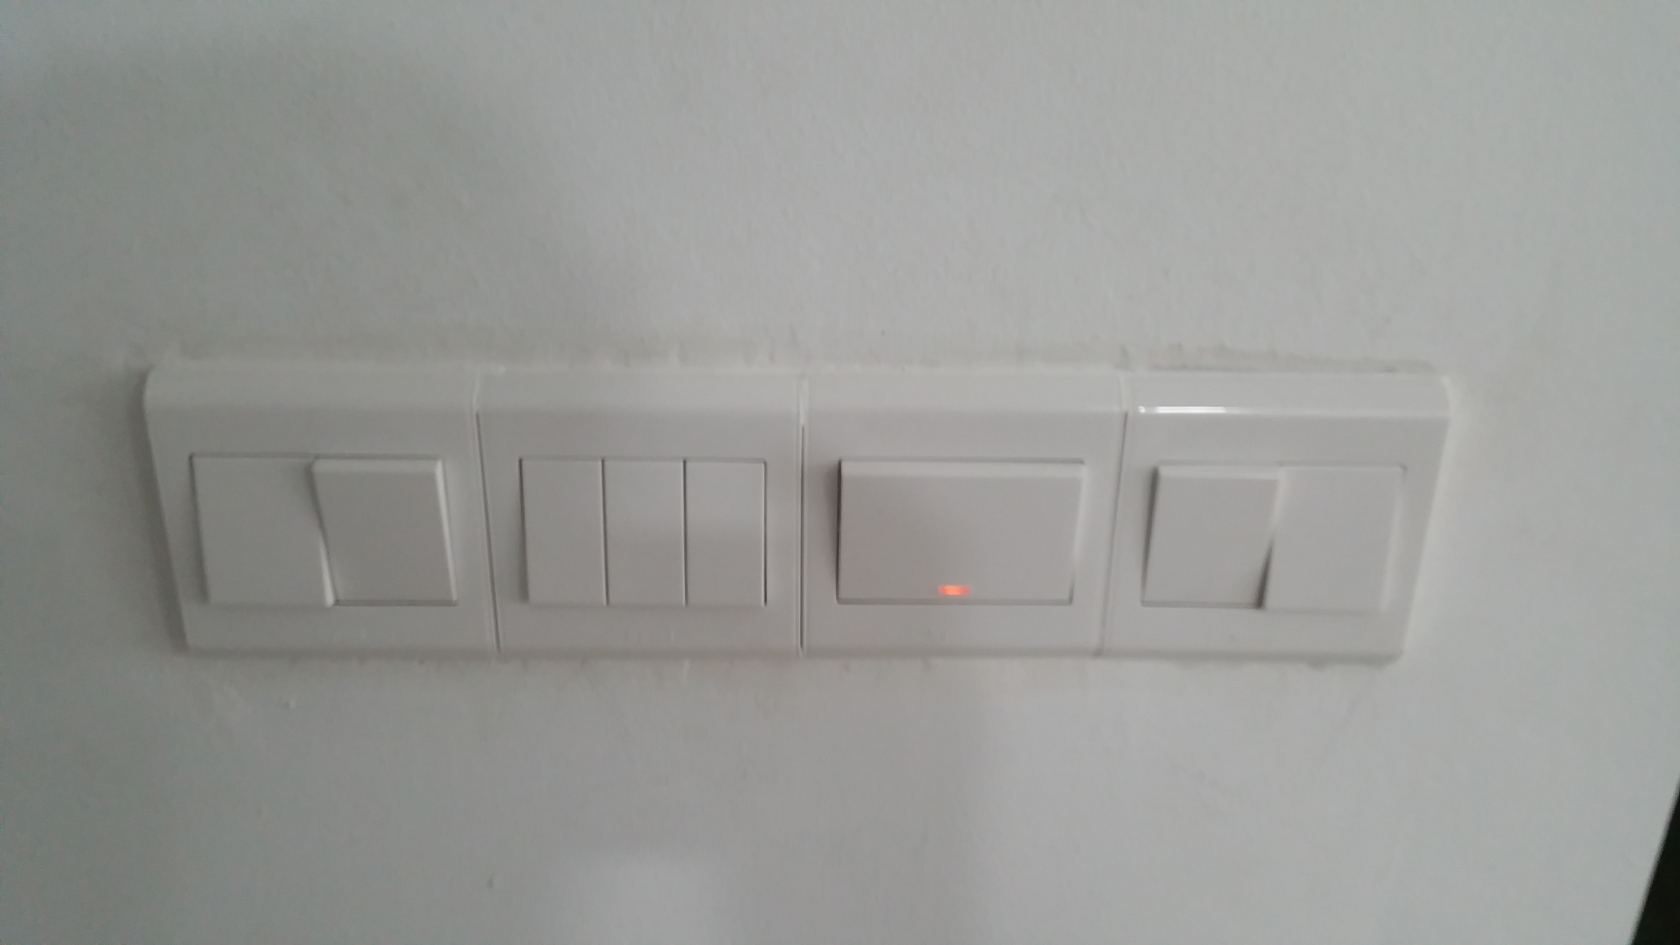
Fan Regulator also nicely aligned with the Light Switch
(Also need abit of touch-up at the edges by Painters later)
---------------------------------------------------------------------------------------------
And finally, the technical issue where Electricians couldn’t install the
LED Strips on the opposite side of my Kitchen is also resolved.
---------------------------------------------------------------------------------------------
So yah it is a small update, but if you’ve been following this blog, you’ll know that all these
issues have been plaguing me since they occurred. (Especially those misaligned switches)
I’m really glad the Electricians managed to finally resolve all of them!!
All that is left with now are Glass Works, Final Touching Up by Painters and Chemical Washing,
which should be done before the end of the week. (Aircon will be next week I think, I’ll need to re-check with Jason on this)Once again, thank you for visiting, and I’ll see you in the next Blog Entry!!
Click Here for the Next Blog Entry:
9th Week after Key Collection – Chemical Washing Done. Everything is SO CLEAN!!
Click Here to go back to Page 1 - Table of Contents -
37 minutes ago, Diluted said:Wow.. your house with the lighting all installed really brings it to another level! Nice and cosy!
Actually the switches look fine to me now. Doesnt seem very crooked as compared to your earlier posts. Mind sharing what’s still not acceptable there?
I went to Ikea to measure the curtains. The dimensions stated on the website is for one piece of the curtain. So one pair’s coversge will be twice the width.
Thanks very much!
")
Switches are less crooked, but the water heater button has a noticeable gap when i turn it on.
Also the fan regulator and switches aren't aligned. Also a few little gaps that is not immediately noticeable on pictures.
Oh ok so curtain dimension is for 1 piece. Good to know thanks! -
13 minutes ago, jothm said:Maybe there are those flow re-stricter inside the shower head? I've read some where that it could be remove.
Ya i also tested out dig out the rubber thingy, still lose to HDB shower head lol!!
of course i never dismantle the whole thing. just that little rubber ring.
One thing is for sure, Instant Heater water pressure CONFIRM lose to Storage Tank.
My friend using instant heater, using the exact same HDB shower head as mine,
and his water pressure is noticeably weaker.
So if anyone wants to have stronger water pressure, storage tank is definitely the way to go. -
26 minutes ago, andotang said:Did you tested it with the heater on? I also had grohe and if the heater is not on,
the water is weaker as some water from the hot pipe is not pumping out.
Ya tested with Heater already on. I remembered it was on for at least half hour.
Even when water heater is on, if water not hot, the pressure also weak,
only if water in the heater is hot, the pressure is good on grohe.
Tested the water, of course not boiling, but sufficiently hot, still lose to HDB's default shower head.
But also depend on the mixer you have on how the hot and cold water is mixed.
I feel is also a physics issue also. My Grohe shower head is bigger than the HDB shower head,
so i'm guessing maybe that is also a factor? Maybe water need to travel longer, and thus the
water pressure is reduced? hahaha
I can only say after using for sometime as i also experience weak water pressure
that I found out heater must be on and water must be hot to give good pressure.
Only for storage heater, not instant heater. also shower head also have option to turn,
if set to rainshower, water is weaker as it try to simulate water droplet effect, have to
set to normal spray to get better jet. mine also have a jet setting which spray something
like your bidet spray. I am using the Euphoria 180 as attached below which have this problem.
Ya i also tried the different water settings on the Grohe Shower head.
One is so called "Air Technology" mix water with air. I don't like this one very kaopeh and noisy lol!! Somemore Water pressure also weak.
The other one is Rain, which i tested as shown in the pictures.
3rd one is the narrowest beam of water like hose like dat.
At first I also wanted to get Rainshower, but I decided that since my bathroom too small
to put bathtub, I personally feel Rainshower is like wasted lah. (Nowadays water tax also increased liao,
don't use rainshower is also save money lah ) For me is pretend my shower head is rainshower can already.
Interestingly, when I put my Grohe Shower head at the top most of that vertical shower bar,
the water pressure feeling is noticeably much stronger, and I would say a ... "Softer" feeling type of water?
Got a .... "Stand in Rain" kind of feel, very hard to describe.
HDB's default shower head ironically while water pressure is stronger, the feeling feels.....like very harsh like that.
Obviously gravity has a part to play also lah hehehe. But for now, i'm sticking with HDB's default shower head lah
Well the only complaint i have is it's so tough to keep those shine on
stainless steel equipments, keep getting water mark, need to buy a lot of $2 magic spoonge from daiso.
Does this also affect Grohe products? I thought people buy Grohe is because their so-called "Starlight" technology
make the shine last more longer right? The magic sponge u mentioned sounds interesting though. Mind sharing how it looks like?
What i've read is people using Autosol to maintain the shine? I'm not sure I'm that diligent to do that LOL!!

-
3 hours ago, huairen said:Is there a maximum height for platform bed?
i want to make a 450-500mm high storage platform bed but my ID says is not allowed by HDB.
true?
Hi huairen, there is no such rule as far as I know.
that said, 500mm is quite high for a platform bed?
are you intending to sit on it with your feet be able to touch the ground?
You need to take into consideration that you will also have a mattress which will elevate the height
even higher. (~ 10 inches / 25.5cm) and that may be a safety hazard if the entire height of the
platform bed + mattress rises too close to your bedroom window, as you actually run the risk of falling off. -
6 hours ago, blubugs said:I experienced this in my flat as well. An expensive shower head gives very weak water pressure while a cheap cheap shower head has proper water pressure.
This is why I am not keen to spend on expensive shower heads. In the end, I gave the expensive shower head to my sibling.
Hahaha ya. So surprising HDB default shower head worked so well. Heng I never throw it away
-
Blog Entry Date: 13th November 2017 Monday
Click Here to go back to Page 1 - Table of Contents
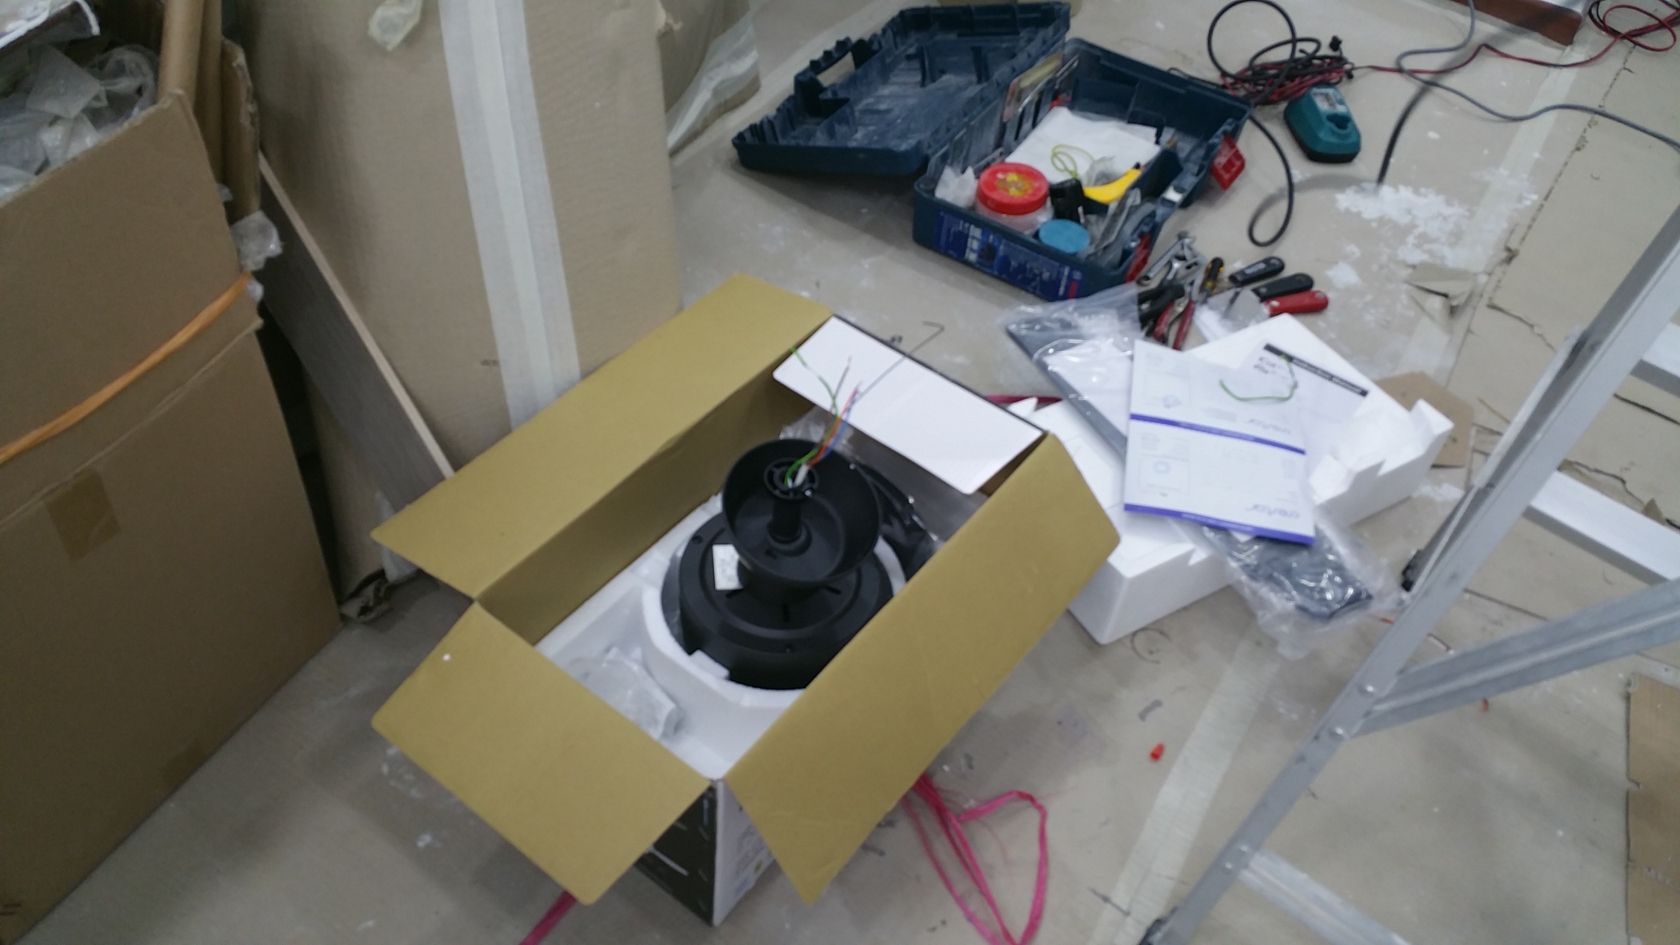
9th Week after Key Collection - Ceiling Fan is UpGonna be a short update for this one.
I scheduled for the Ceiling Fan technician from Sembawang Lighting House
to come up and install the Crestar Icol 46″ Ceiling Fan that I bought earlier.Unboxed and ready for Installation
Drilling and mounting the Ceiling Fan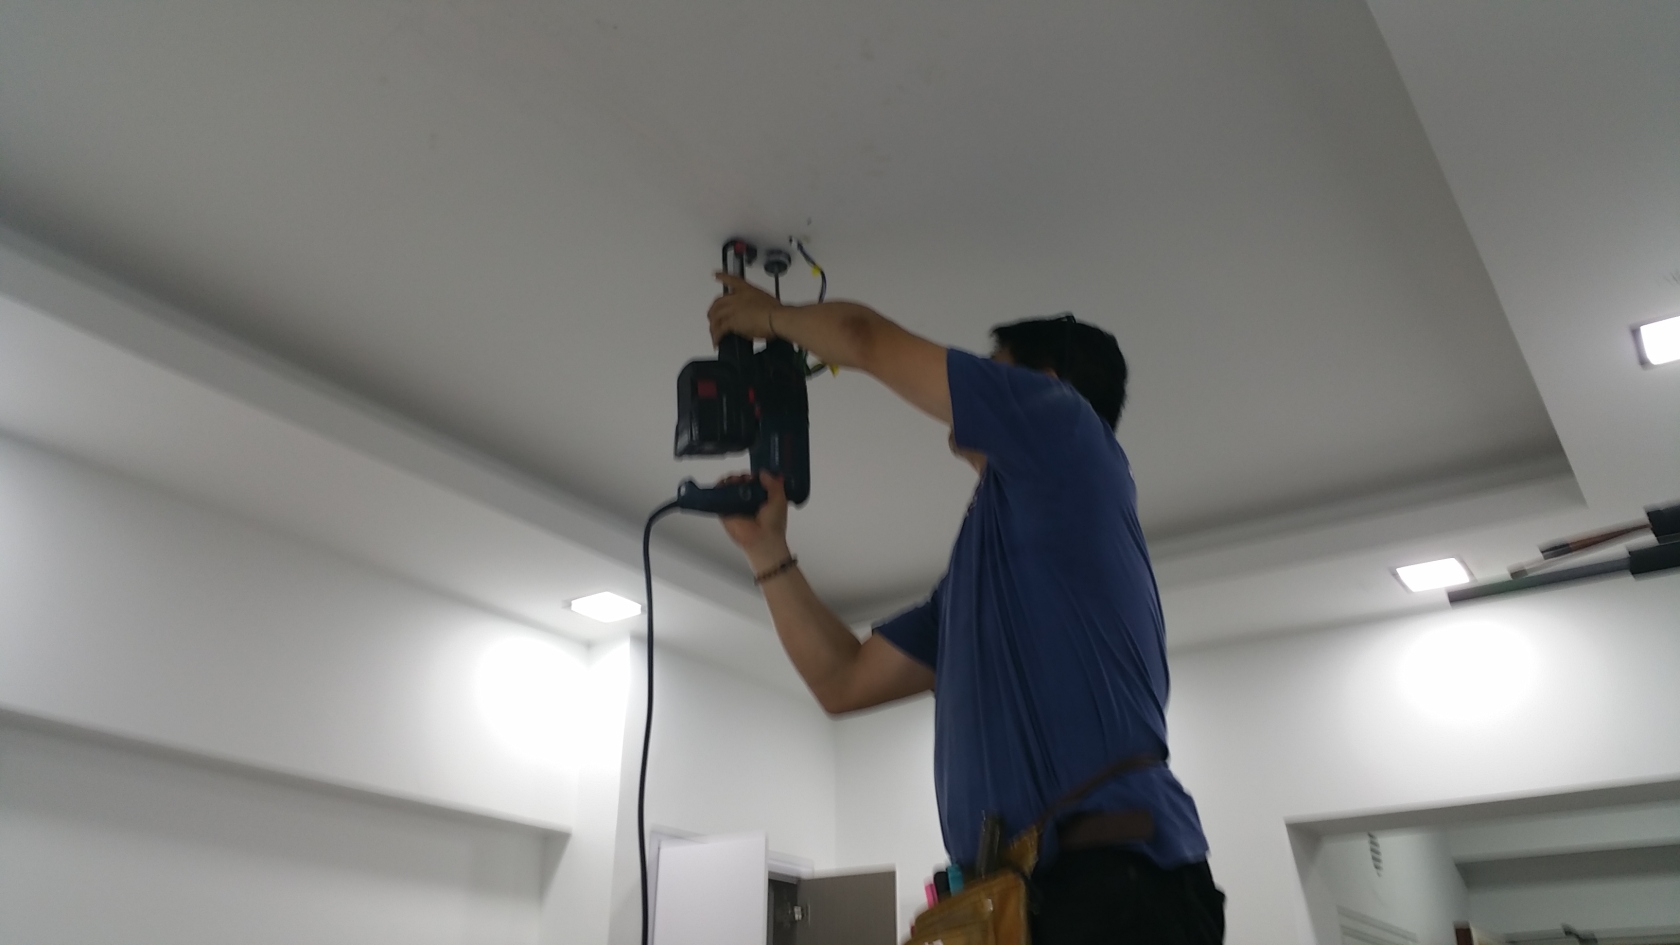
Installing the Wall Regulator at the Hole that the Electricians made earlier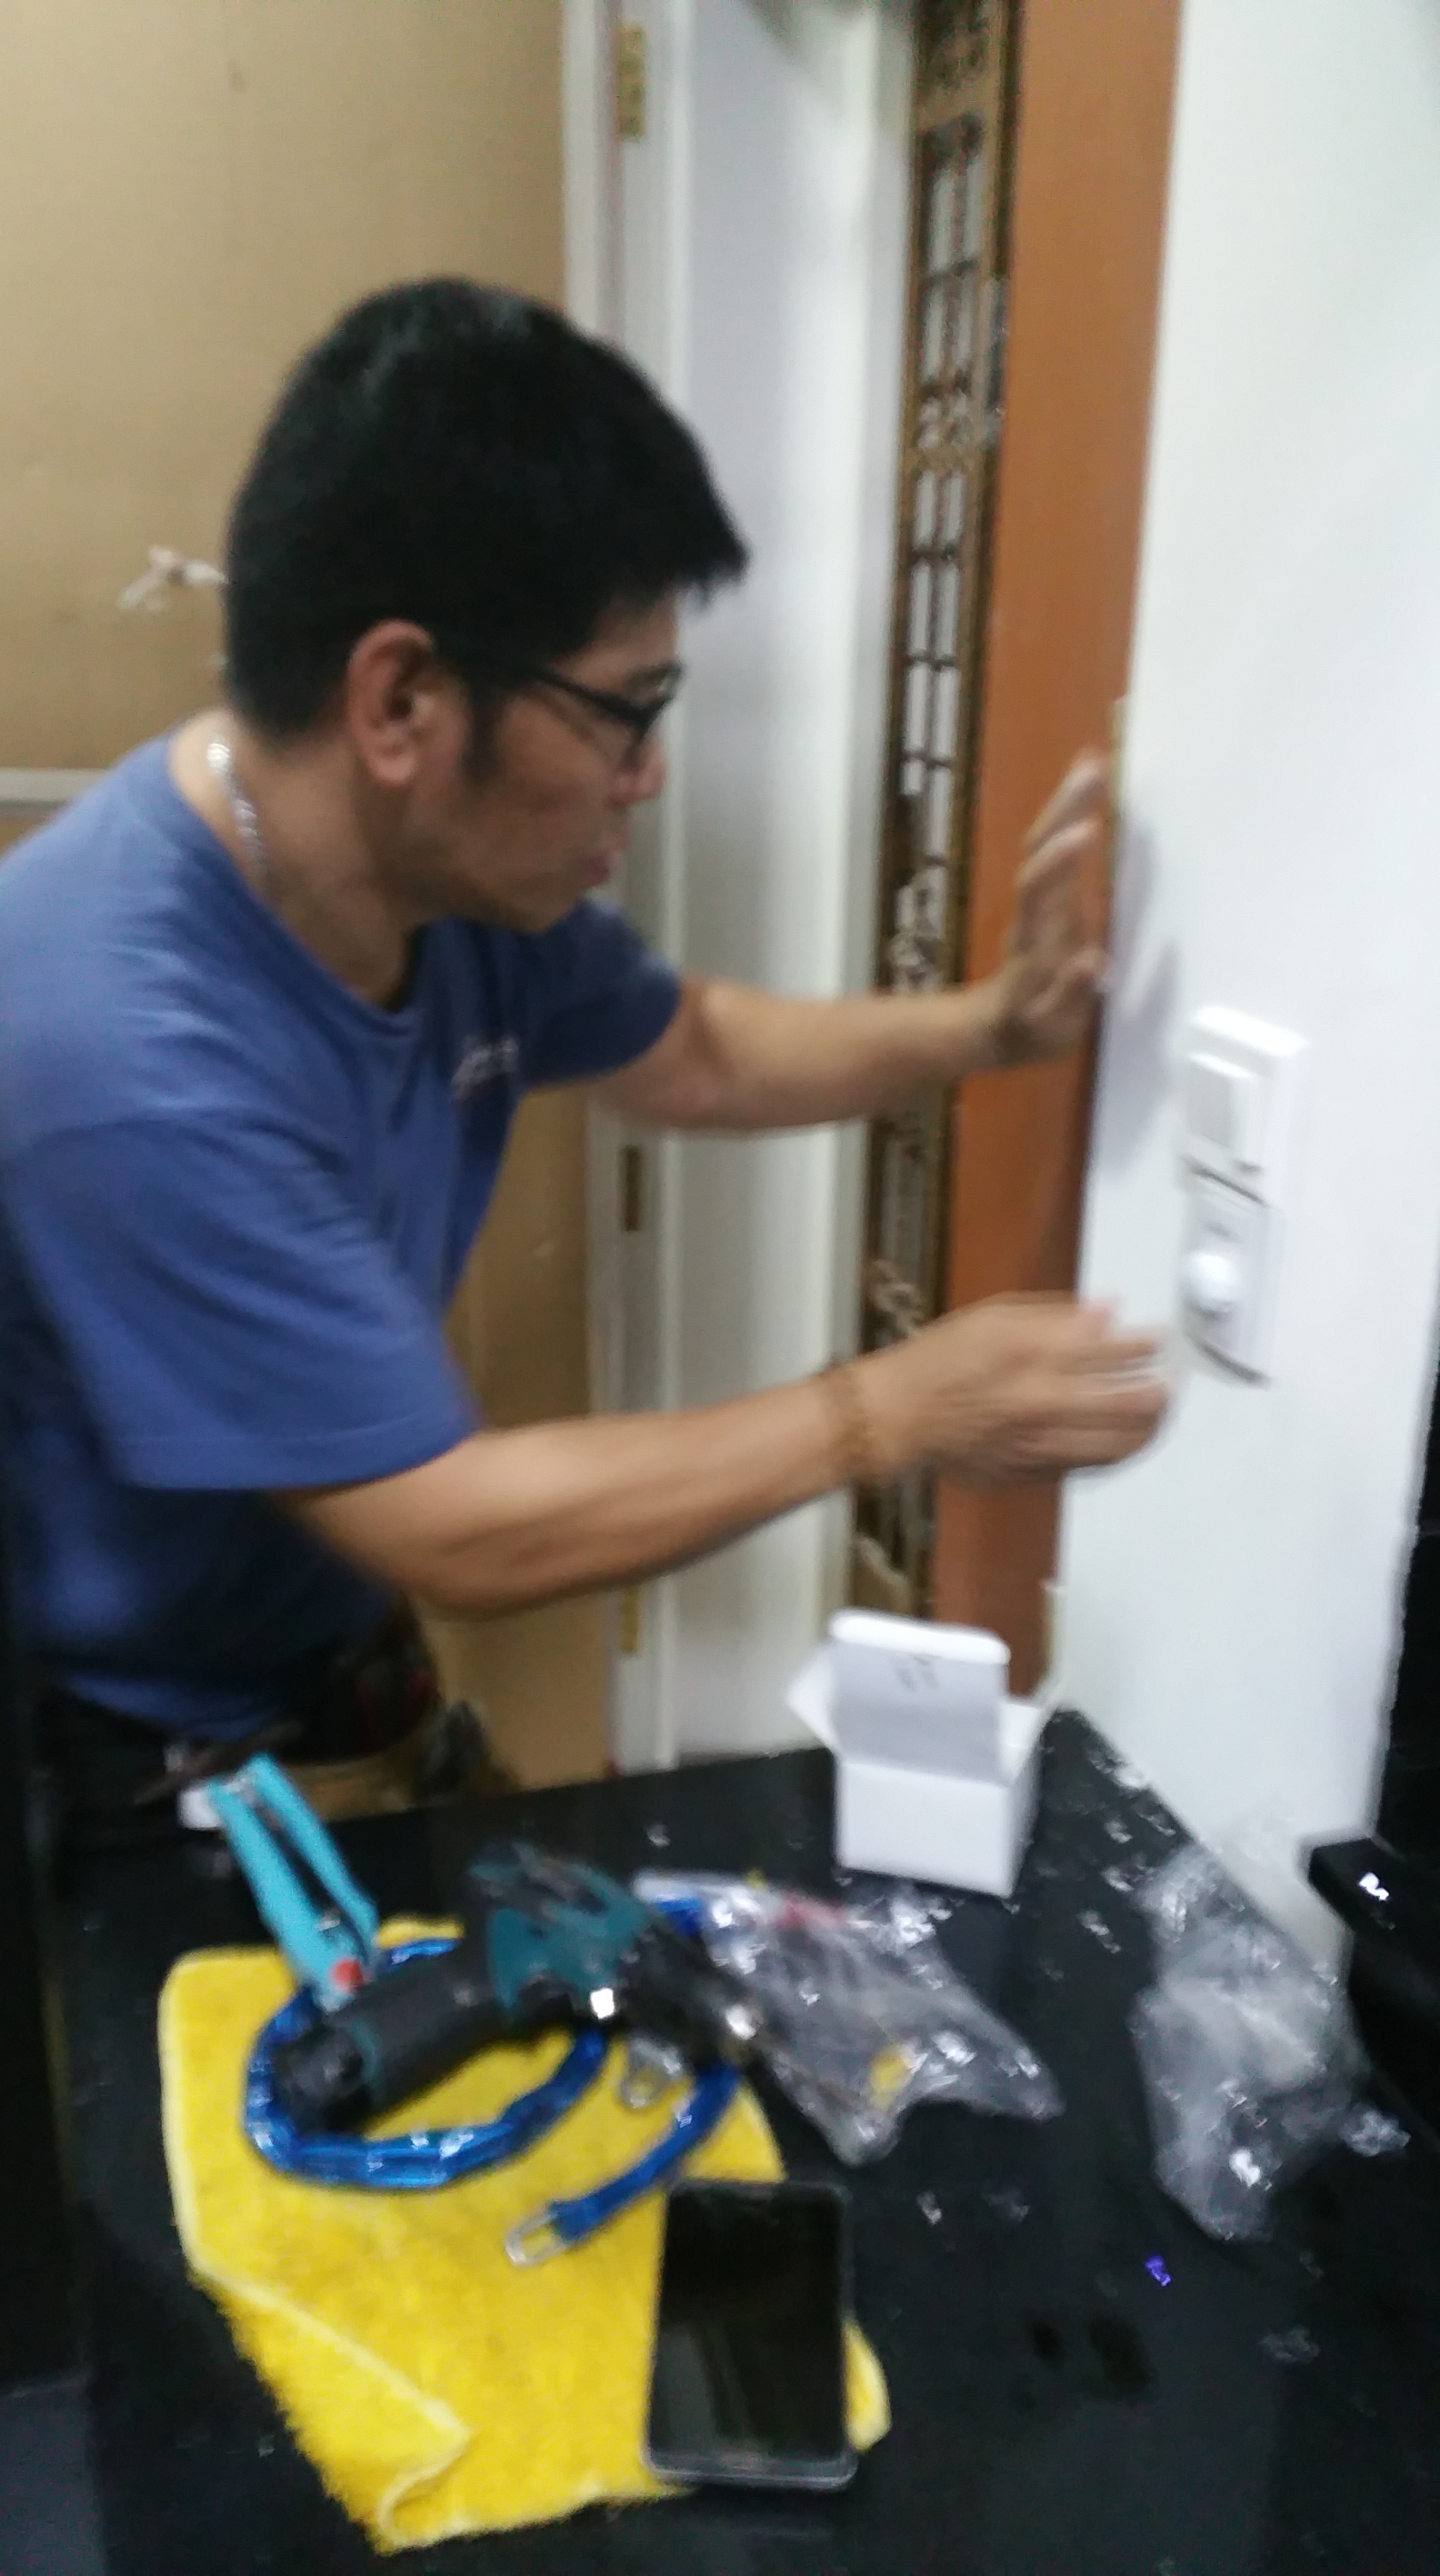
Alignment isn’t ideal, but it should hopefully be sorted out by the Electricians
when they come by to re-do my switches and outstanding electrical works again.
(I don't seem to have any luck when it comes to Wall Switches it seems)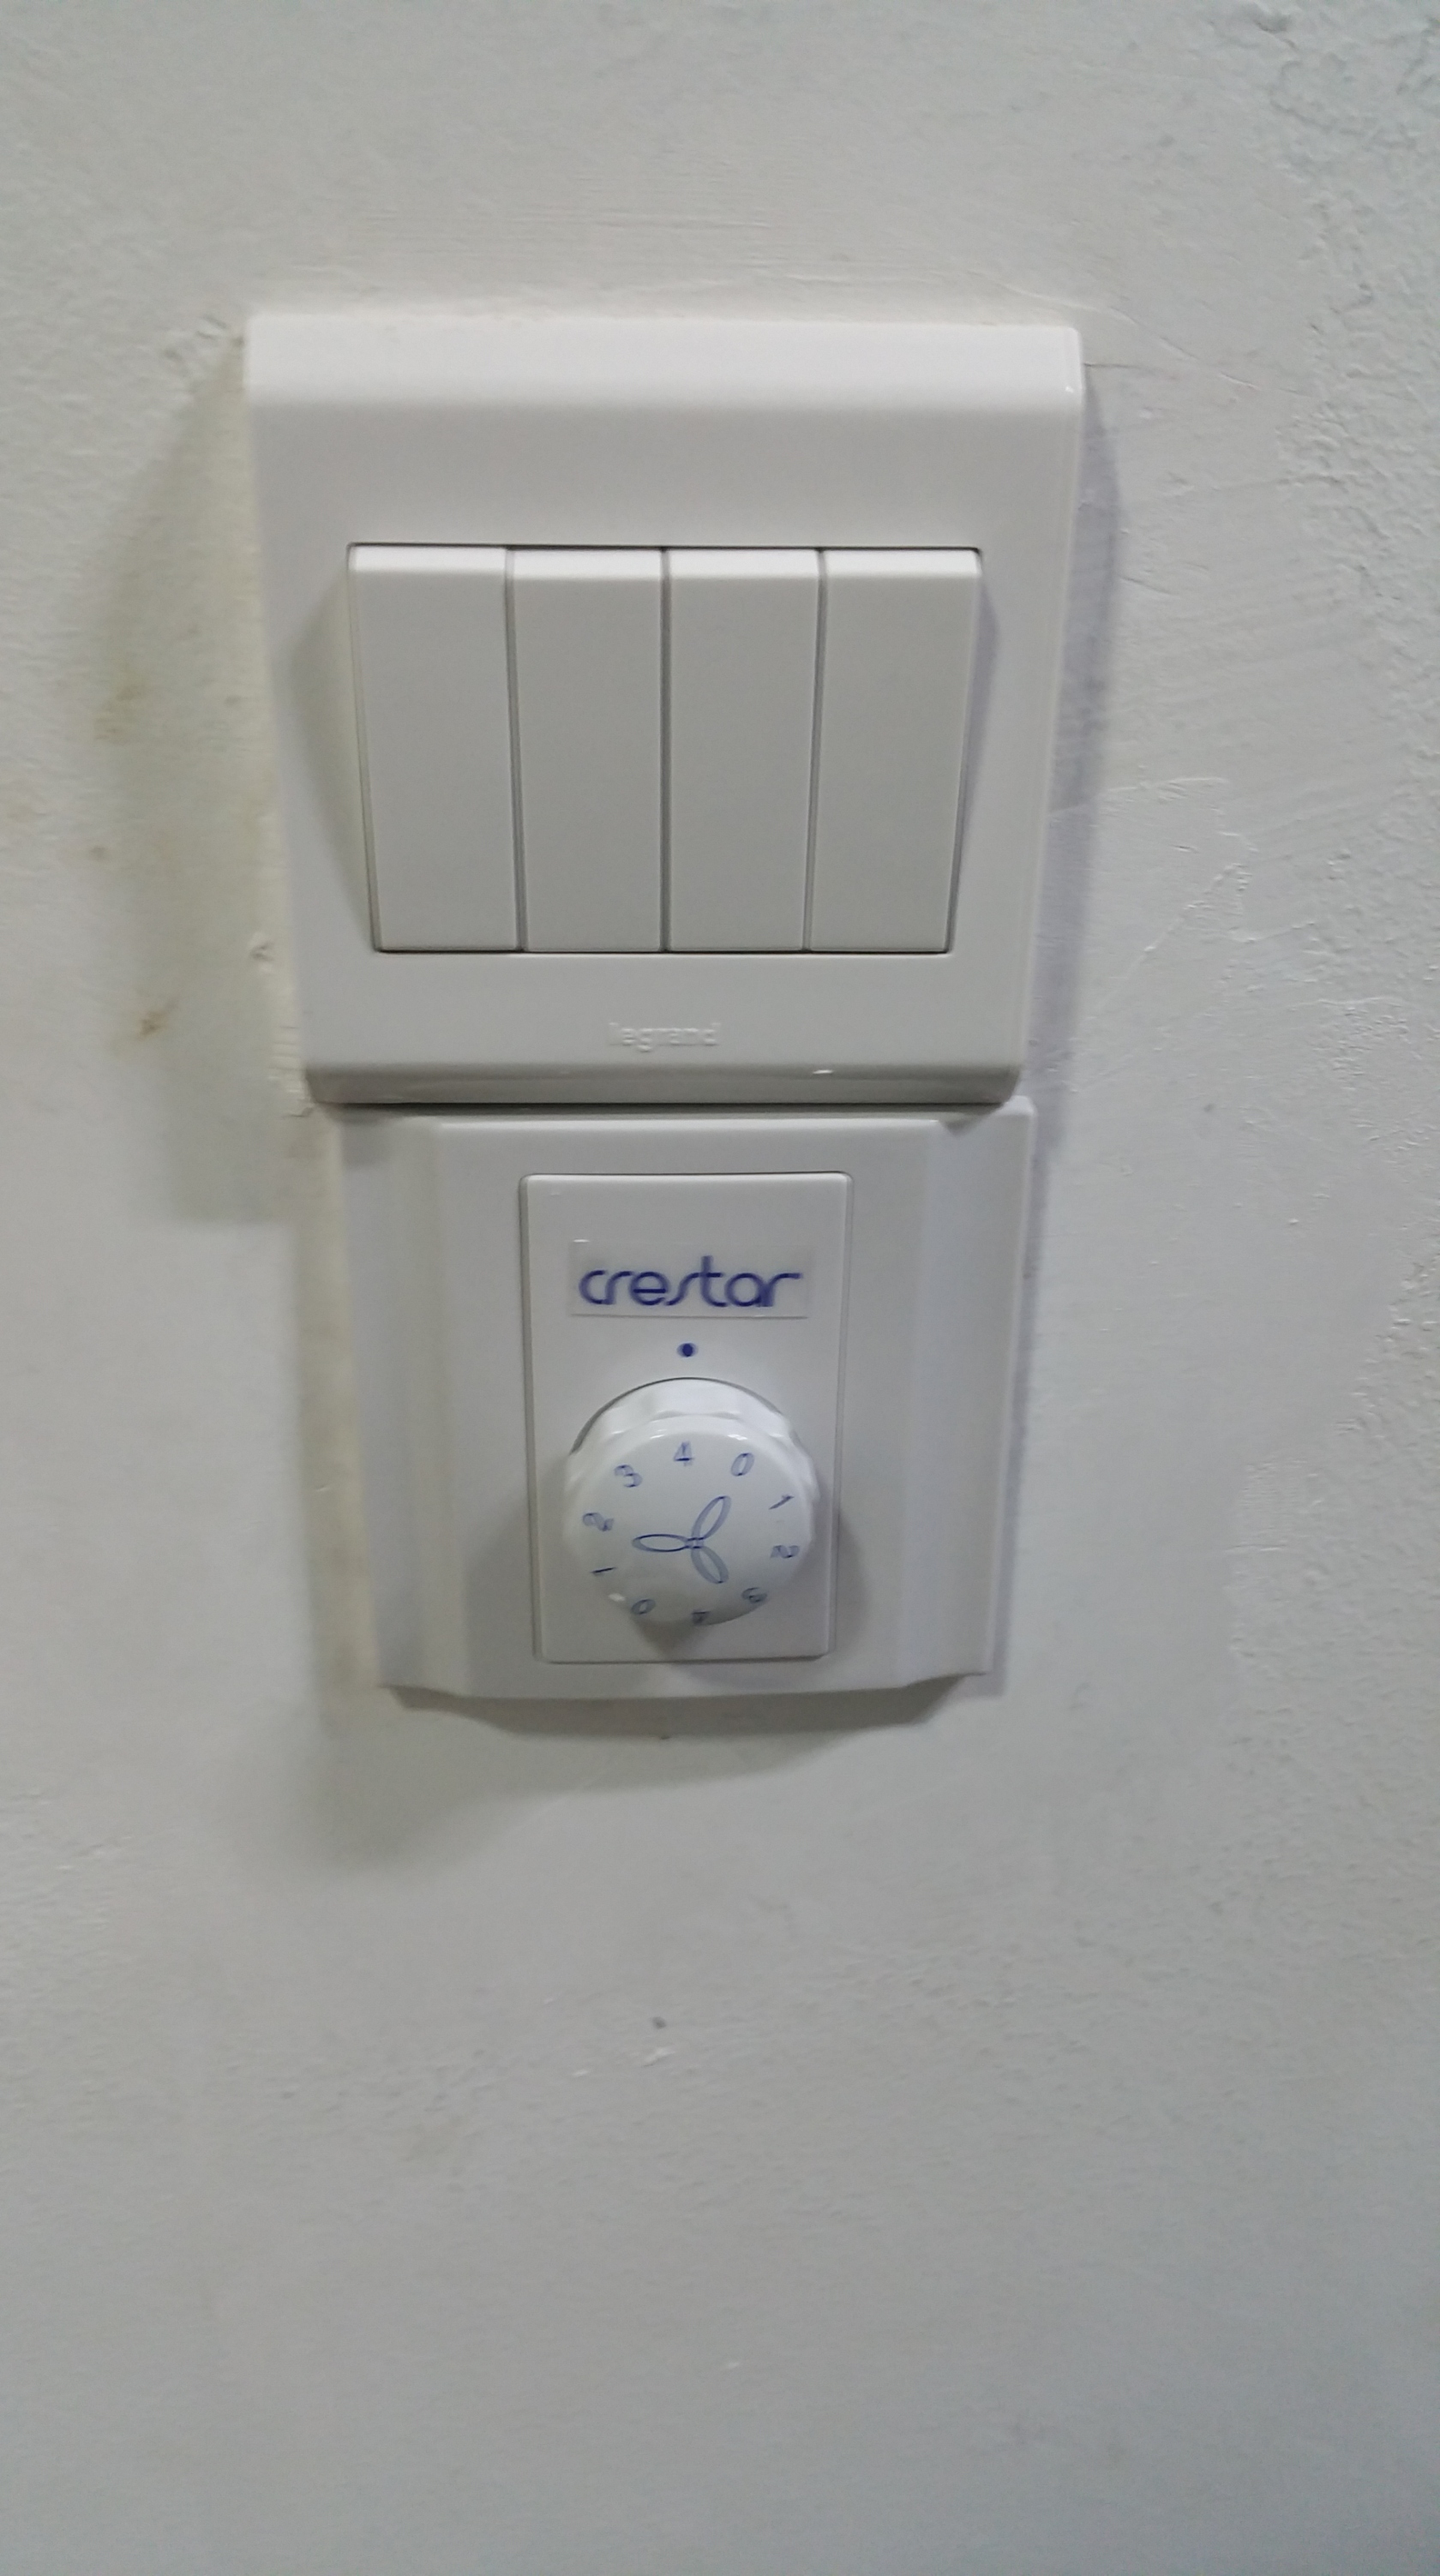
Ceiling Fan installed and Ready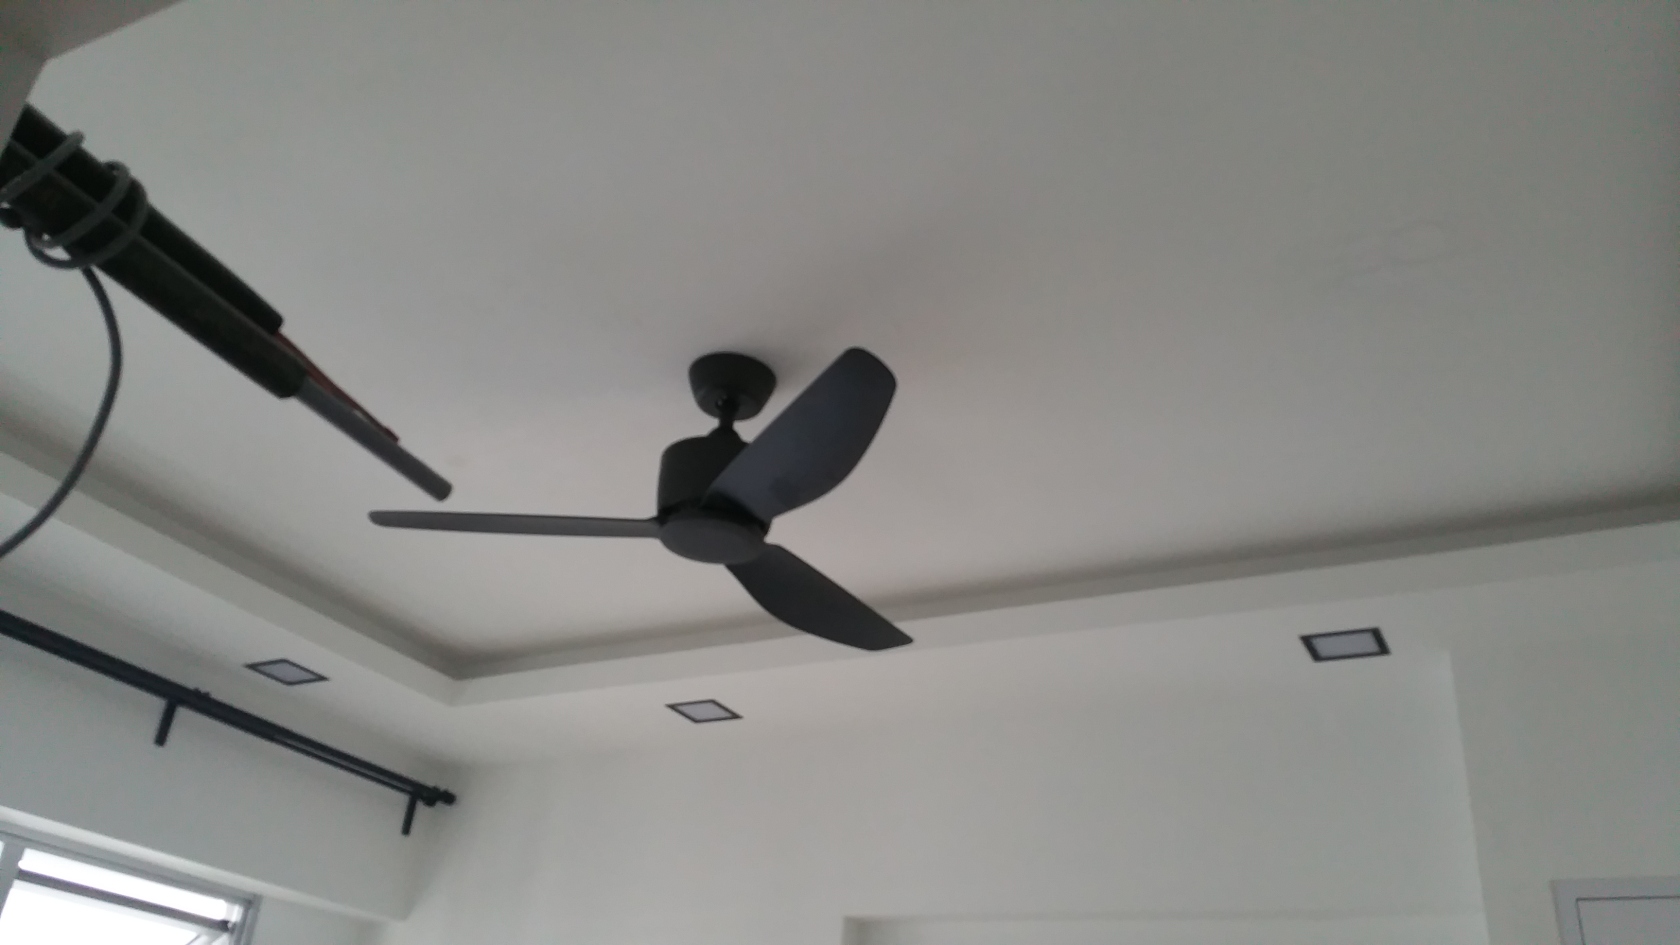
Ceiling Fan in Motion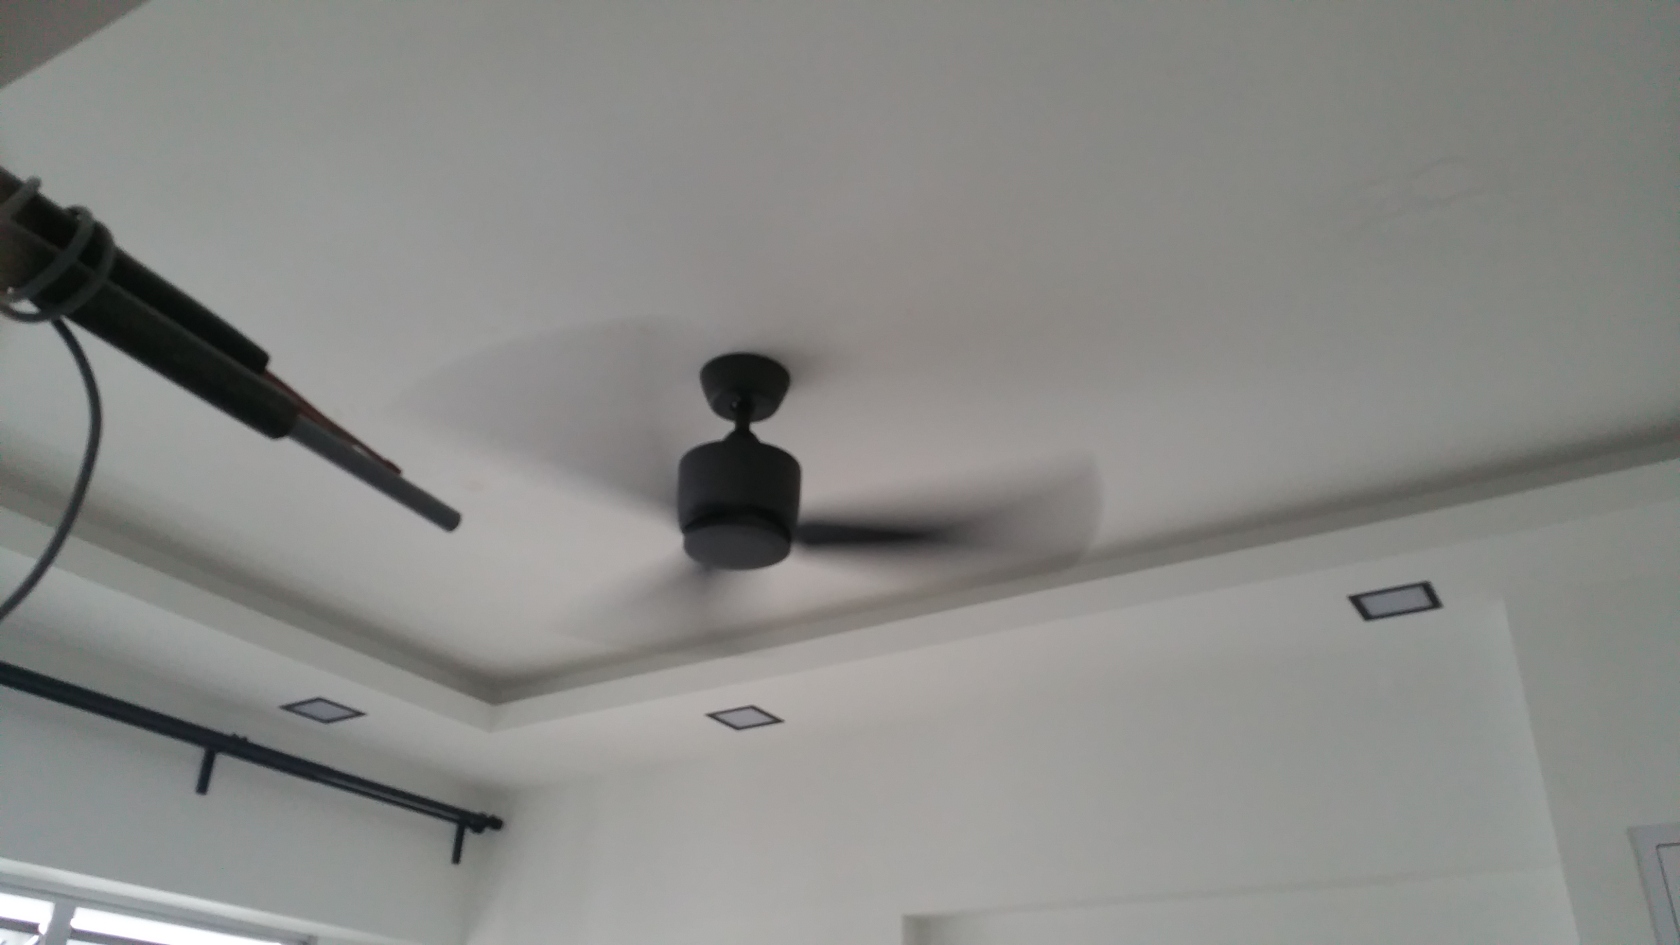
My Personal Review so far.
The technician from Sembawang Lighting House was very punctual.
In fact I was the one abit late because I was rushing back from work lol.
Fan looked and felt stable so far after about 2 hours of continuous usage.
Sound-wise, it was pretty silent during operation.While this Crestar Icol Ceiling Fan certainly looks sleek and modern looking,
I find that unless you stand directly under or very near the fan, you actually
won’t be able to feel any wind even at Maximum Speed.The air definitely feels more breathable and cooler with it around of course,
but I’ll have to be honest, it isn’t really worth $248. So if you are able to position it in such
a way that you are directly below it, this may be worth it for you if you also like the look.
So yea, only a short update today.
Just a couple more days before the unofficial end of the renovation!I’ll see you in the next blog entry!
Click Here for the Next Blog Entry:
9th Week after Key Collection - Electrical Issues are ALL FINALLY RESOLVED
Click Here to go back to Page 1 - Table of Contents -
2 hours ago, andotang said:Hi Ryanyth, I believe ikea curtains uses some kind of ring to pass thru the pole to hang them, so my understanding is your curtain cannot pass thru each L bracket as it is obstructed by those ring on the fabric curtains. Some curtain is you insert the whole pole into the fabric curtain. Does this mean that your curtain will not be be able to open/slide to both side to leave you with a nice opening in the middle, because from this picture I am curious at how the middle portion of this curtain is able to slide to either side, your curtain will have one piece in the middle permanently? If you do 3 L bracket instead of 4 then the logic is you still can slide them to both side.
Hi andotang, very perceptive yes.
I don't intend to draw curtains fully. Ikea does have this ring accessory you mentioned but I did not get it.
The curtains that I bought have these cloth loops in which I can insert the poles.I don't intend to move the curtains often because you know la ikea isn't known for durability.
Also, i understand curtain got 2 ways to do it. One is using curtain track, the other one is pole.
Curtain track is better designed for people who prefer to fully draw open their curtains regularly.
But then again, curtain track disadvantage is easily trap dirt, but pole is easier to clean.
While pole can also draw open curtain, there is additional stress when you draw it open because of friction
whether using loop or not. Somemore this MAJGULL Black-Out curtain I got also feels heavy.
Because the one I got is Pole, I suspect if I open and close curtain often, it will eventually stress out the
pole or the loop, or the ring and cause it to collapse. So while I'm not able to fully open curtains, I should
still be able to draw it aside and use a nice rope to tie them like this picture if I do want to open the curtains so to speak.
My logic is, the less I move the curtains, the less likely the curtain poles will collapse.
And additional kiasu-ness of making it 4 brackets hopefully will reduce this risk even more.I hope my theory works though, because its after all still an experiment.
-
Just now, daztan89 said:Wow, bro..
Like **** nice leh.. I still don't know what to do with mine yet.. Haha...
Thanks bro
Slowly, take your time. Take lots of pictures,
draw plenty of inspirations then slowly the look of your house will come to you
Be prepared though. Renovation is a very draining process. Very draining but very fulfilling
Good luck!! -
Blog Entry Date: 12th November 2017 Sunday
Click Here to go back to Page 1 - Table of Contents
End of 8th Week after Key Collection -
Installed shelves for DB-Box, Solving Electrical Issues,
and a Special Look at the Completed Works so far!
Hello everyone, so this is the 2nd post where I’ll talk about events that happened on Saturday 11th November 2017.
Before I do that, I wanna give a special shout-out to 2 lovely ladies who came over to take a look at my place
and they told me they’ve been following this renotalk blog? OMG!! Apparently, they are also my downstairs neighbour!?!!
I’m so sorry I didn’t manage to catch your forum nicks, also very paiseh my place looked so messy lol.
Whoever you are, THANK YOU SO MUCH FOR YOUR SUPPORT!!!
---------------------------------------------------------------------------------------------
Ok moving along. Guess what?
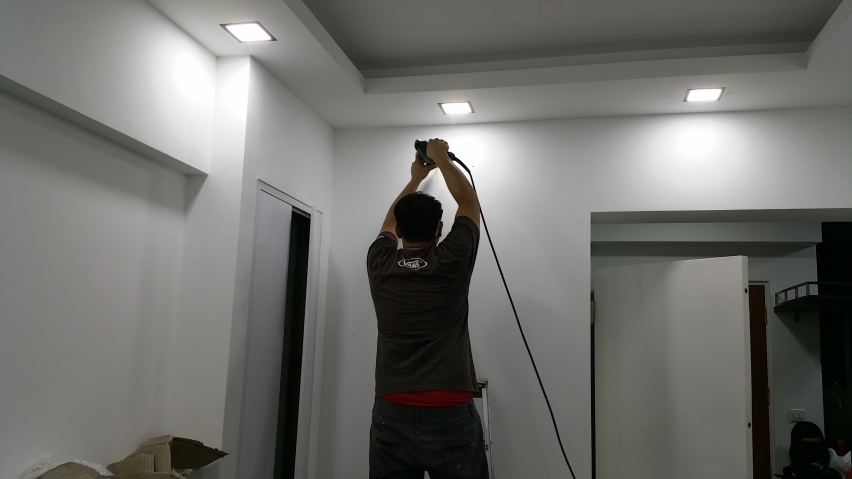
Apparently the DBBox Cabinet installation wasn’t quite finished yet, and the Carpenters came to install a couple of shelves for it.Carpenter working on adding Shelves to the DB-Box Cabinet
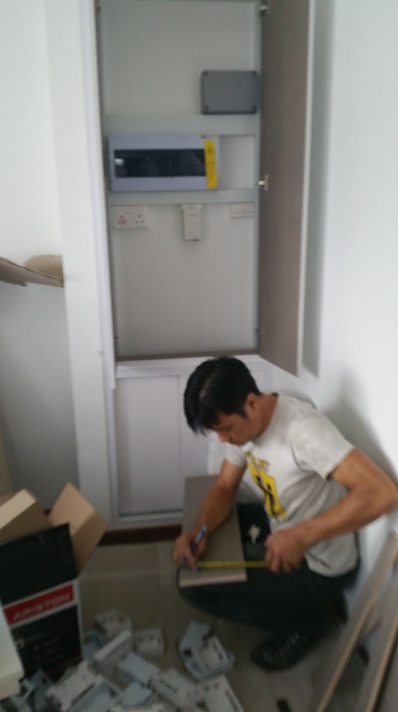

DBBox Cabinet Shelves Completed
Not bad, I can put my WIFI Network Router on it nicely I guess.
I requested for no shelves at the bottom sliding door area though.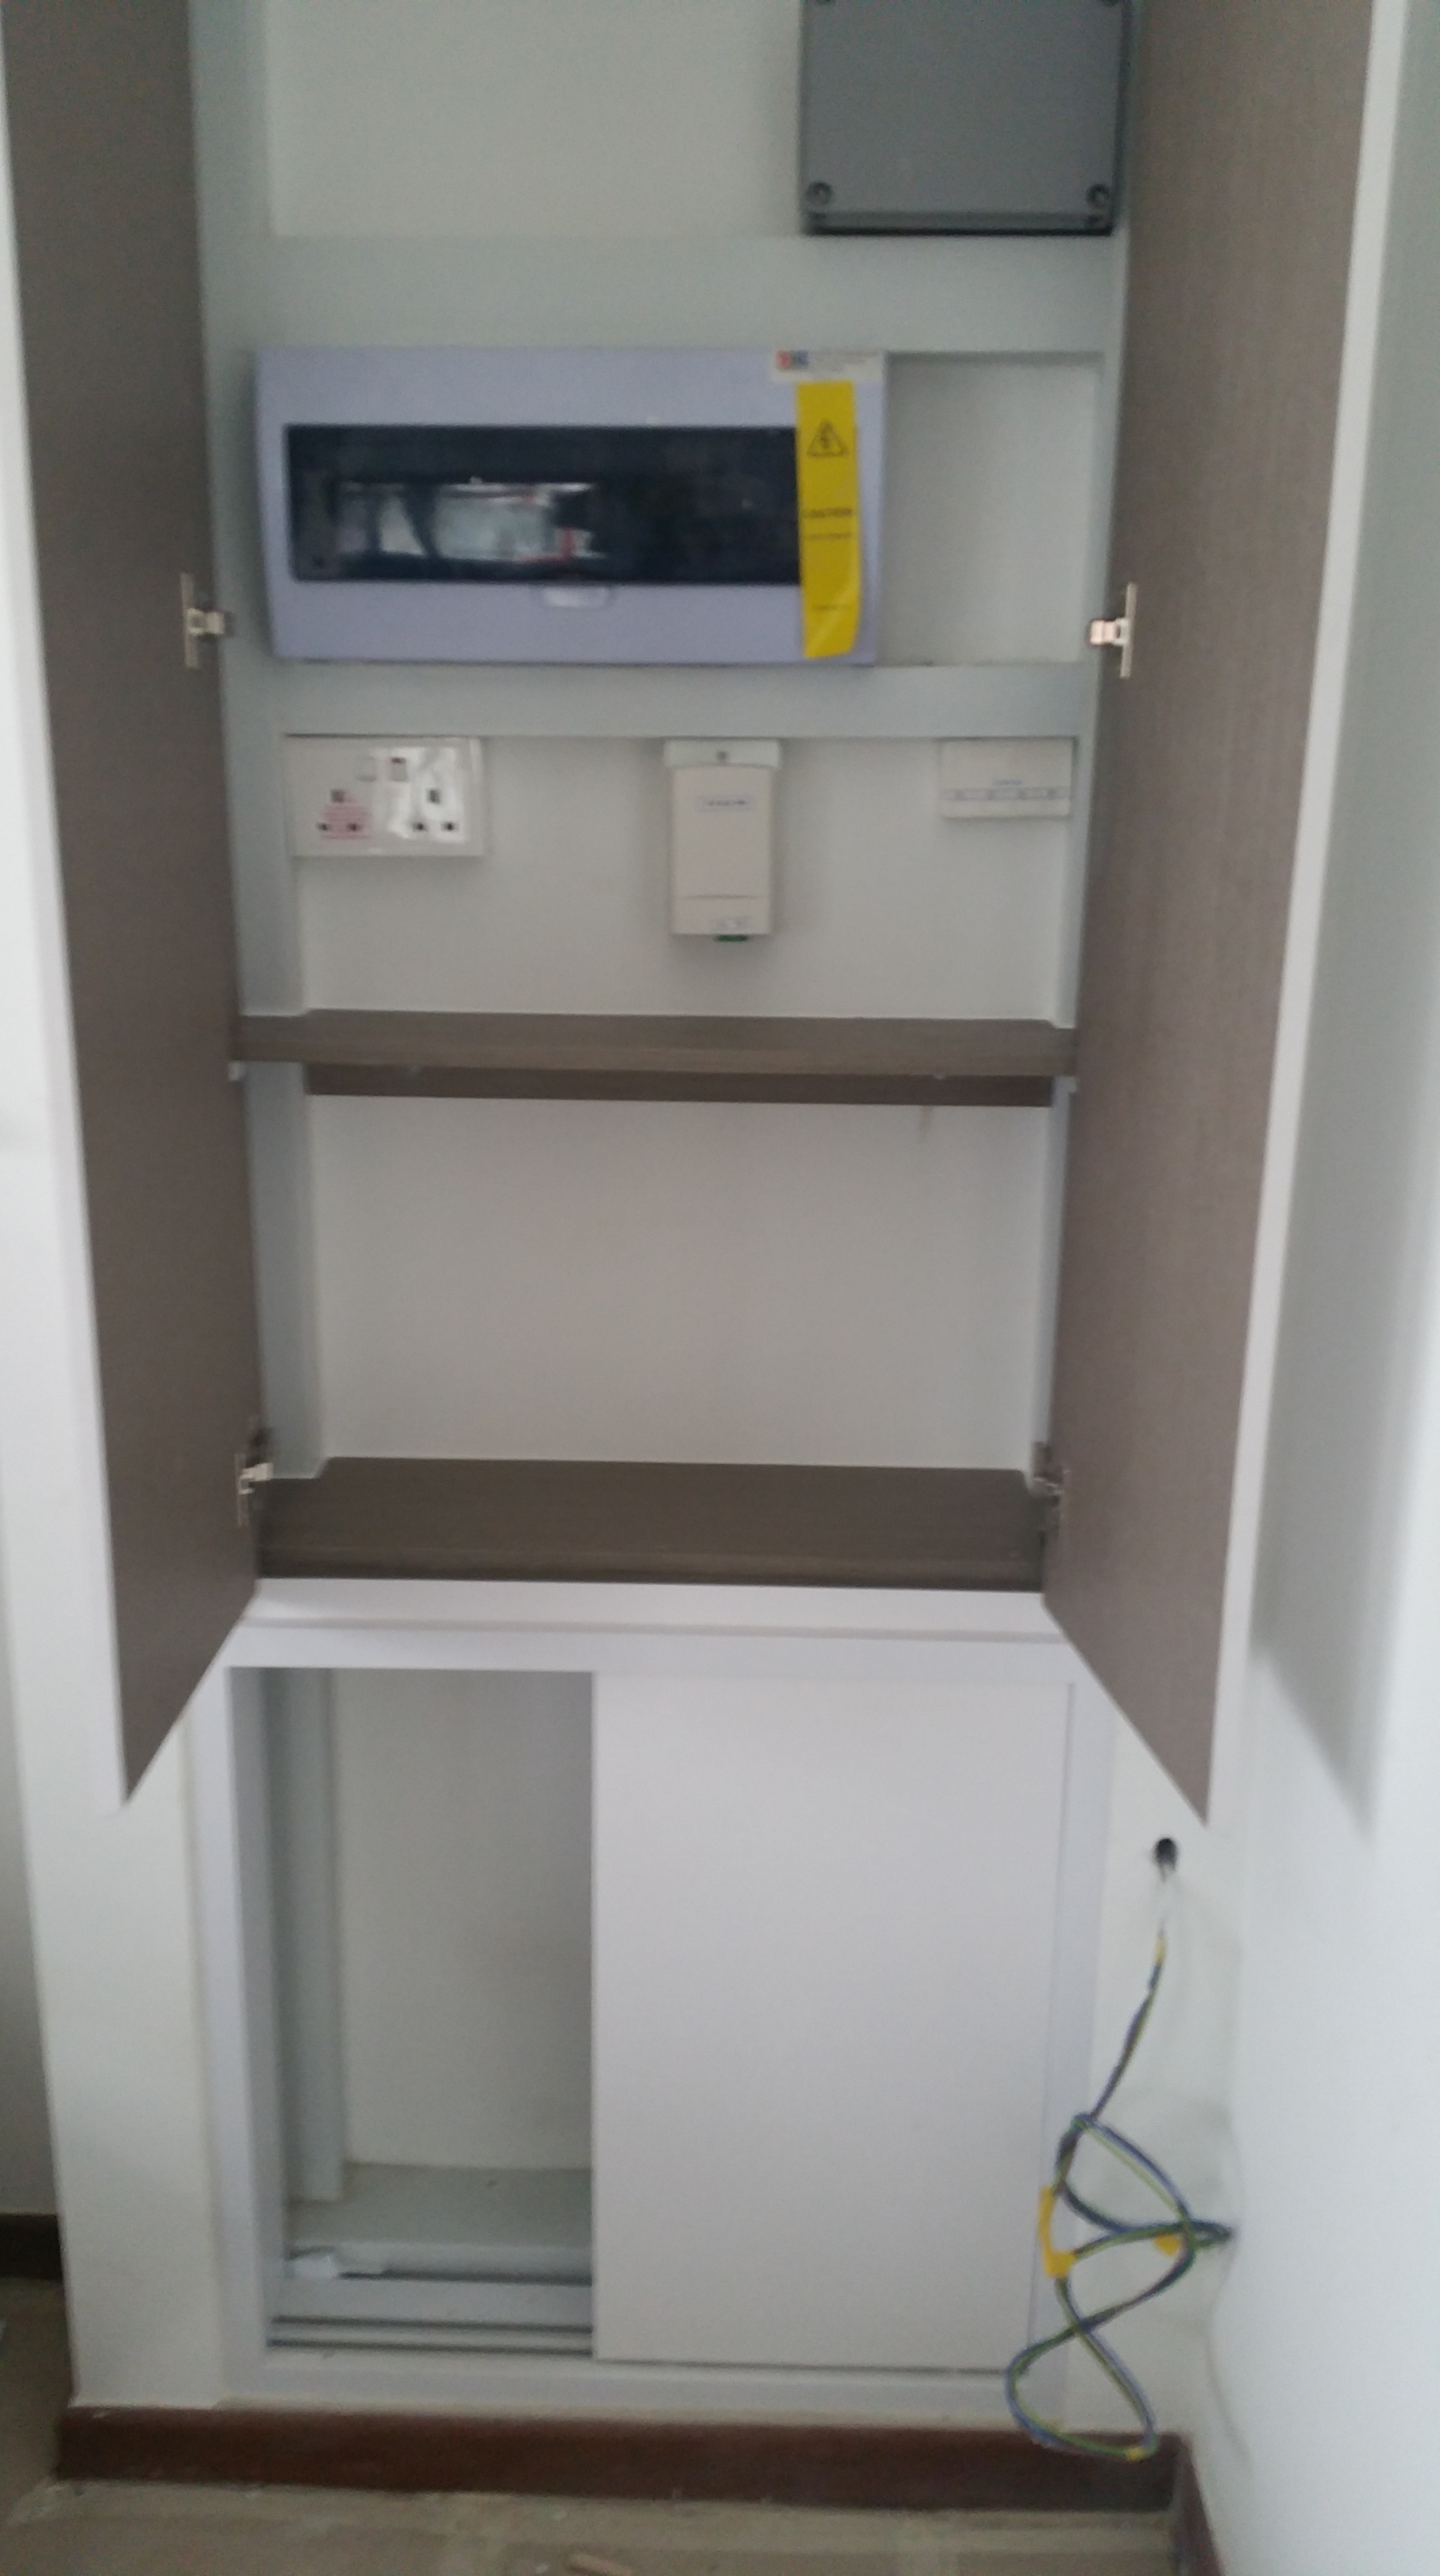
---------------------------------------------------------------------------------------------
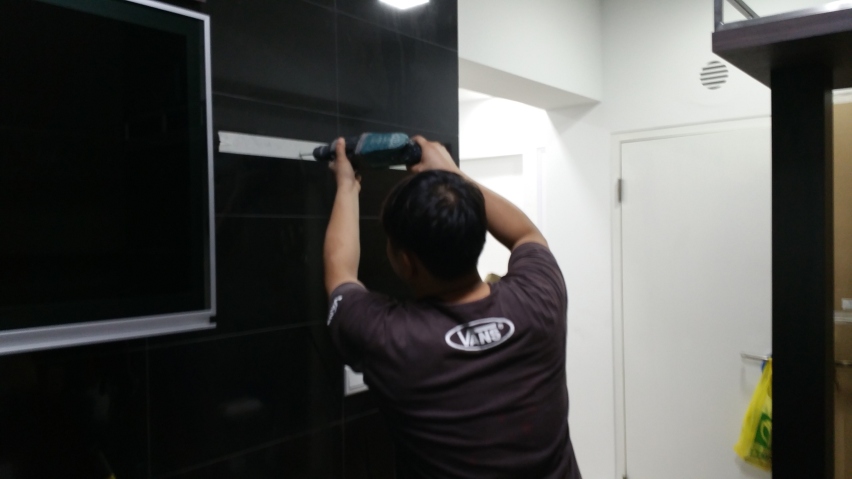
Oh but Saturday’s Main Event has got to be the Electrical guys coming up to install
the rest of my electrical works. Quite a fair bit of issues that cropped up I might add.
Before I show all the issues that cropped up though, I'm happy to report that
Ceiling Cove Light is no longer tripping Electrical MCB when I tested it.
This bothered me quite abit, and I'm glad that at least this is resolved.
Now on to the issues.First Issue:
Almost immediately, we encountered an issue with the Dining Table Downlight.
The downlight and LED Driver I bought apparently is too thick to be able to fit in nicely. Uh-Oh.
After checking with Jason, he told me he would settle it later with either buying a more
suitable downlight or check with his carpenters if they can modify it, need to see how.
---------------------------------------------------------------------------------------------
Second Issue:
While installing my Ariston Oven, apparently the Oven I got had a
plug head thats using a Non-Singapore styled plug-head!?!?!

At this point, I had to make a decision on the spot whether to cut the plug-head
and connect it directly to the electrician’s electrical coupler.
Cutting the plug-head would mean I might void my Ariston Oven Warranty though…
Incompatible Oven Plug on the Left, Electrician’s Coupler on the Right.

Aiyoh, after everything go so well with my Sanitary Fittings, SaniQUO sabo me at this last minute!

At this point of the renovation, I was already very tired to chase anymore, and I just want everything to be completed.
So I told them to proceed to cut the plug-head lah.
If Oven do indeed break down, I’ll just act blur tell Ariston people I don’t know lor see how they react.
Hope they still honor the warranty because they shouldn’t have given me an incompatible plug-head
in the first place anyway?? Hope this oven can at least last a few more years before breaking down lor.
Some of ya’ll reading may be thinking…Hmm…why not use those Adapter to fit the Non-Singapore Plug right? PLEASE DO NOT DO THAT!!!
Oven is very High Amp Appliance at 15A and its better and safer to use Electrician’s Coupler which is rated at 20A.In fact the Electrician was surprised that my Oven came with a Plug-Head in the first place.
Most Ovens according to him come with No Plug Head and is ready to connect to Electrician’s Coupler anyway?
So Dear Readers, if you buy Ovens, do take note of this potential issue.---------------------------------------------------------------------------------------------
Third Issue:
The LED Strips on the Washing Machine side of my Kitchen had some powerpoint issues
that they needed to resolve with Jason, so they would not be installing it yet.
This one sounds abit technical and complicated. I also dunno how to explain it properly,
and I’ll just let Jason liase with them to handle this one.
---------------------------------------------------------------------------------------------Photo Collection of Electrical Works
I got the Electricians to dismantle and redo new Electrical Switches, but it seems that
the buttons still feel crooked especially the water heater button as you can see.I can see the Electrician has tried his best already. It looks like issue is due to the
quality of the switches itself. I’ll be checking with Jason how we can resolve this.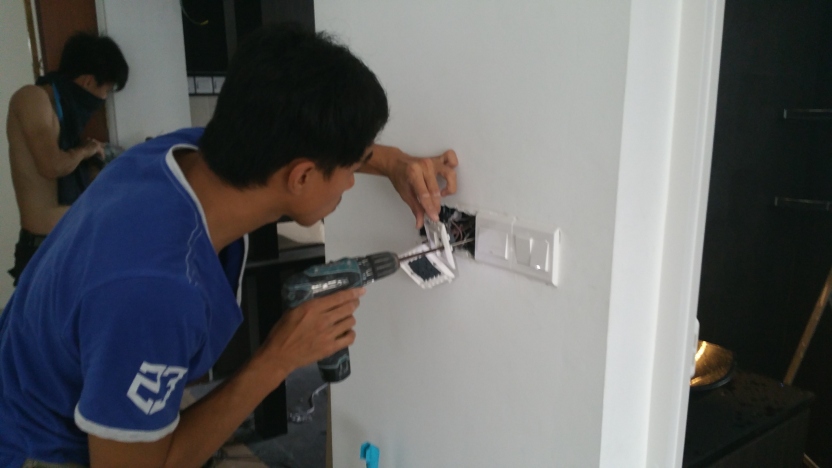
Electrical Switches at Kitchen
So funny, these switches here are so nicely done compared to the other ones I pictured above.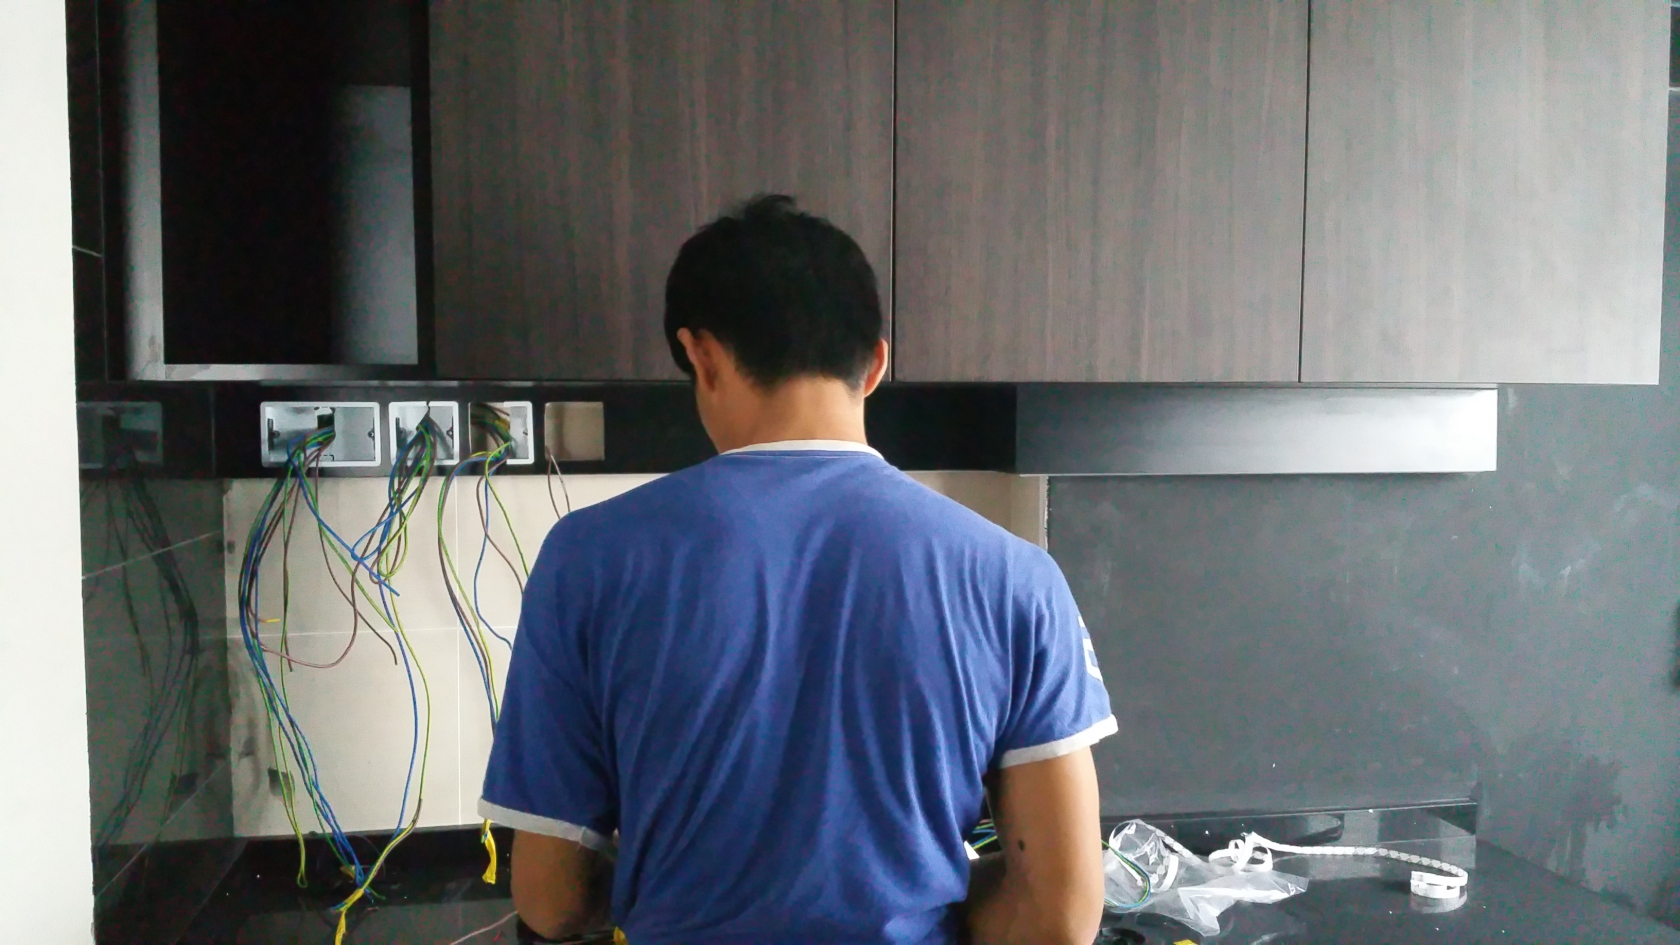

Working on Switches at Kitchen (At Opposite Side)
Fujioh 2 Ring Induction Cooktop is ready to use!
(Haven’t actually cooked anything yet though.)
Ariston Oven seems operational, at least the lights can turn on LOL!!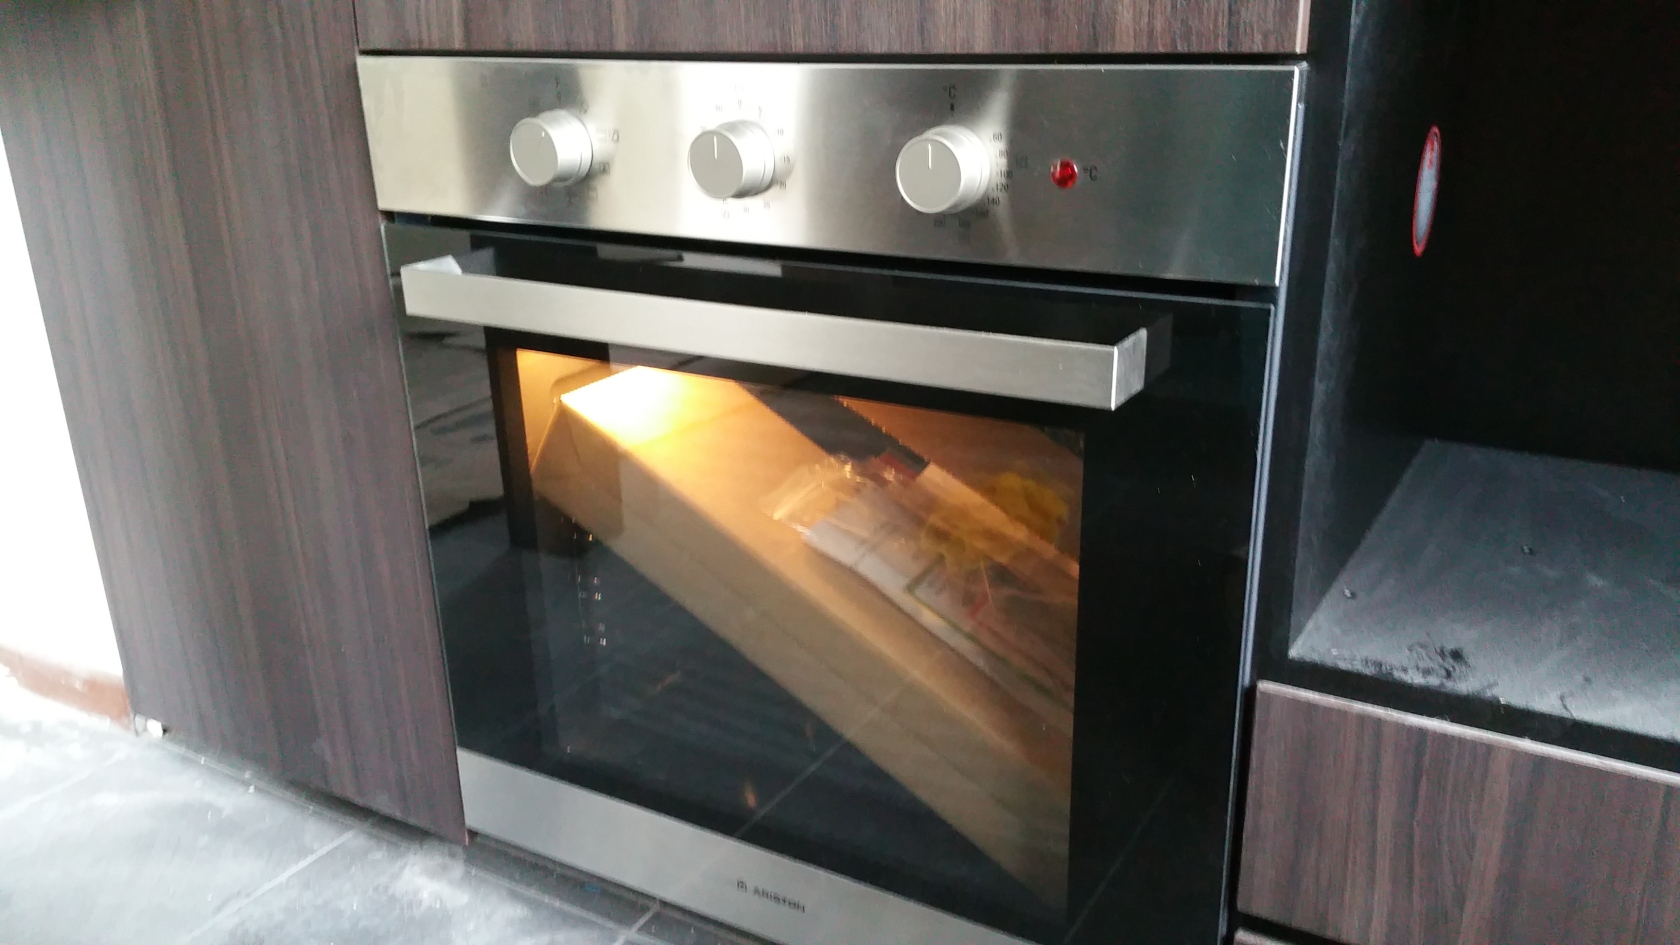
Ceiling Wiring doing Concealment to prep for my Ceiling Fan
(Shifting the cables towards Centre of my L-Box Cove Ceiling)

Adding a hole for installation of Ceiling Fan Regulator
---------------------------------------------------------------------------------------------With all of the issues and Work in Progress pictures out of the way,
THE BELOW PICTURES were the end result of the Electrician’s work.Of course there ARE still issues to sort out, but I simply can’t help
but have a big smile on my face when I saw these photos I took…My Bedroom
Macdonalds has Samurai Burger, I have Samurai Bedroom!! LOL!!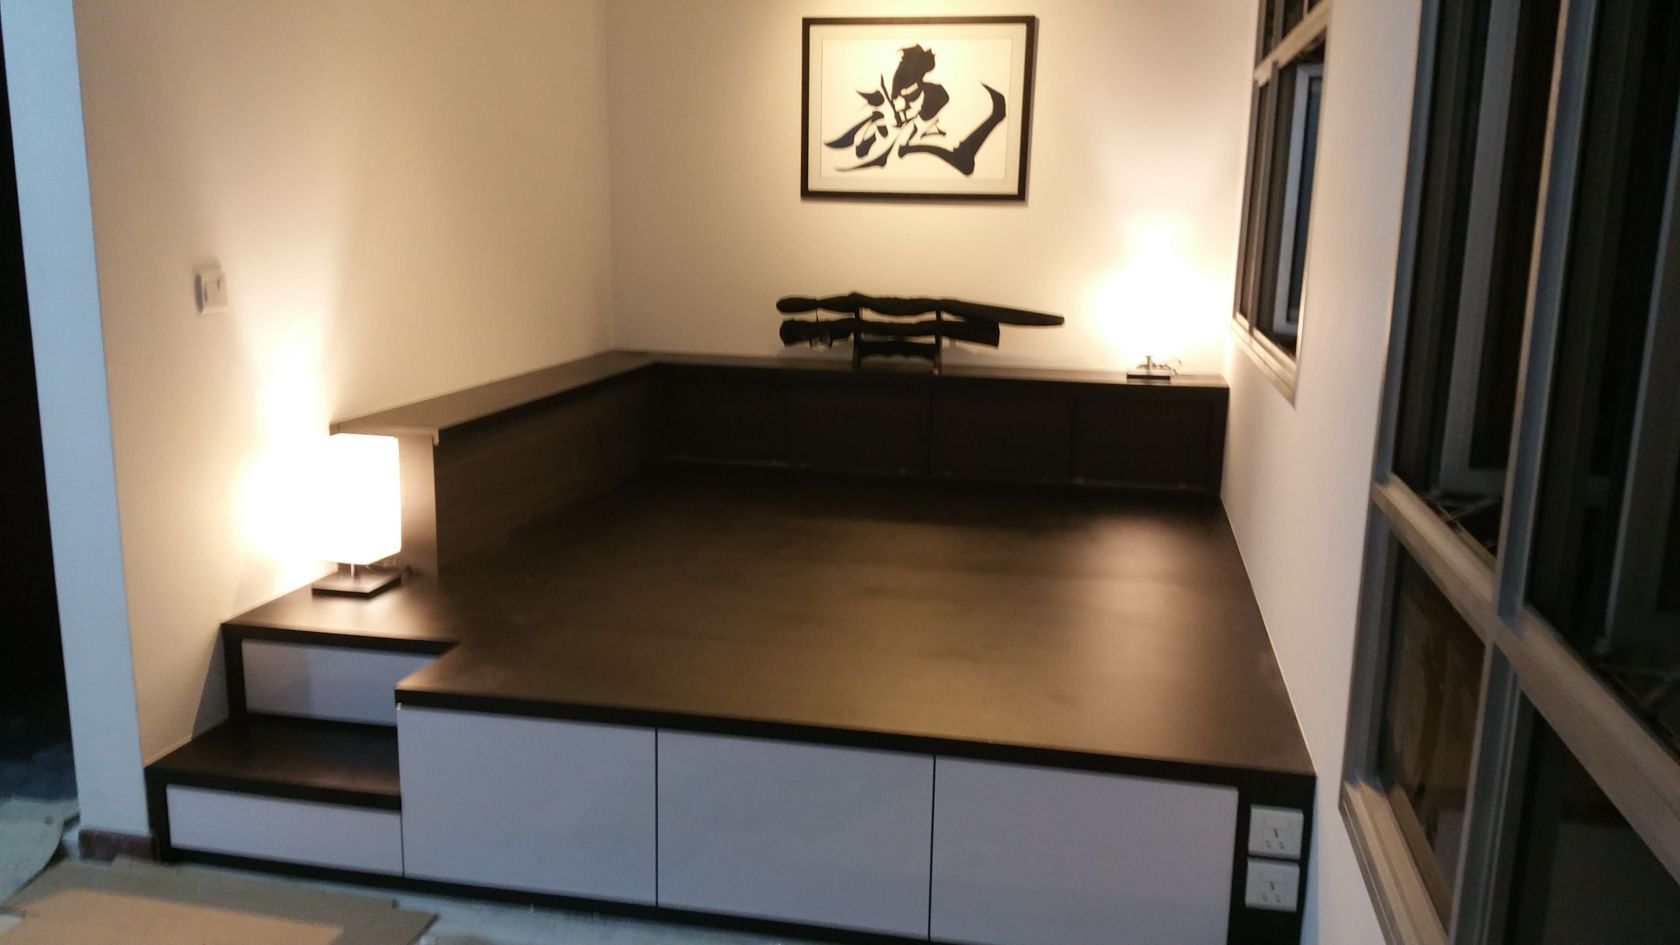
My Bathroom
Got Hotel Standard or not?
My Kitchen
Actually only one side of the Kitchen for now, but yea I’m happy.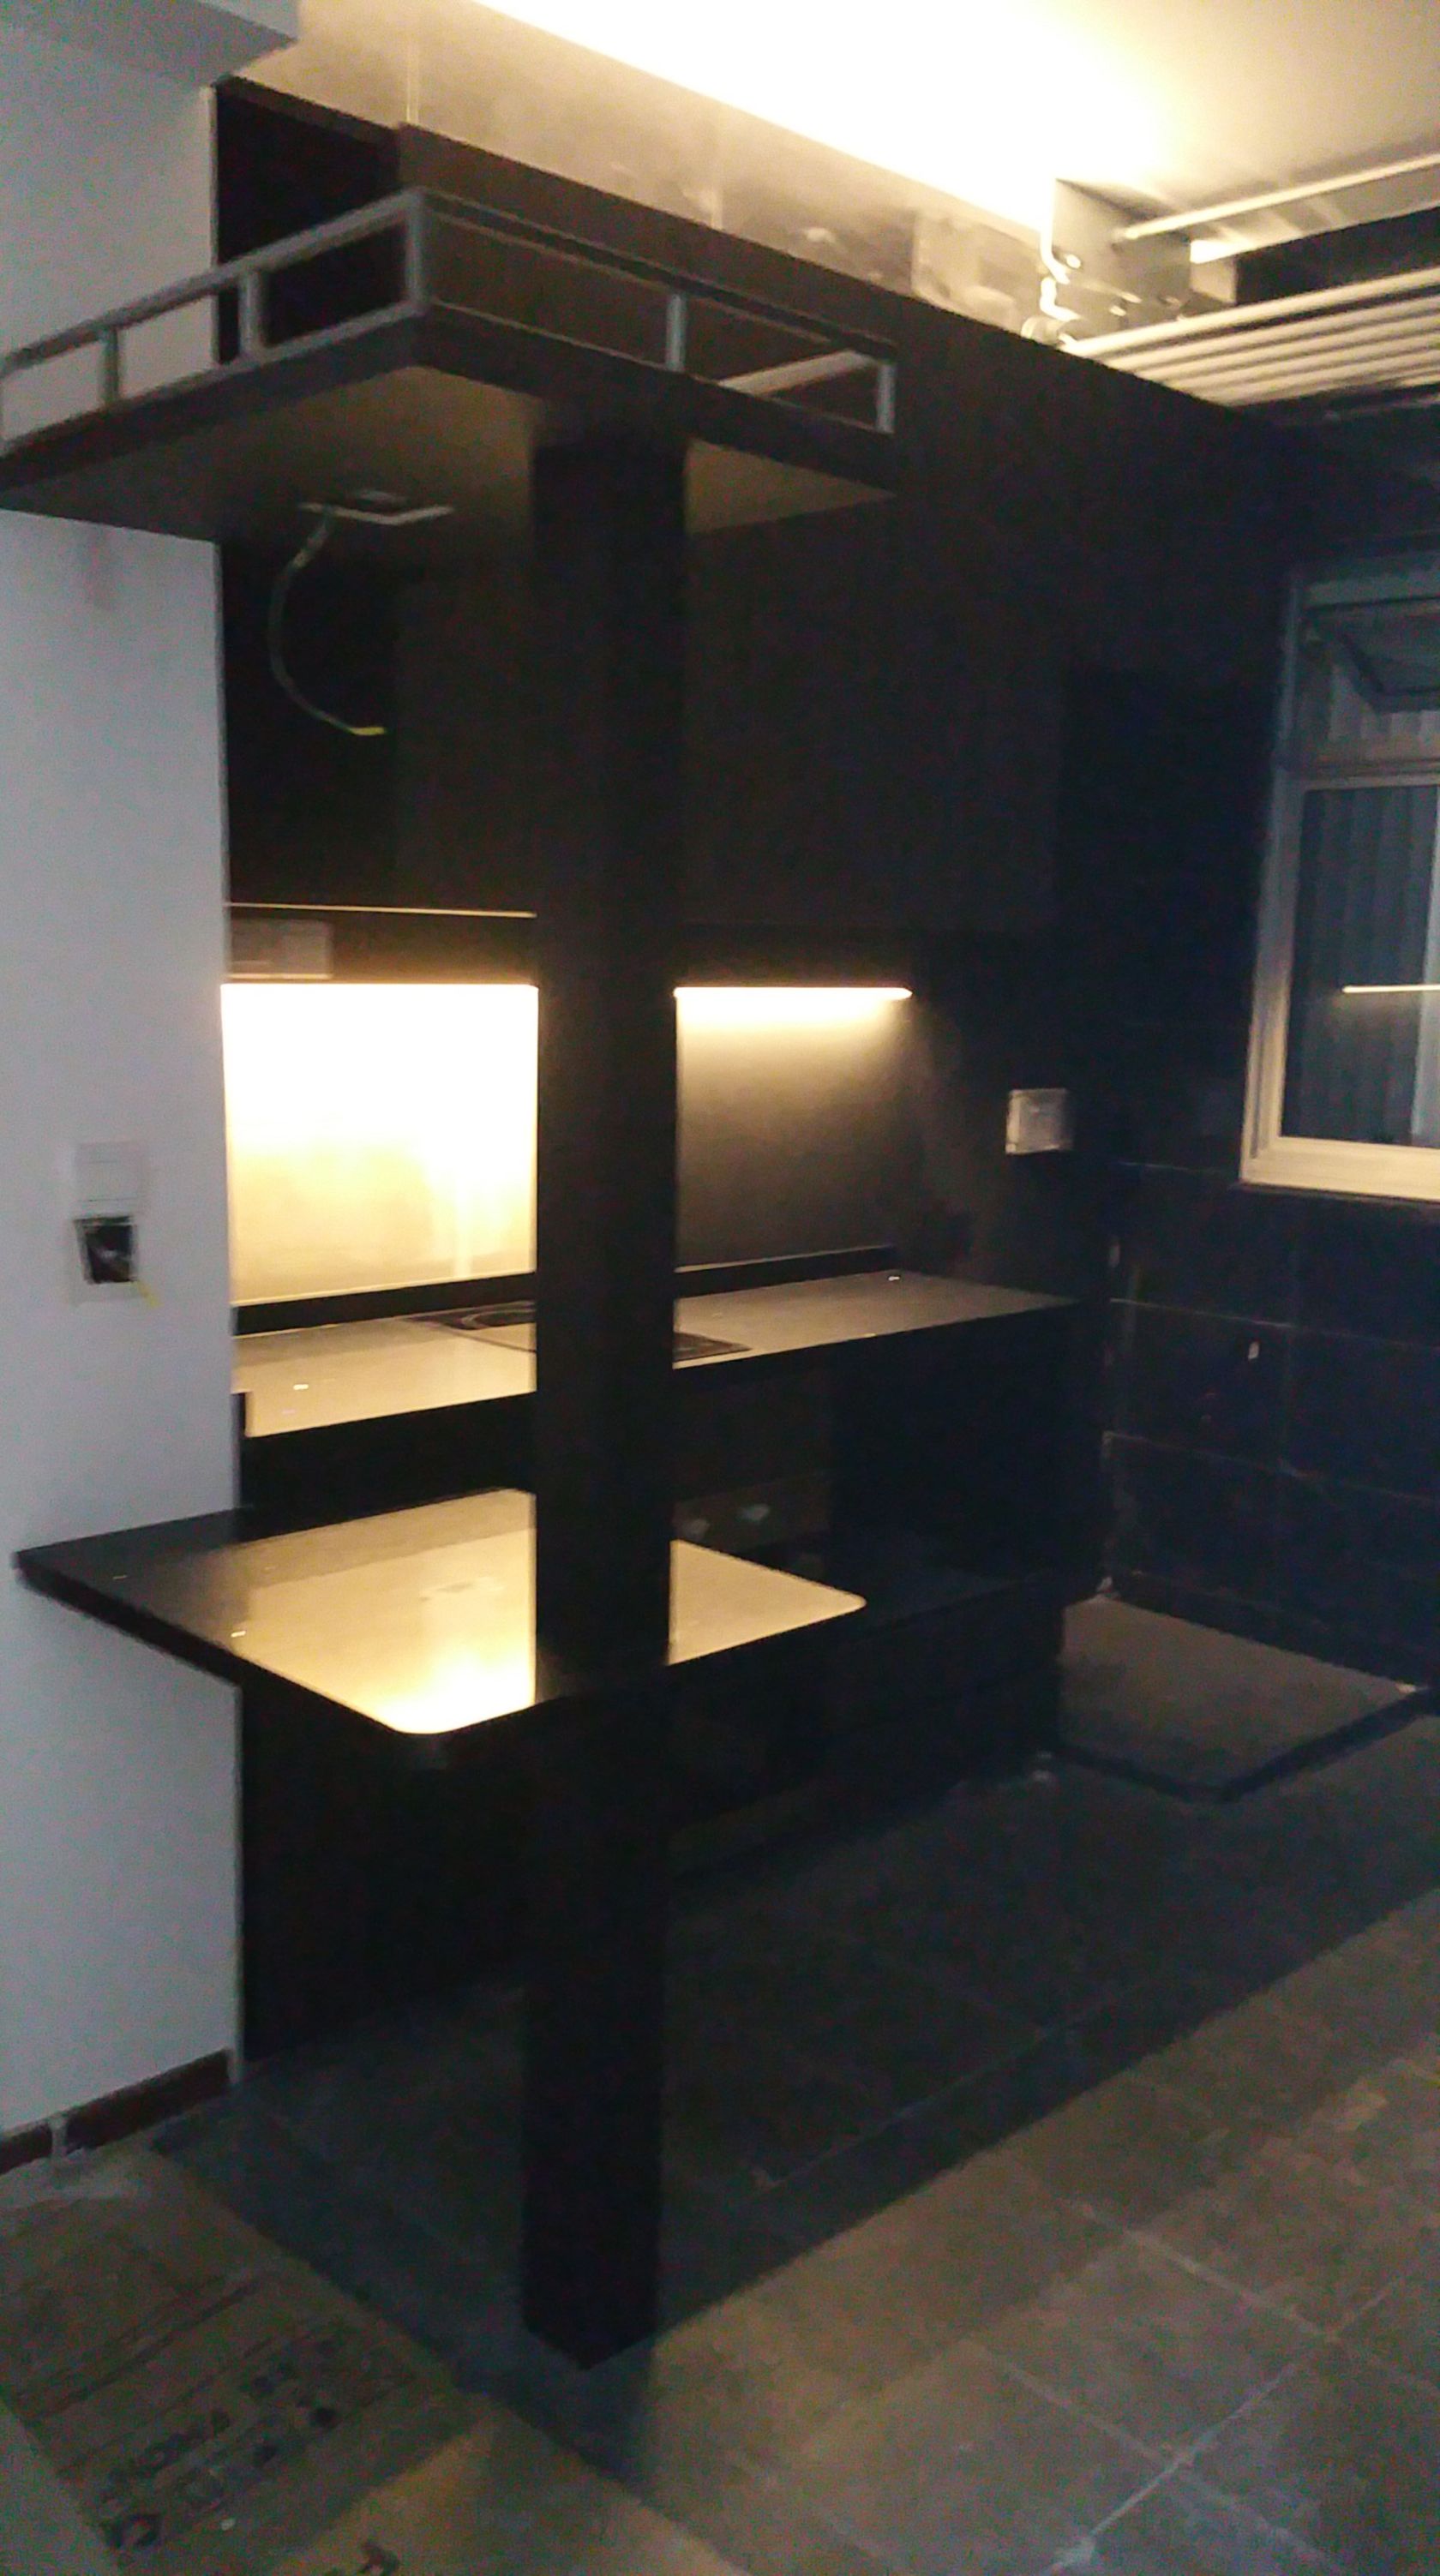
---------------------------------------------------------------------------------------------What do ya’ll think so far?
Light really does enhance the look greatly don’t you think?")
The last few pictures I took really caught me off-guard.
I myself can’t help but gawk and open my mouth big big at what was done.
OMG I look forward to MOVING IN!!!!!With 8th week now behind me, I’m now looking forward to the 9th and Final Week!
This is it, the final lap for my renovations!!Thanks for sticking around so far, and I’ll see you in the next blog entry!!
Click Here for the Next Blog Entry:
9th Week after Key Collection - Ceiling Fan is Up
Click Here to go back to Page 1 - Table of Contents-
 3
3
-
-
Blog Entry Date: 12th November 2017 Sunday
Click Here to go back to Page 1 - Table of Contents
End of 8th Week after Key Collection -
Glass Measurement, Plumbers installed Sanitary Fittings and MoreI'm so, so sorry!
I should have posted this blog entry much earlier, but there was simply so much
action these 2 days that I didn't have time to properly sit down and write the blog.
Pardon me lah, also having a bad flu these few days. This crazy weather.
One minute sunny, next minute rainy. *Cough* *Cough* Ahem ahem.
Well, because it was so action packed, I'm gonna do a double post what happened on Friday and Saturday.---------------------------------------------------------------------------------------------
So moving along, Friday (10th November 2017) was really an action packed day.
Firstly, the Glass Company people came onsite and did their measuring of the glass works that I require.
Glass is required for the Kitchen Glass Backing, and also that panel of Tempered Glass I have in the Bathroom next to my Bathroom Vanity Storage.When they arrived, they whipped out this futuristic looking gadget!
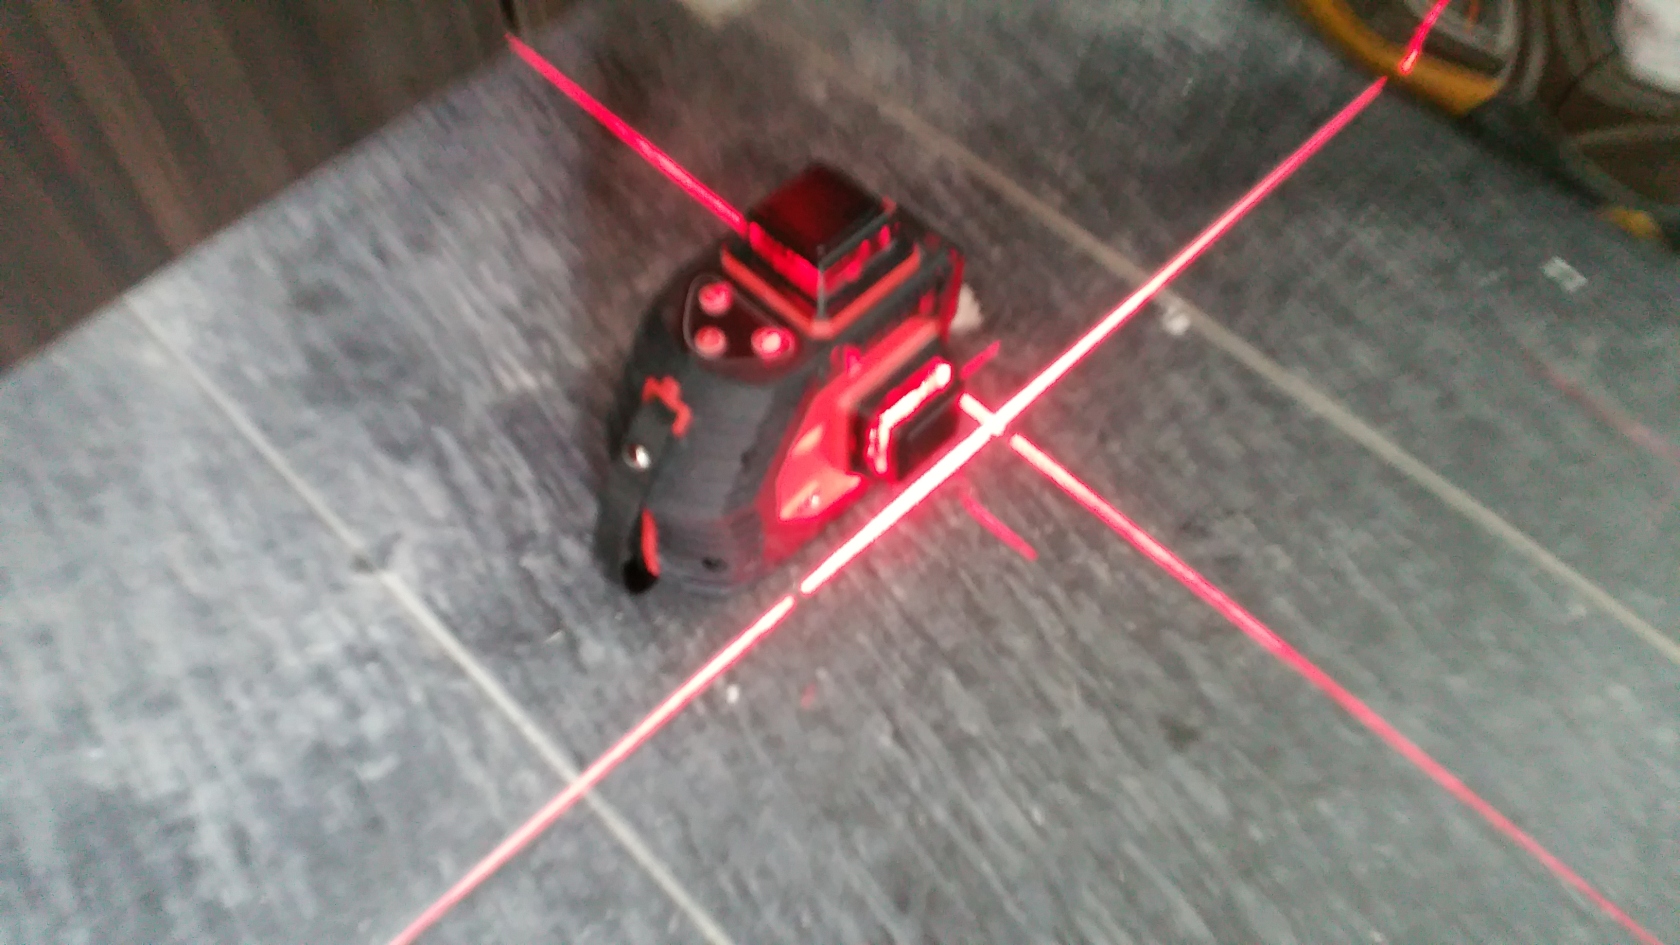
Just look at how futuristic it looked when they were measuring!
They were shooting lasers everywhere!! LOL!! Pew Pew Pew!!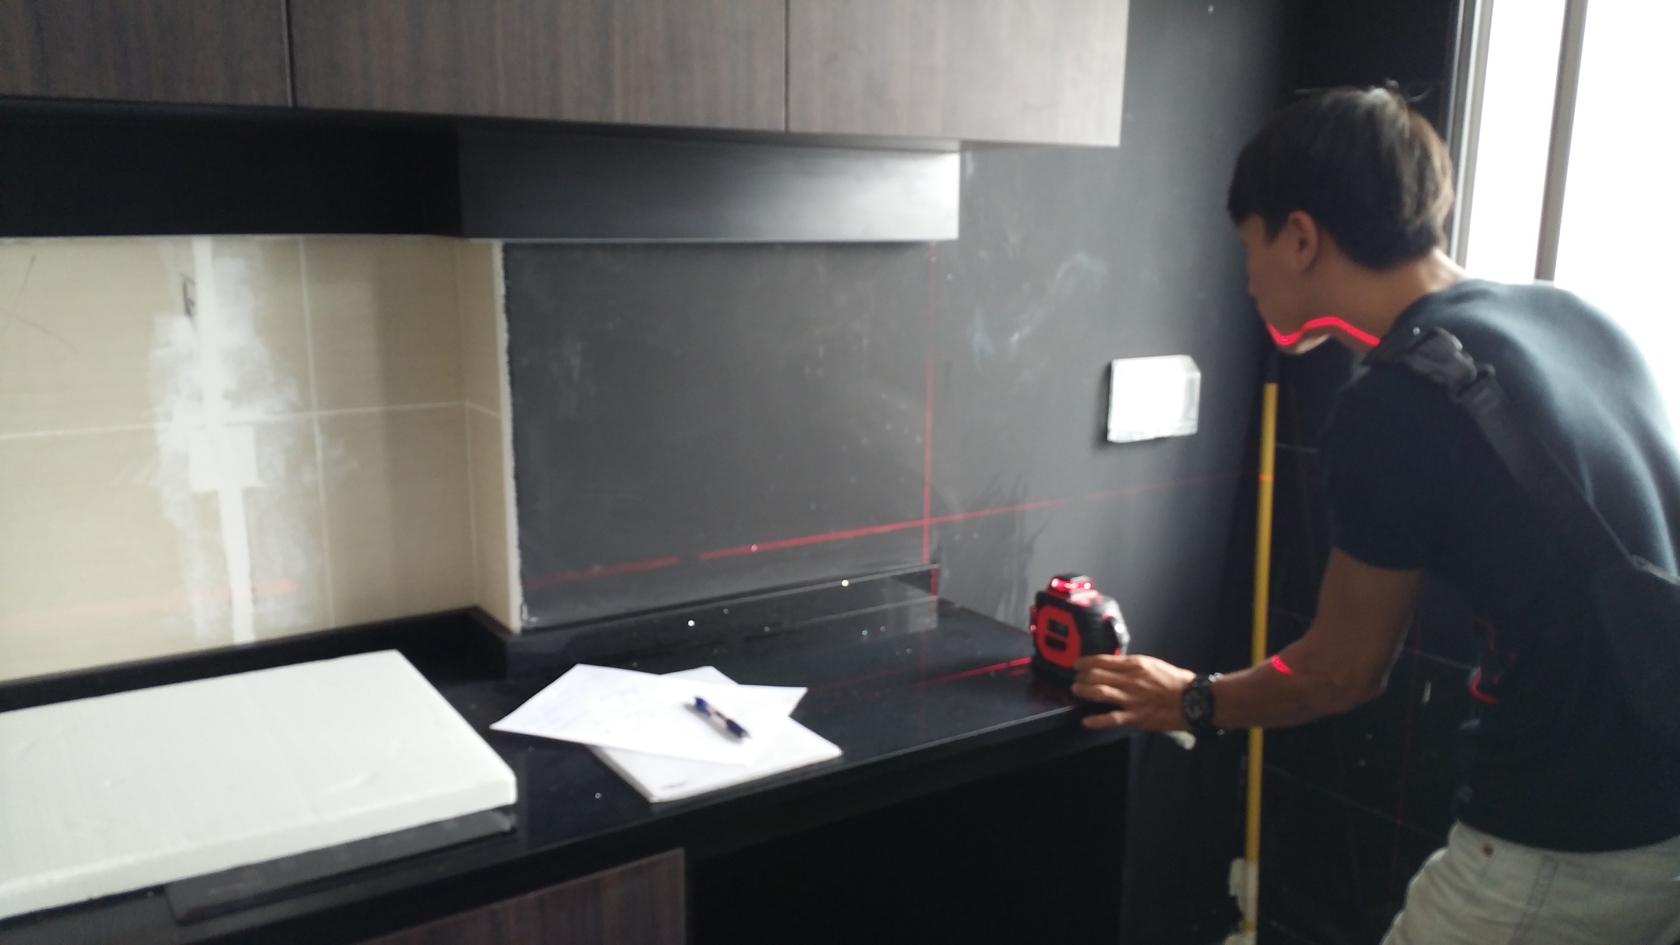
Unfortunately I didn't manage to find out what the device is called,
but apparently its supposed to shoot out some lasers and when correctly aligned,
will allow them to get exact measurements. So High Tech!!If there are any Tech Saavy Readers out there who do know what this device is,
please do share what it's called, and what exactly it does! *intrigued*---------------------------------------------------------------------------------------------
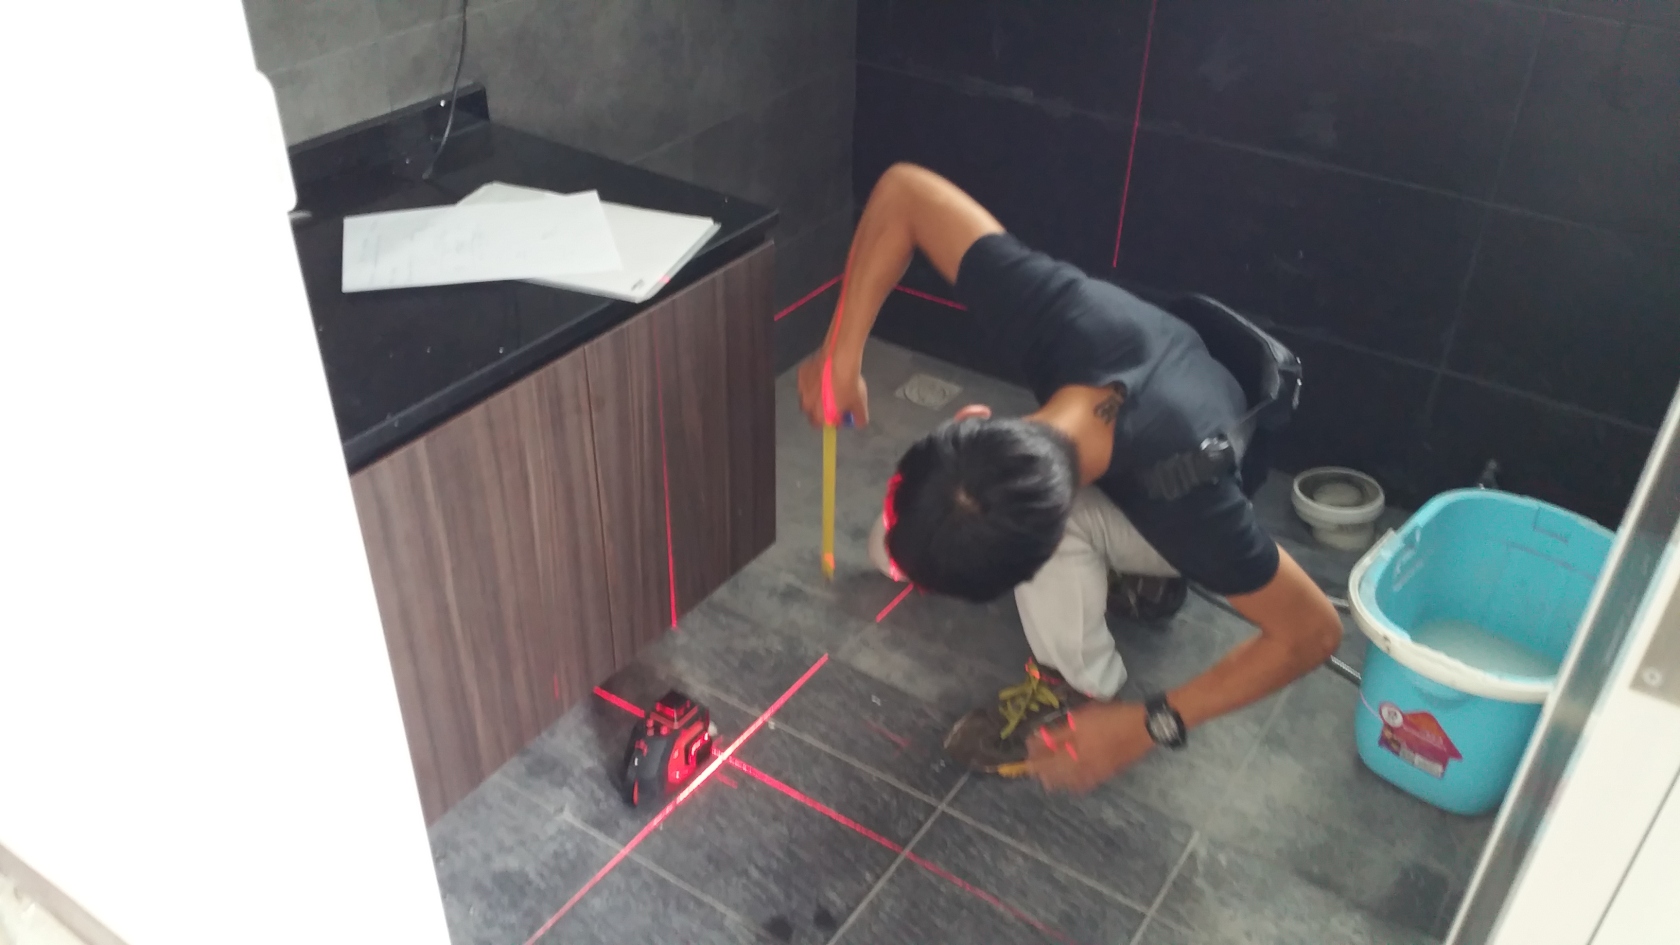
Okay moving on to the main event, Friday was the day the Plumbers came to do the plumbing
and fix up all my sanitary fittings. Finally, after so long I can finally take a bath and properly use the toilet!!
You have no idea how GOOD it felt to finally do this!!Check out the many tools they brought to do Plumbing.
So many barang barang! See until eyes blur liao.
Now I finally know what this strange U-Shaped thing is in the Bathroom.
Its a pipe thats specially meant for folks who do Storage Tank.
Plumber need to manually cut and connect piping to the Storage Tank.
If you are doing Instant Heater instead, this U-Shaped thing will not be touched.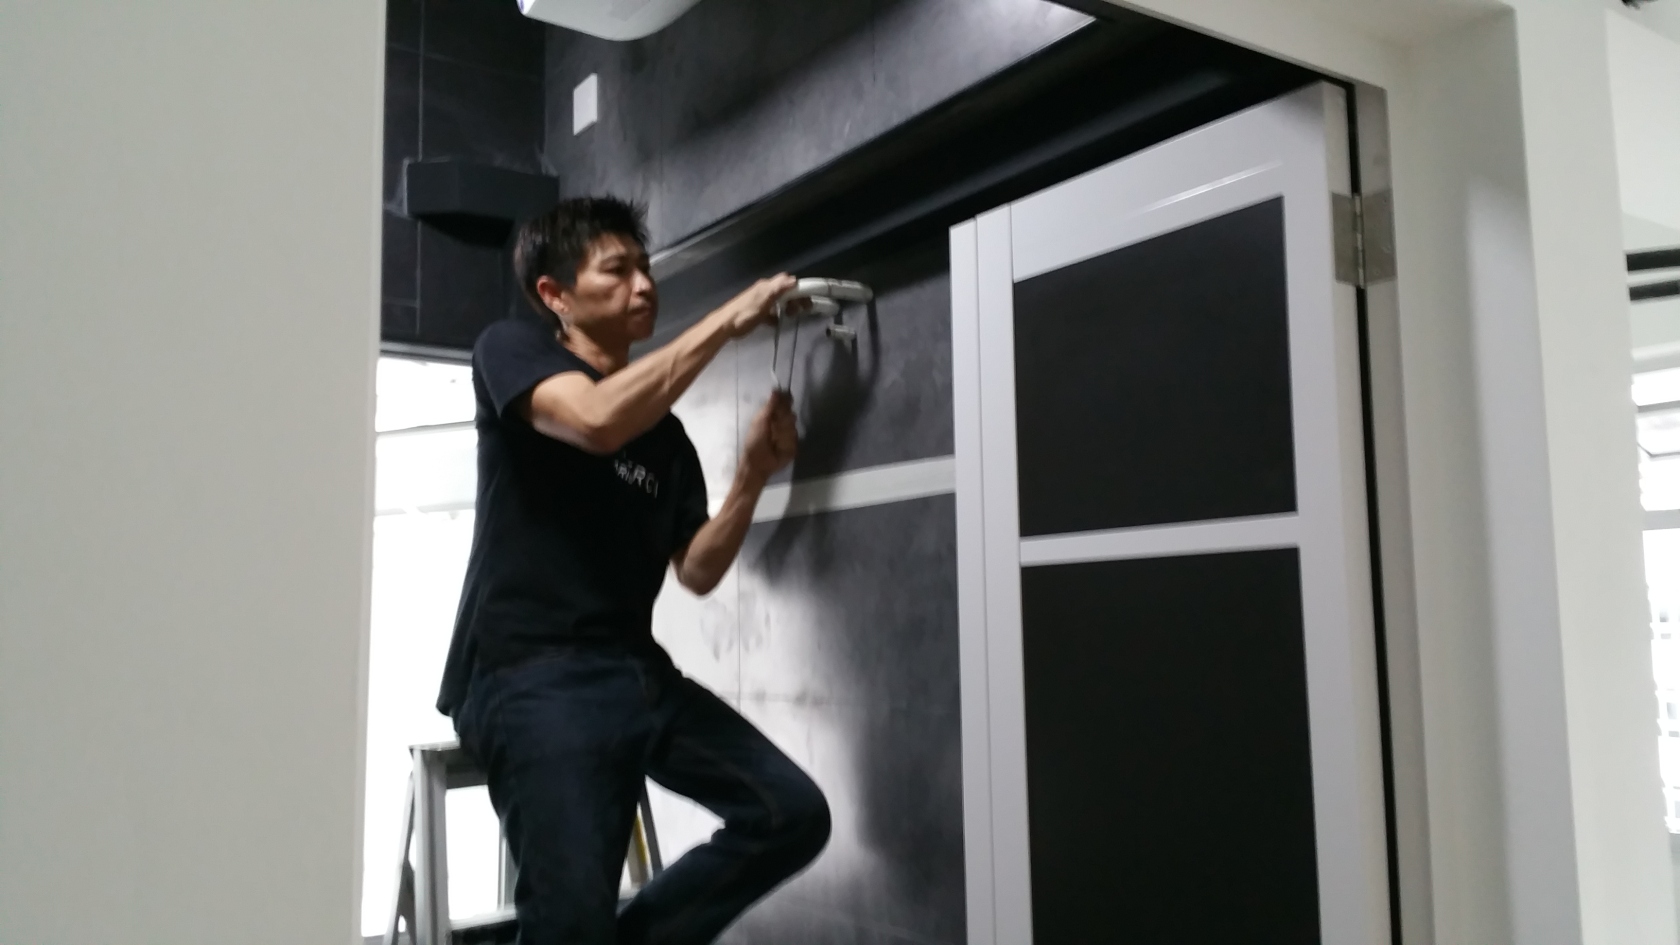
While installing the fittings, we ran into an issue.
Apparently when I bought my Stone Bowl Basin, they told me I did not buy something called a "Multi-Link".It is a kind of stopper that while optional, is good to have because if you don't have this installed,
the Stone Basin may start developing cracks over time.
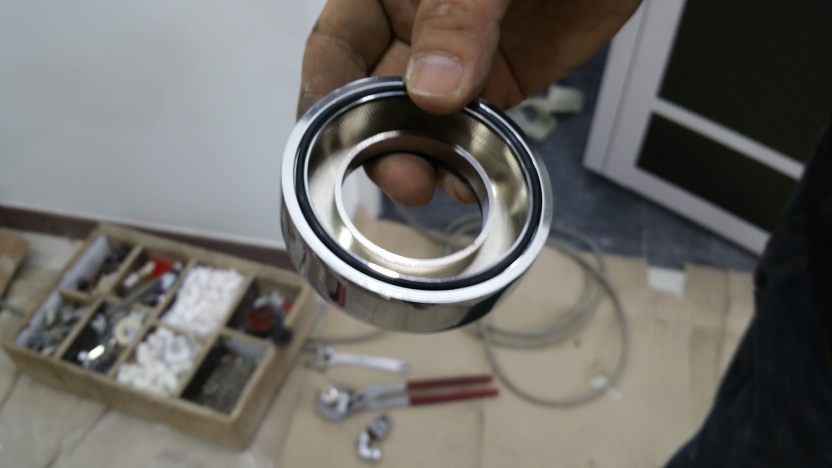
This thing has a rubber lining that helps prevent such cracks from happening.
Initially I was abit skeptical about it and thought the Plumbers wanna sell some extra stuffs.
But meh, at only $25, I figured why not just buy lor. Better safe then sorry I guess.Having this thing installed means the Stone Basin is no longer sitting directly on the Quartz Top,
but I thought it was okay as it makes it a little bit easier to clean the bottom I guess.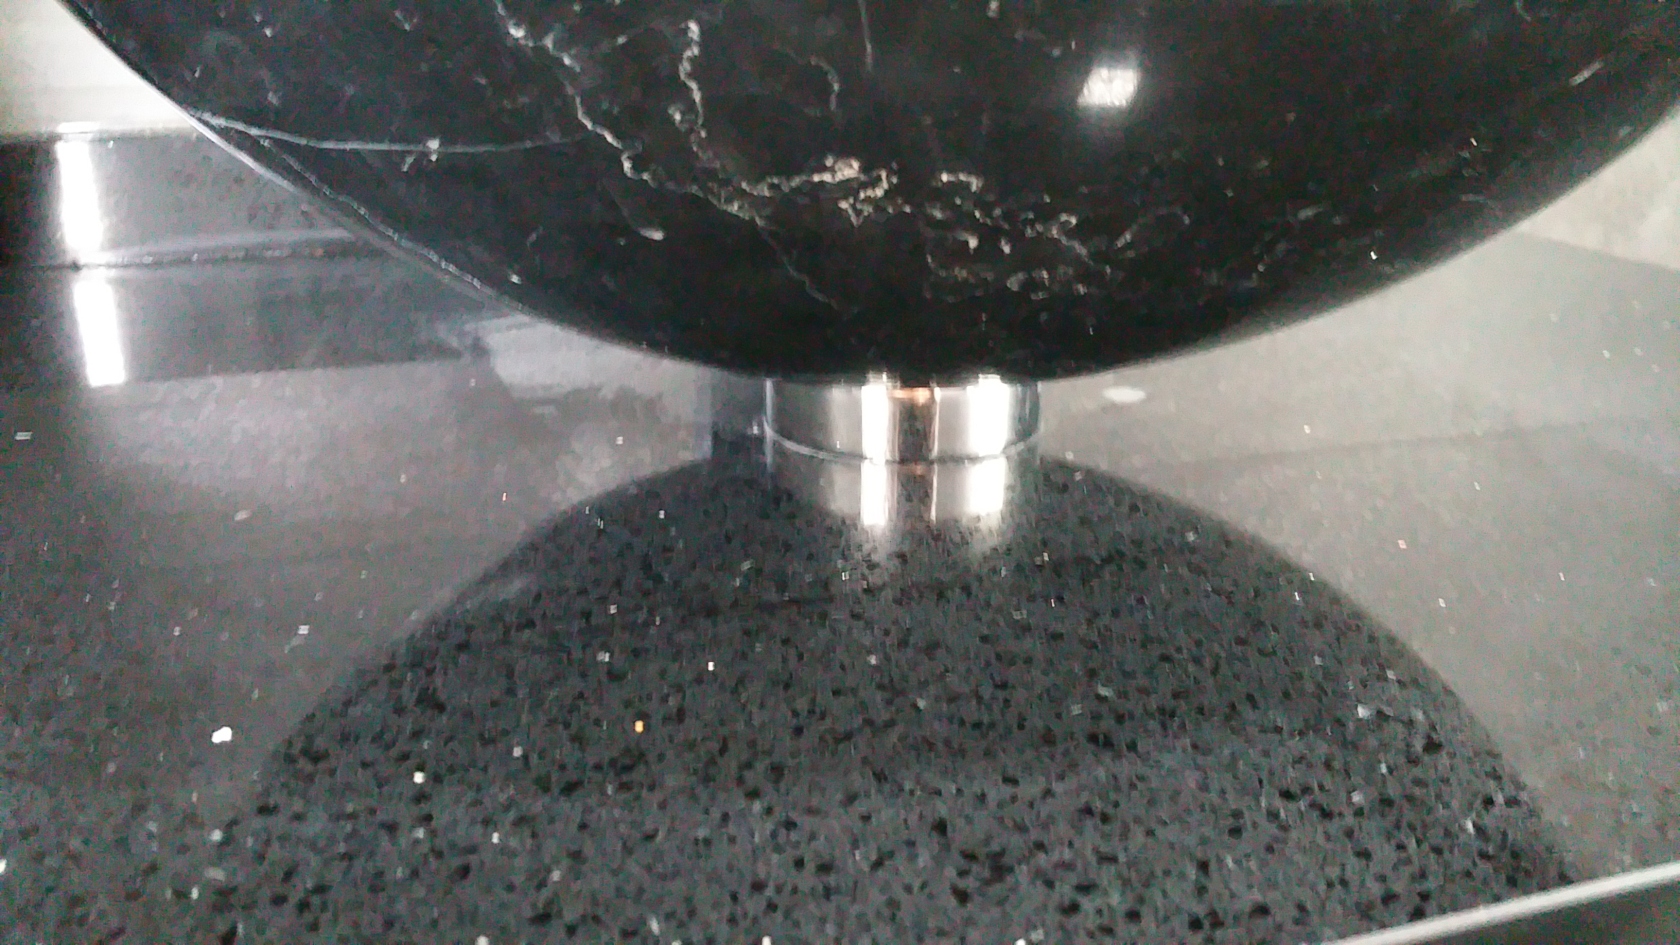
---------------------------------------------------------------------------------------------
Plumbers hard at work.
Really fascinating to see 3 people squeeze into my tiny bathroom to do work.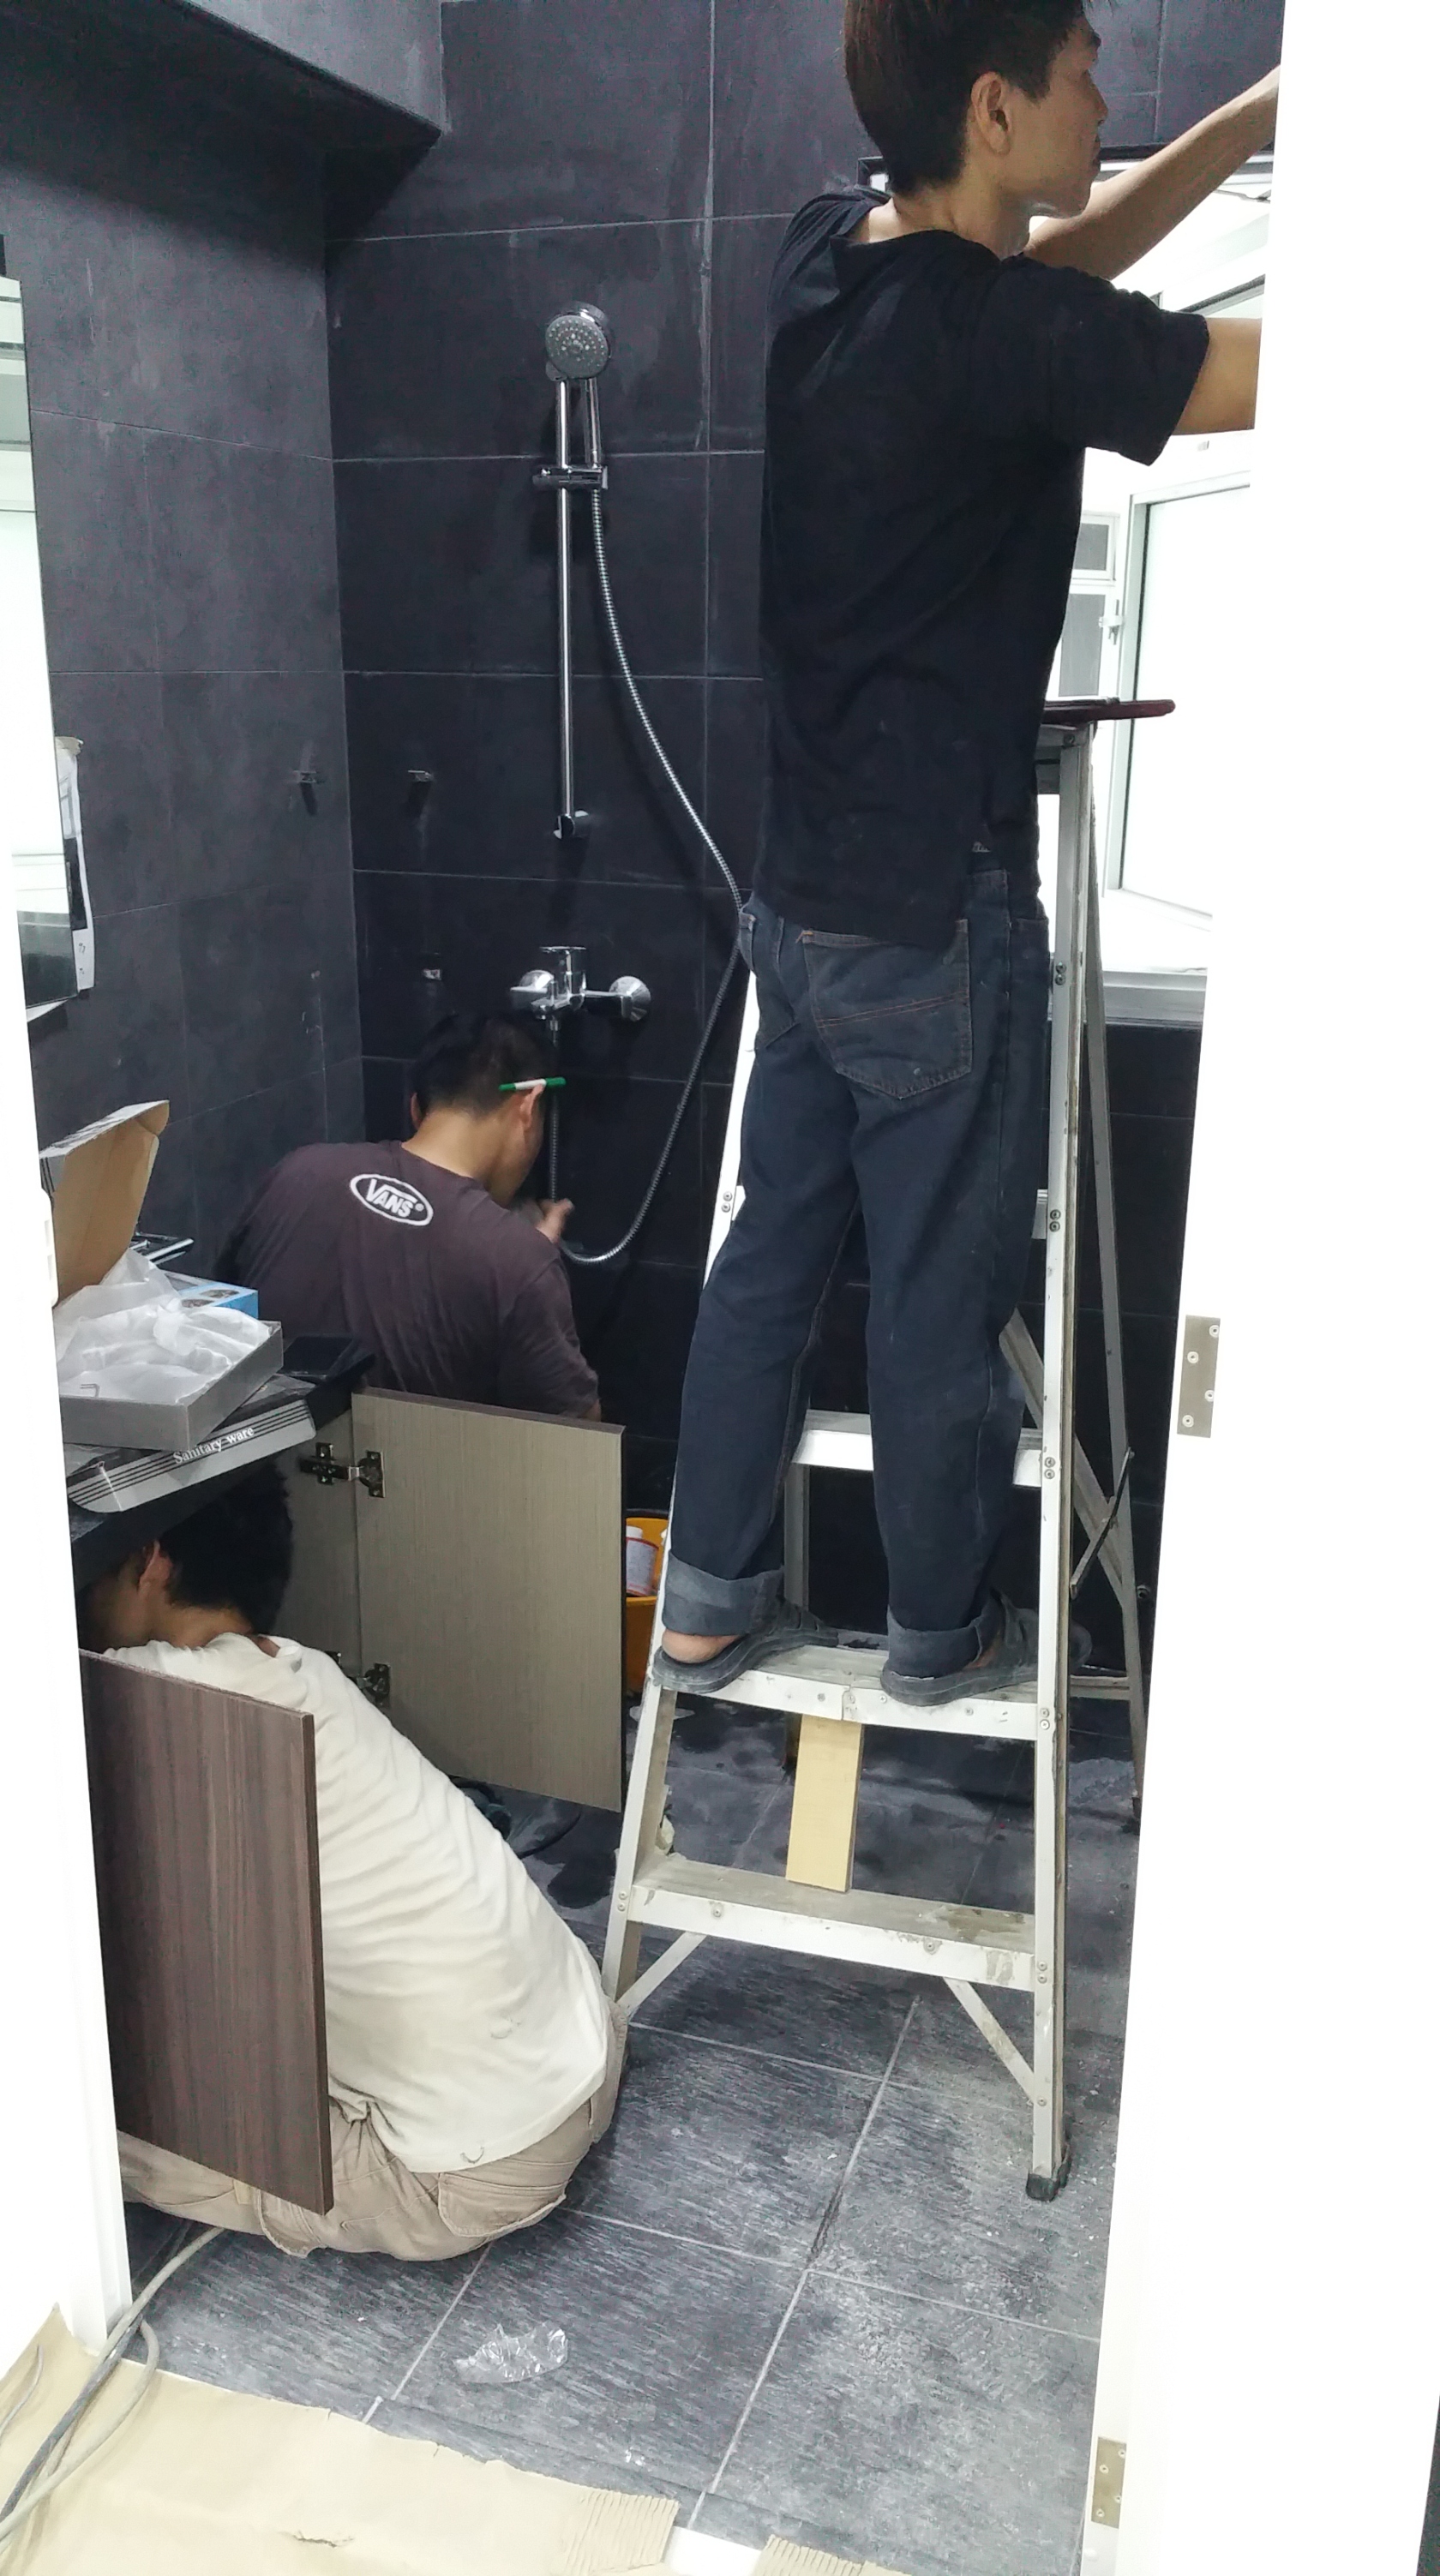
Installing piping at Kitchen Sink area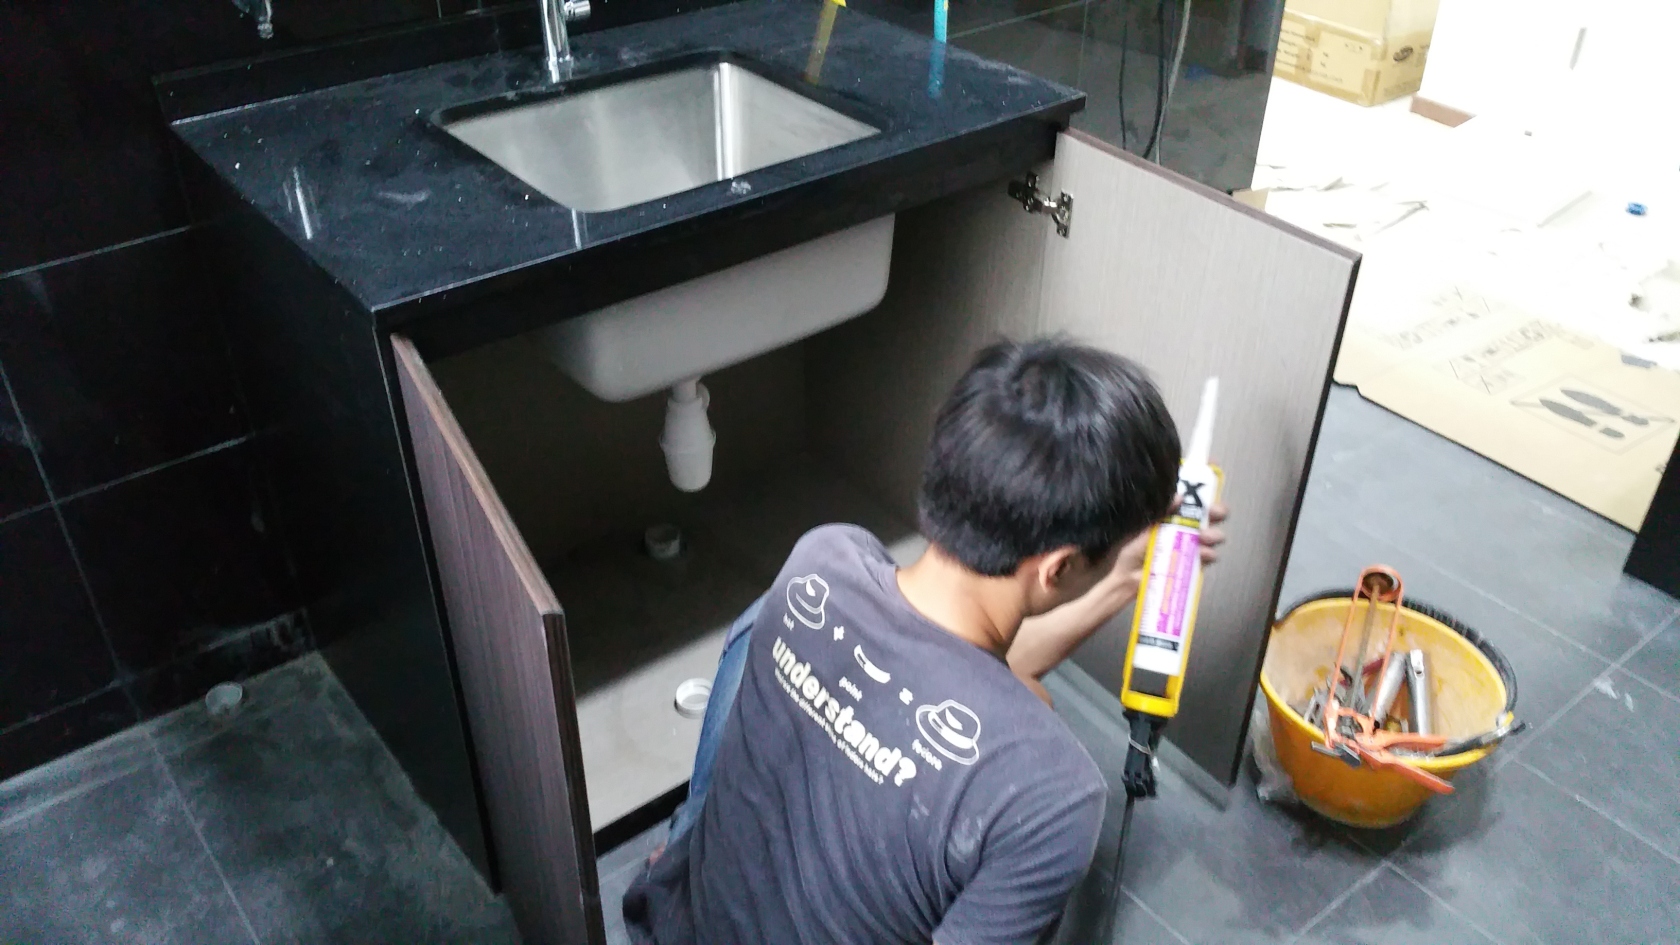
Working on the piping at the Refridgerator area.
Installing my Towel Rack that I bought from SaniQUO.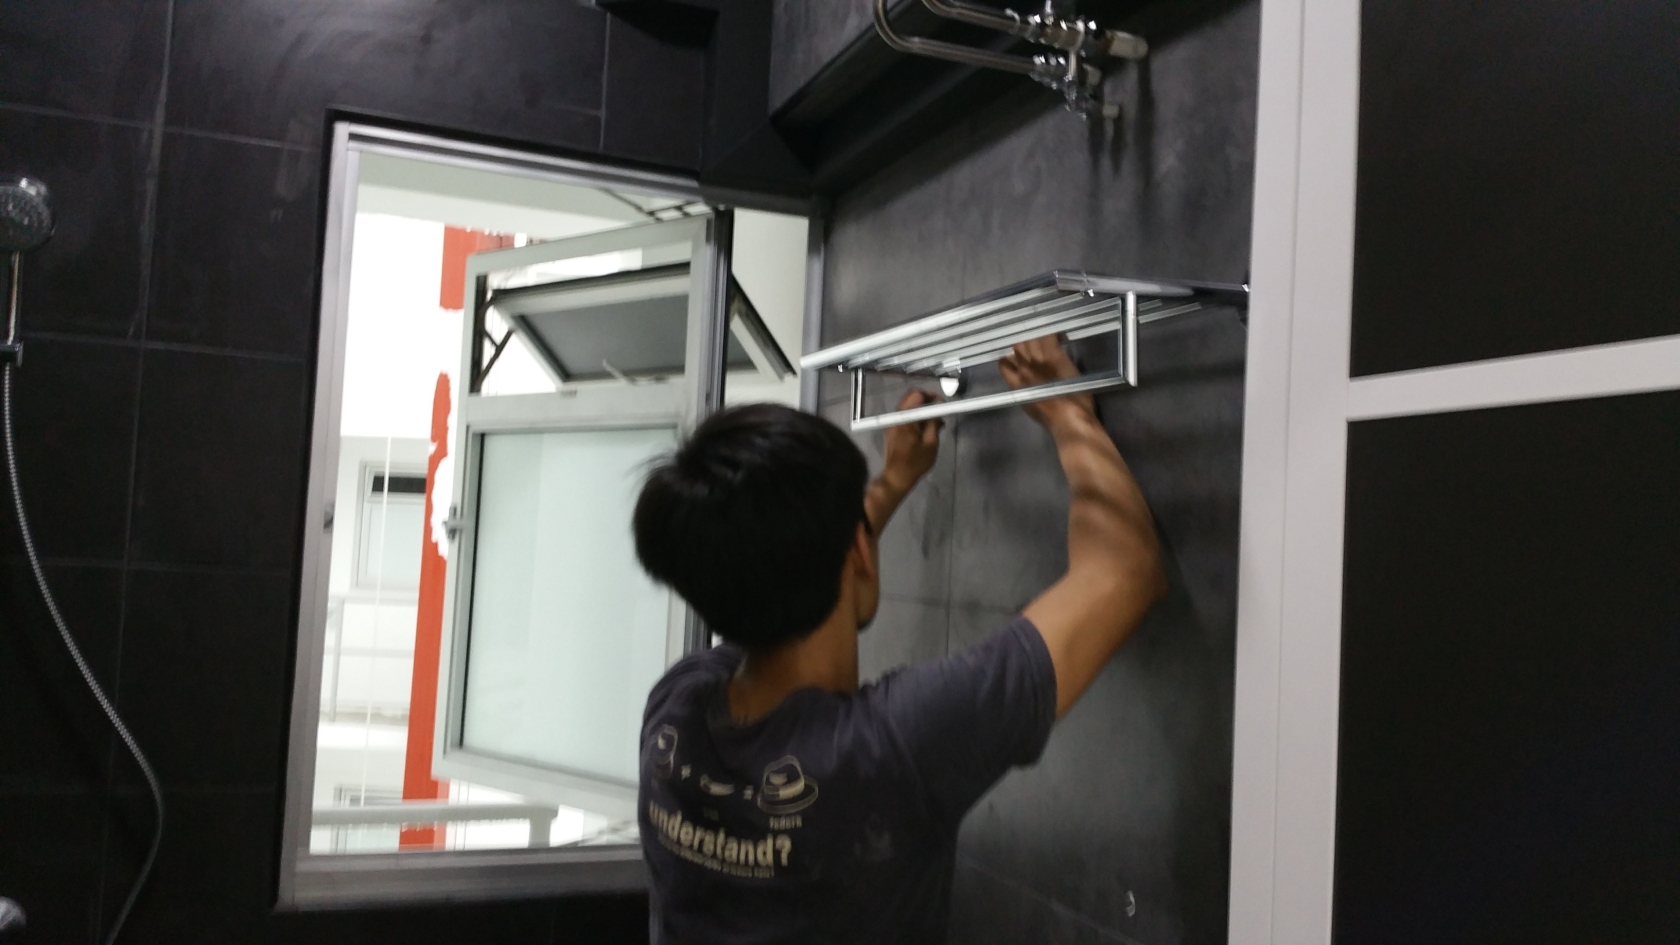
---------------------------------------------------------------------------------------------
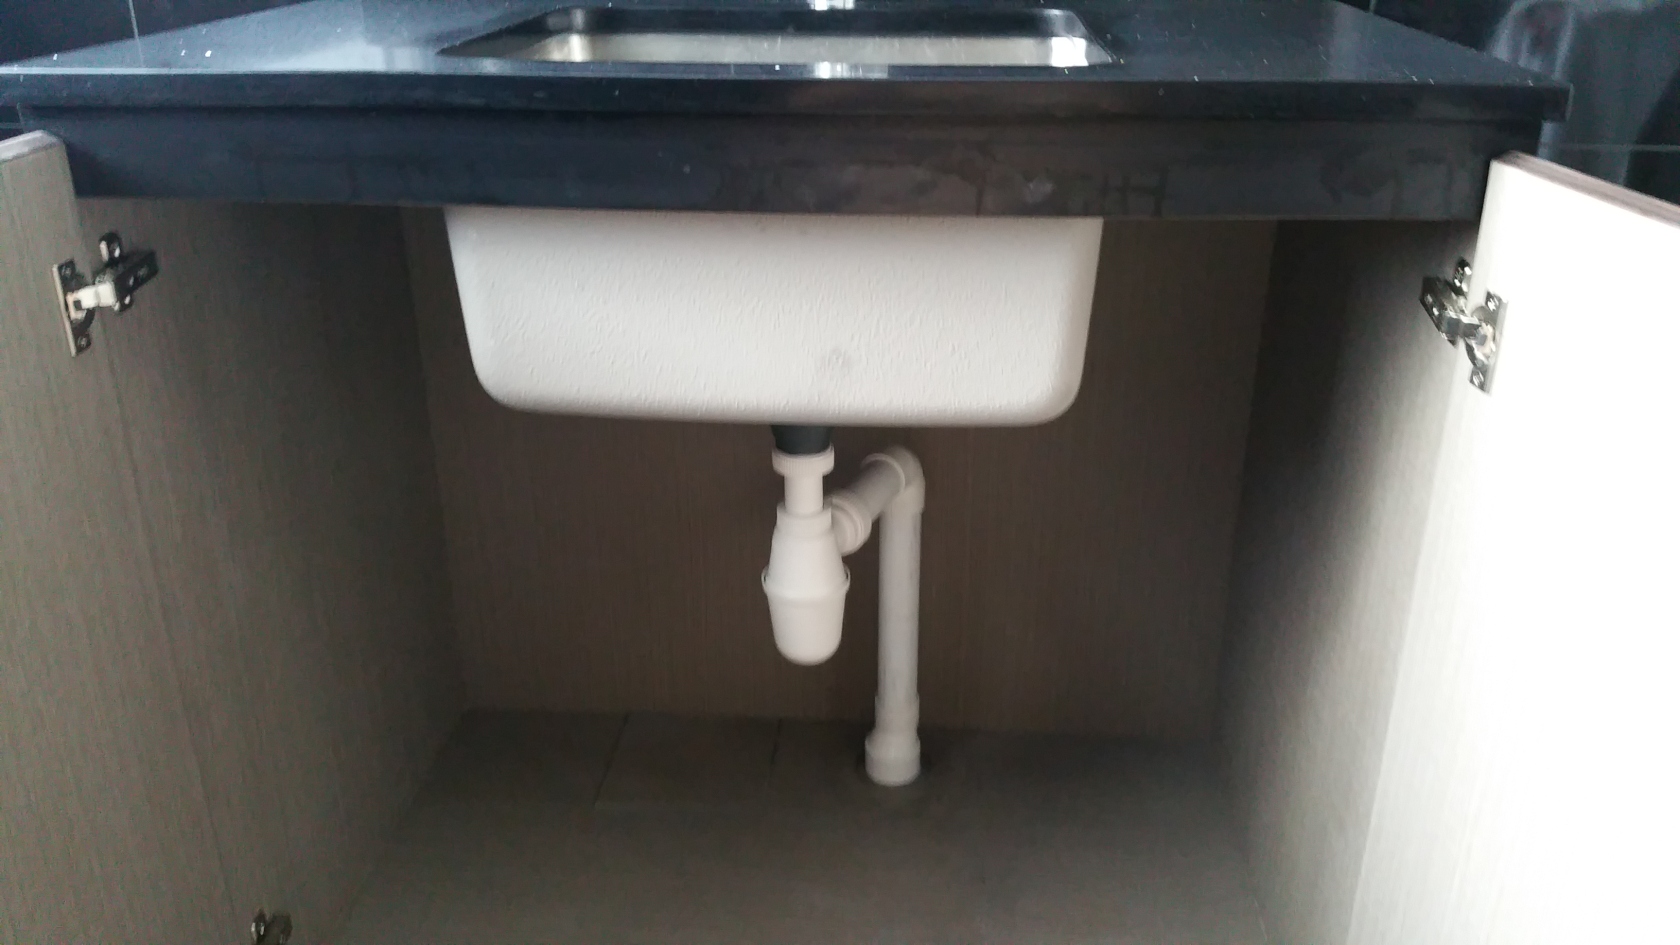
Sanitary Fittings finally completed
Kitchen Sink and Tap
It looks abit old-school yes, but I love how strong the water pressure is for this tap.
Stainless Steel Sink is Undermount. Make sure the Kitchen Sink you buy is at least 1.2mm thickness.
It may cost abit more, but it will be more dent resistant.
Bathroom Basin and Tap
OMG Looks so Classy!!! Got Hotel Standard or not?
It'll look even nicer when my Warm White LED strip is installed!
Towel Rack
I made sure they installed this one just high enough so I wouldn't knock my head on it
when I enter the bathroom, or get up from the toilet bowl after doing my business.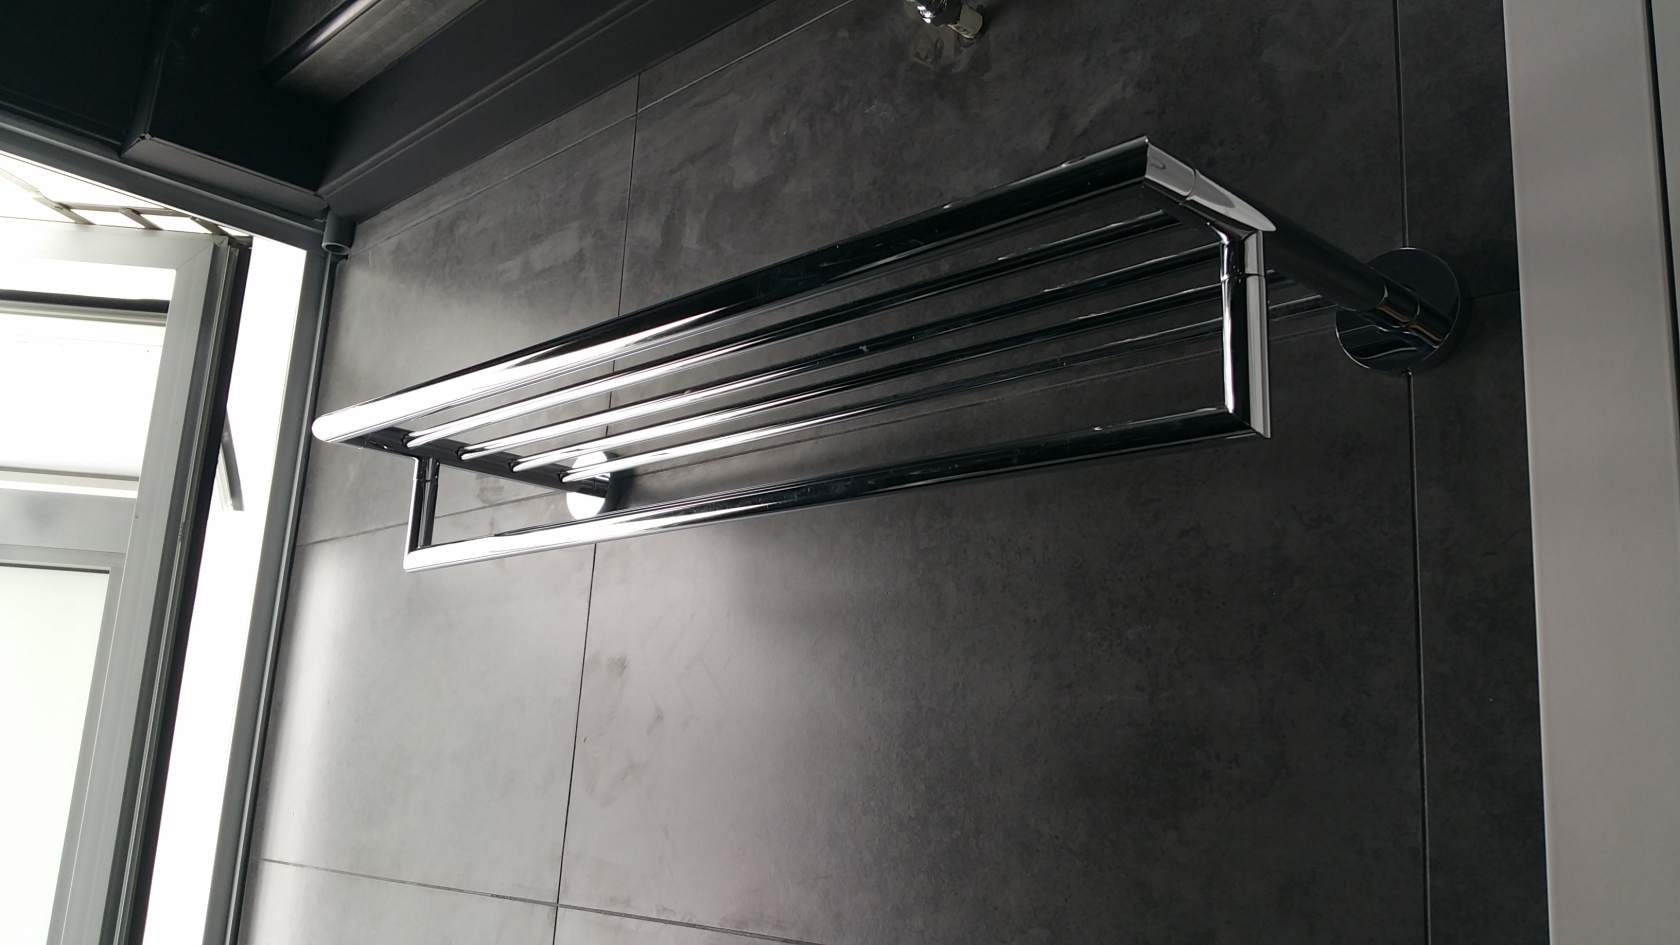
2 x Glass Corner Shelves
Very convenient for me to put my Shampoo. I like the black and chrome contrast!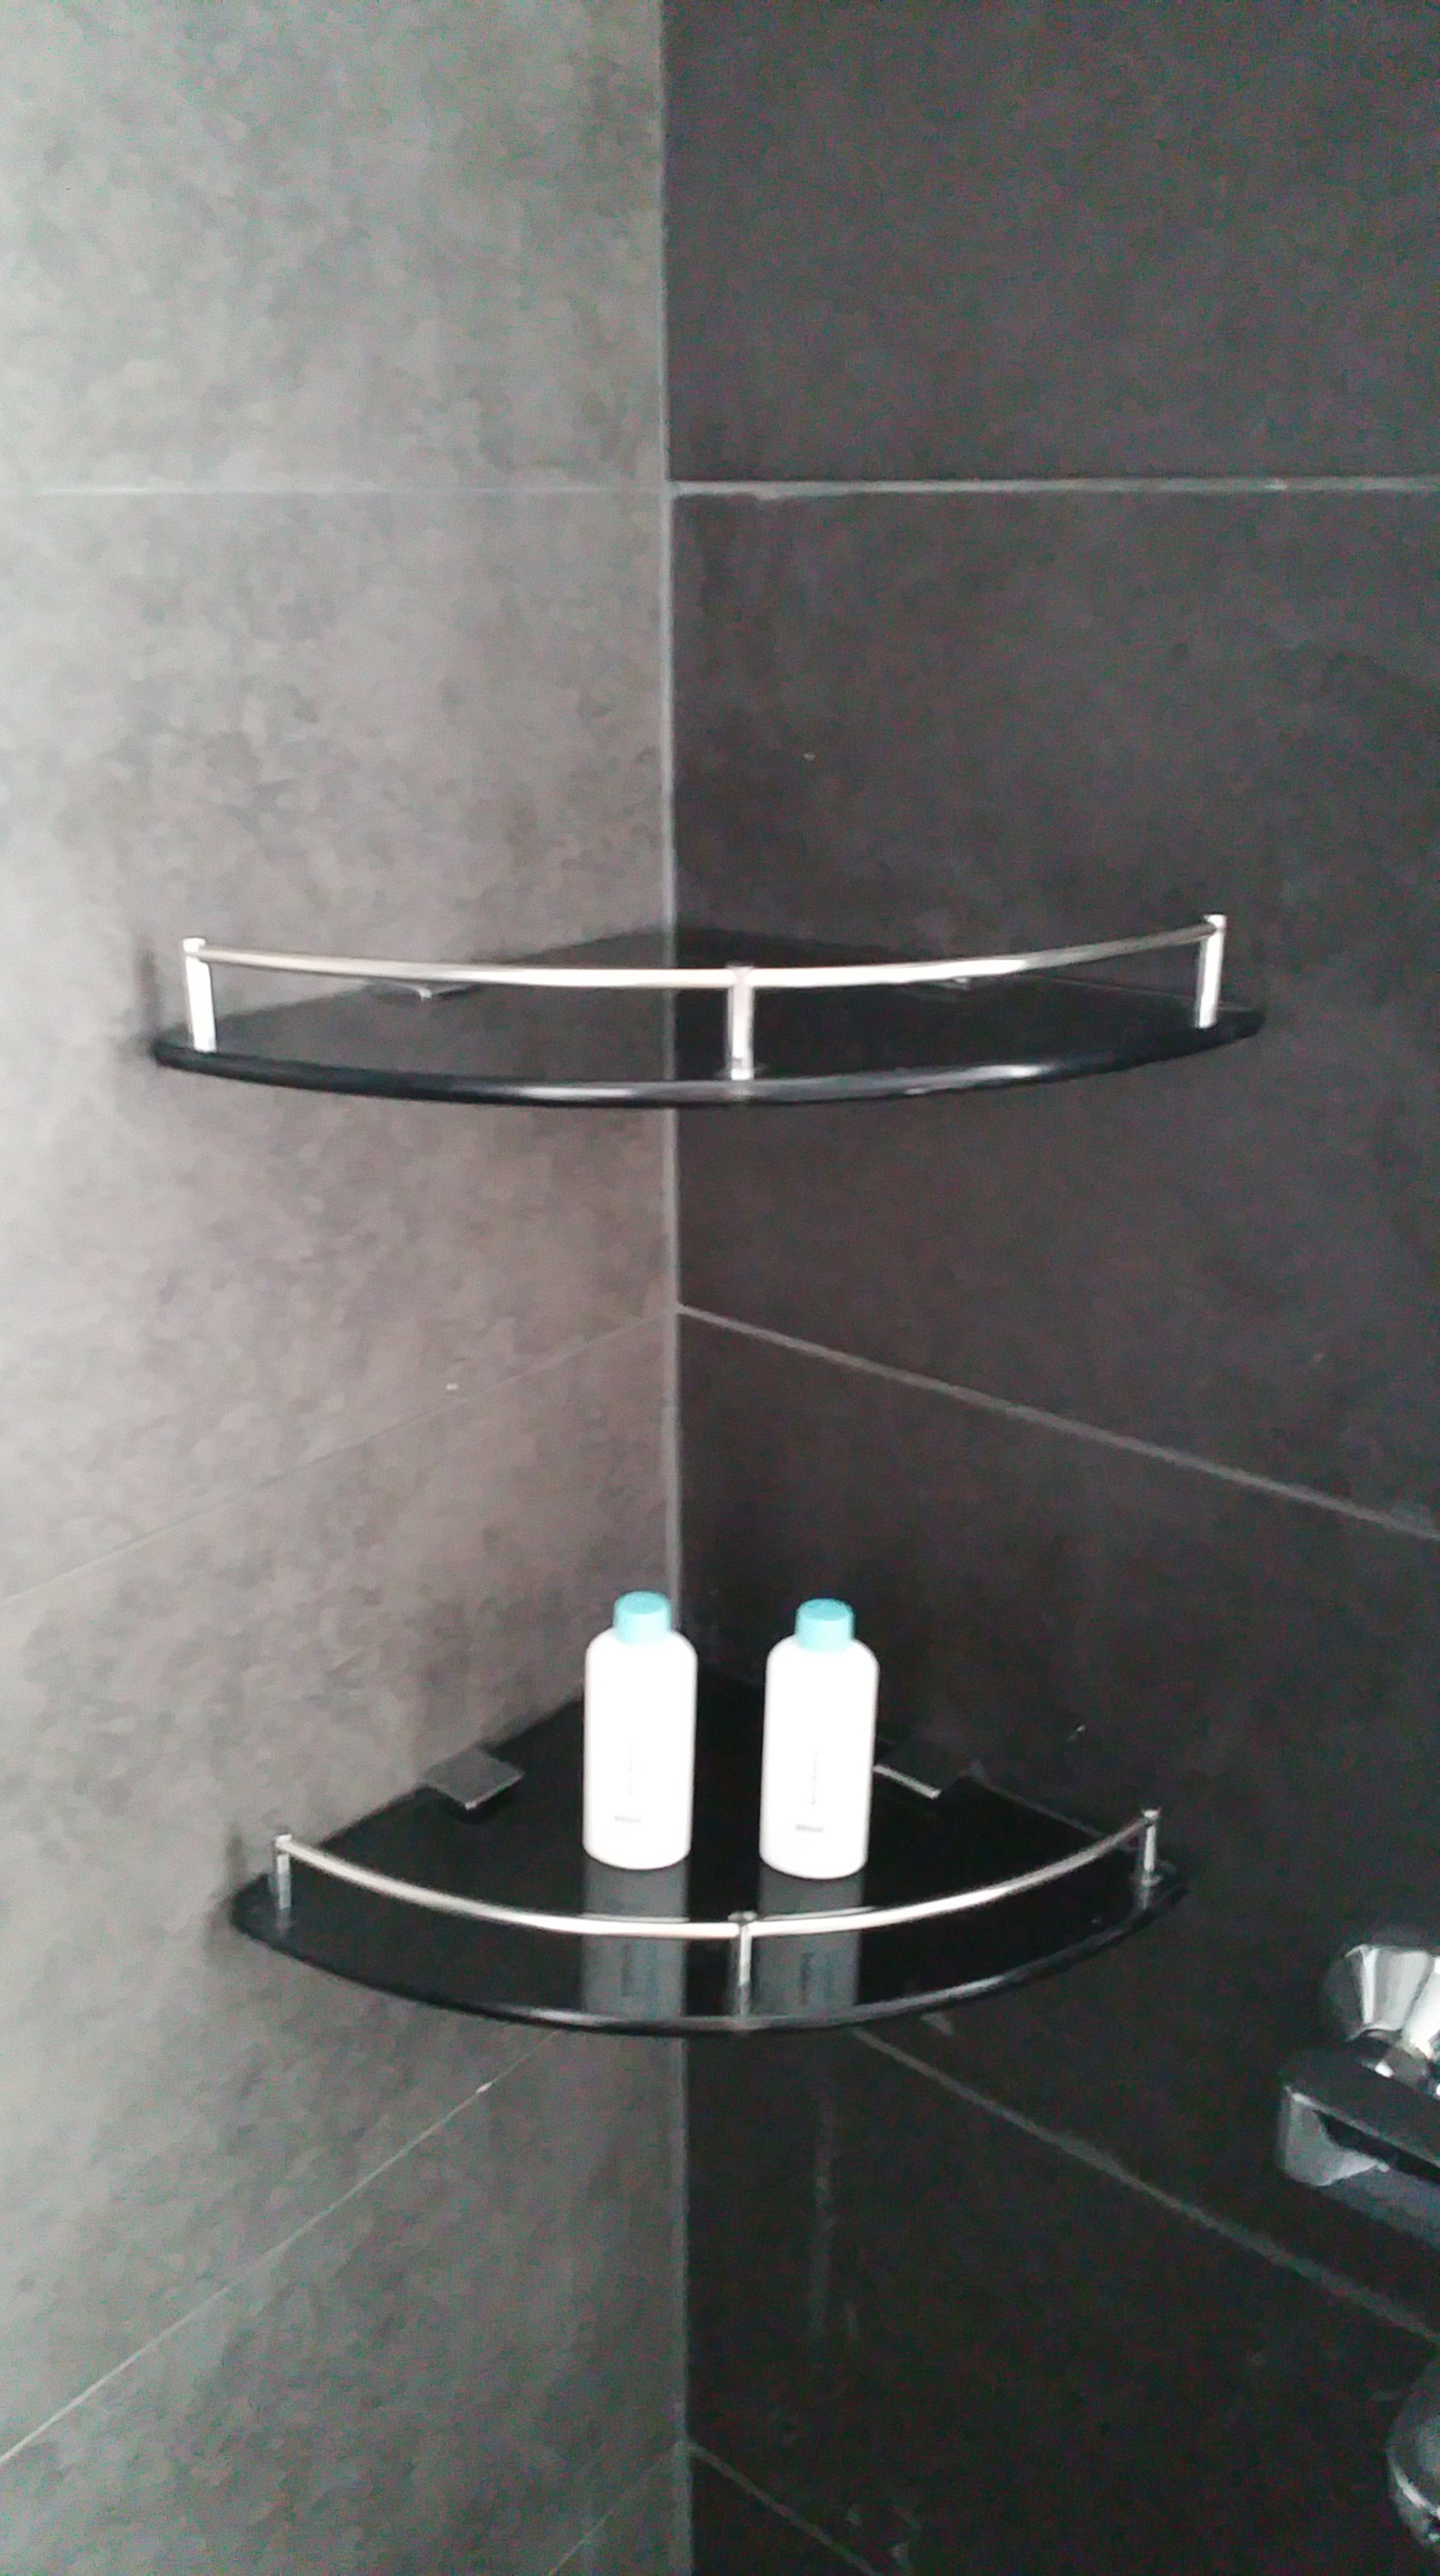
Toilet Paper Holder
Nothing special, just a holder with a cover.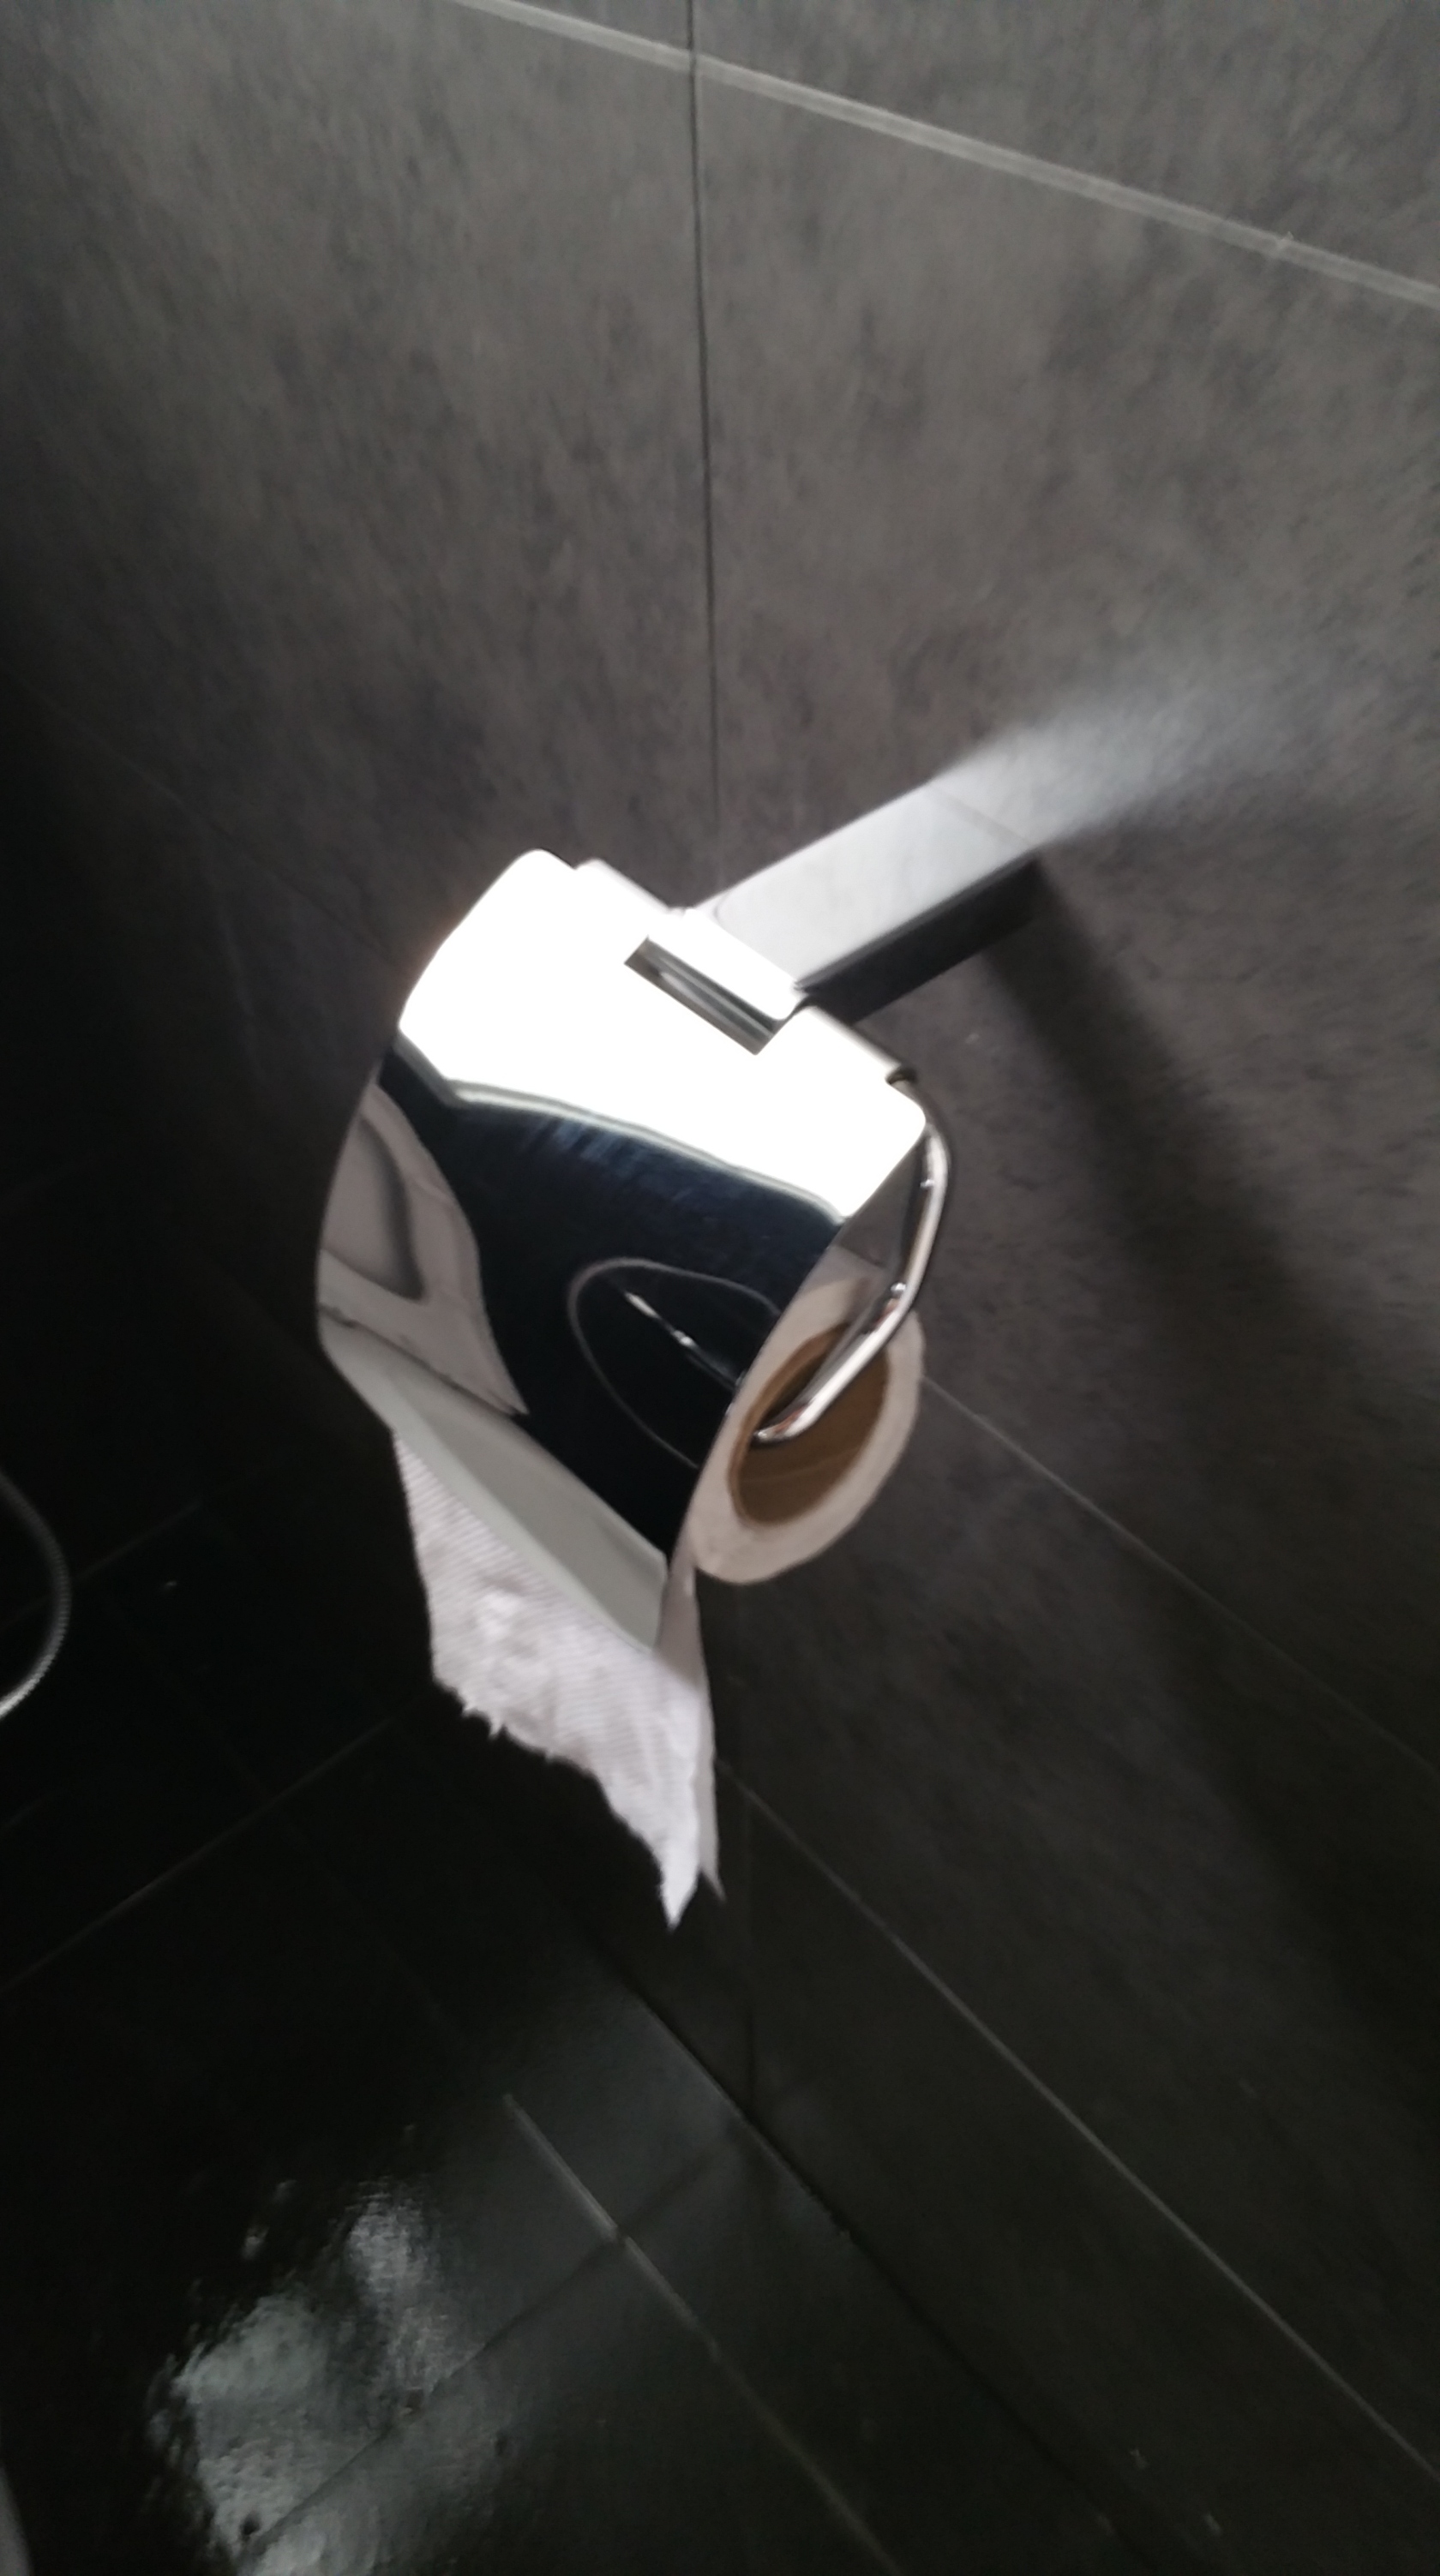
Toilet Bowl
Again, nothing special, I used back HDB's default Toilet Bowl.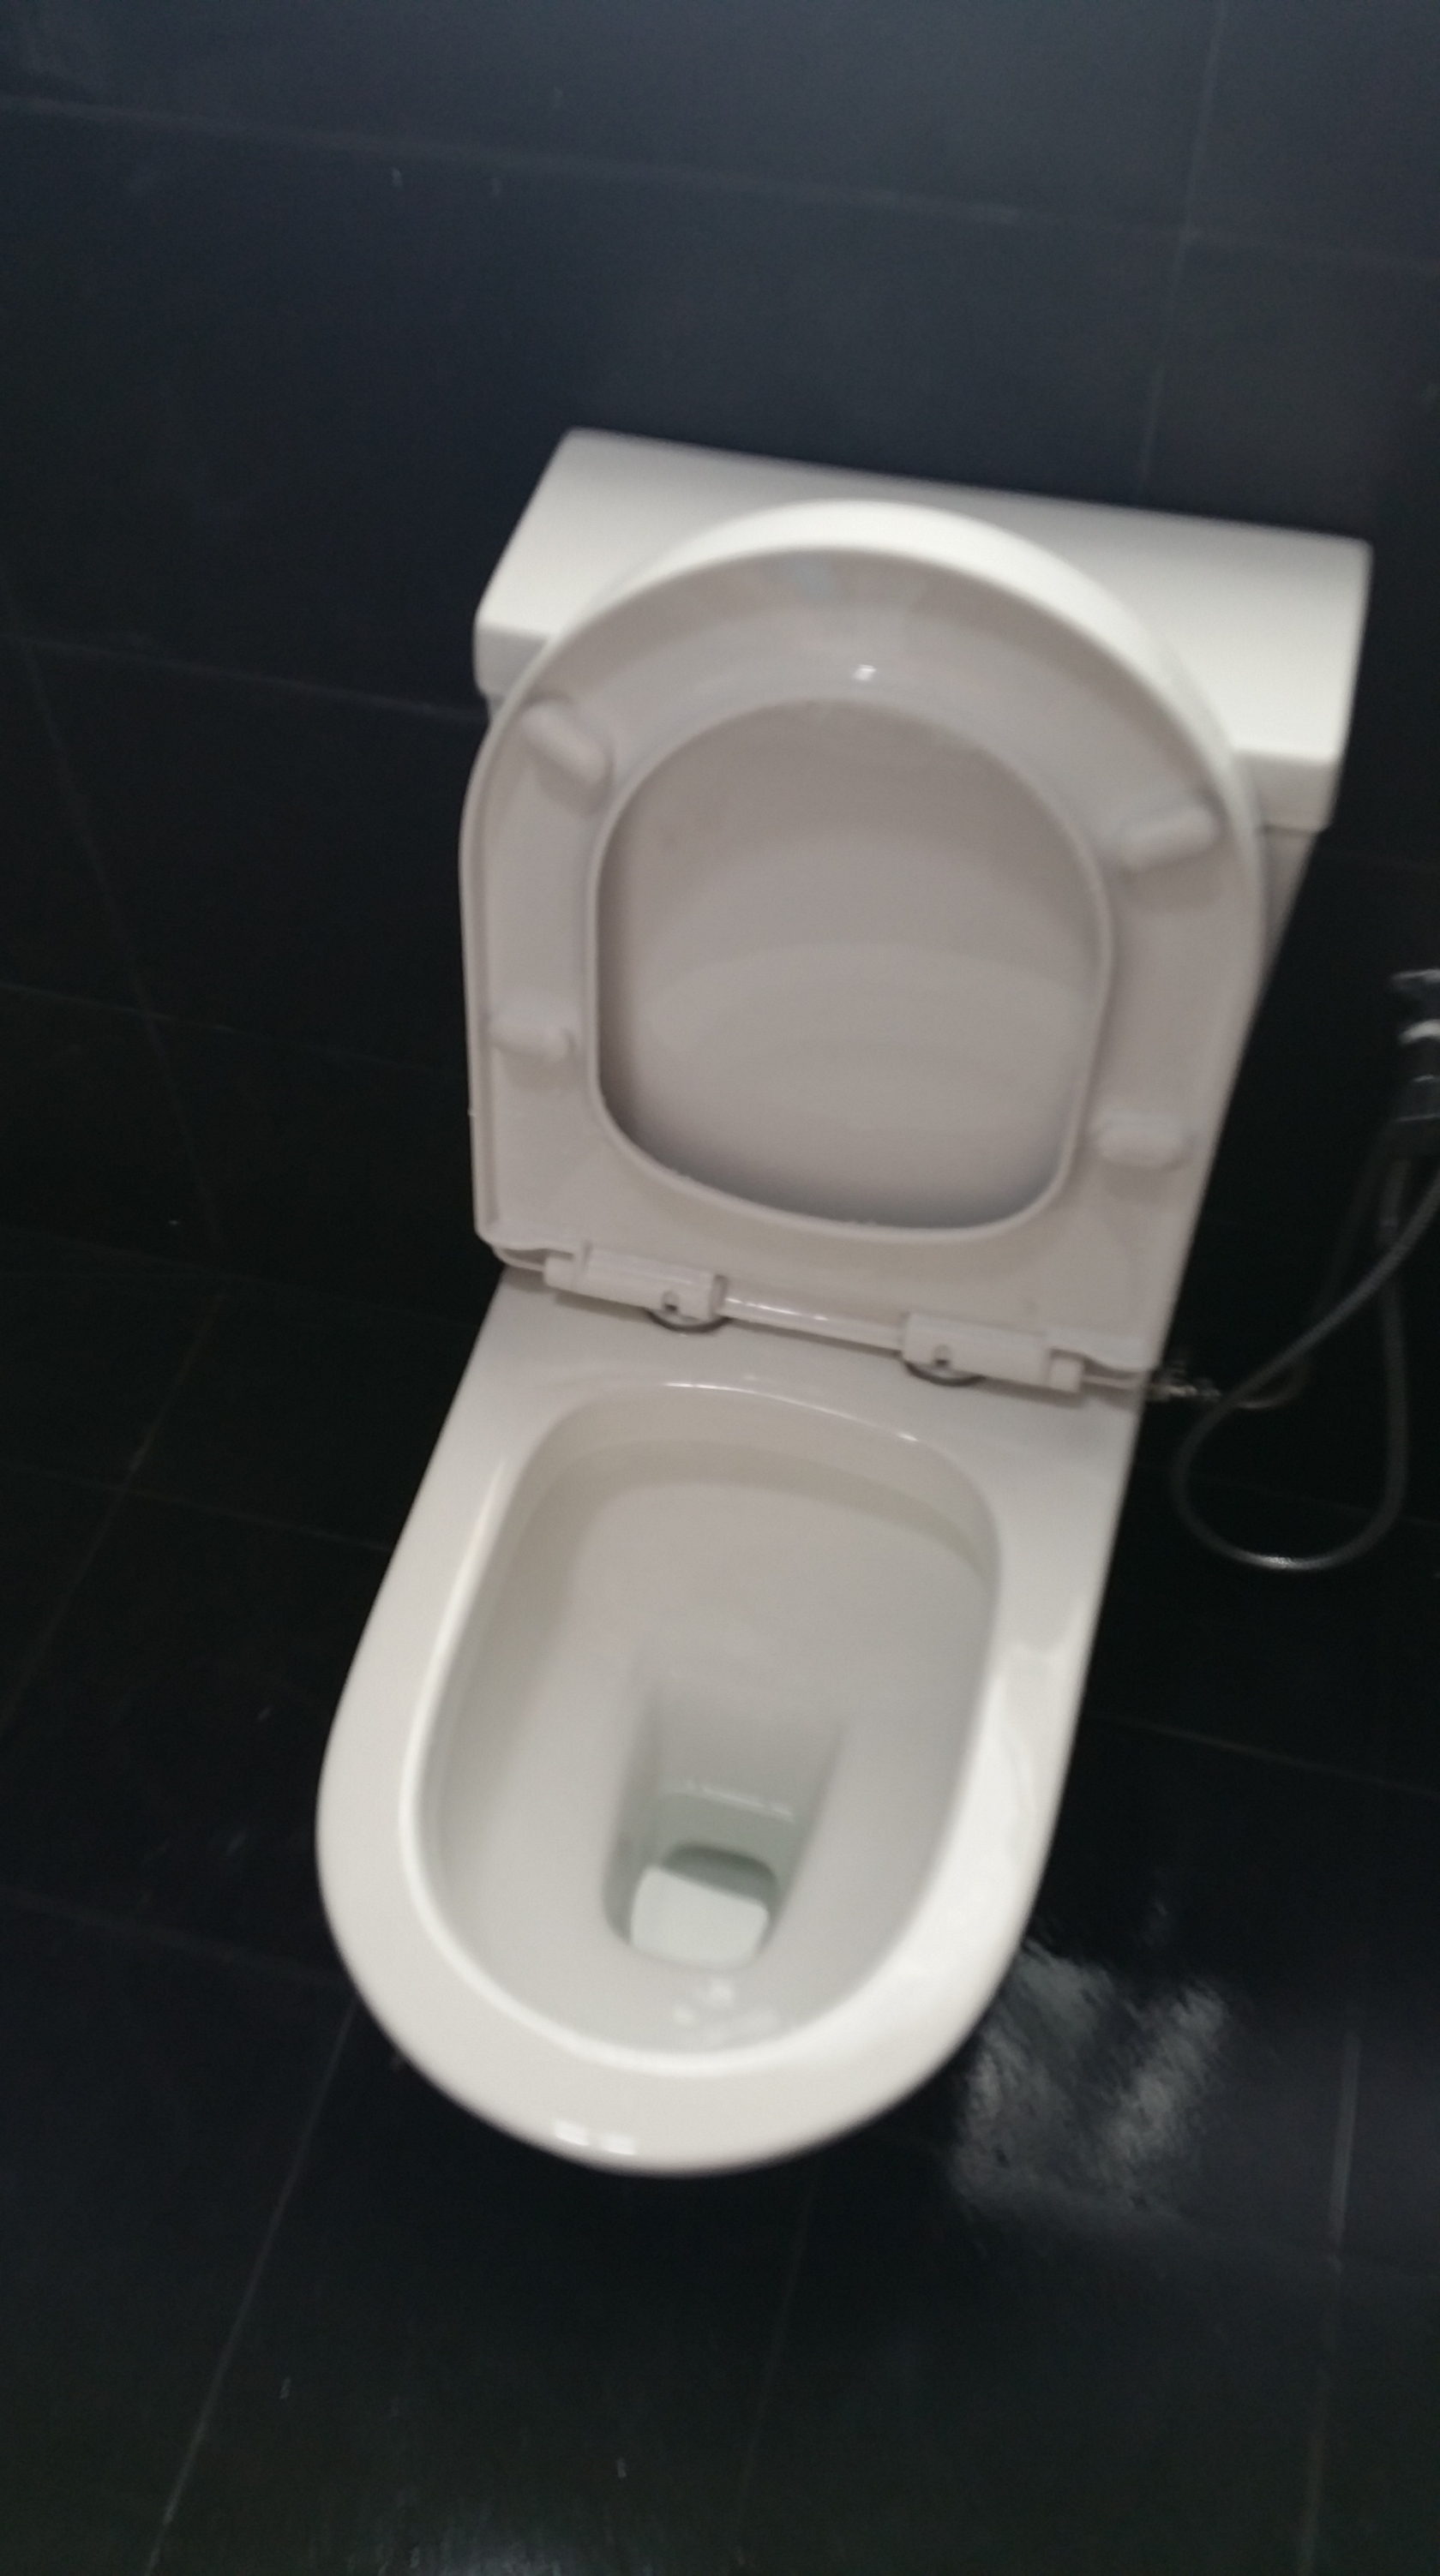
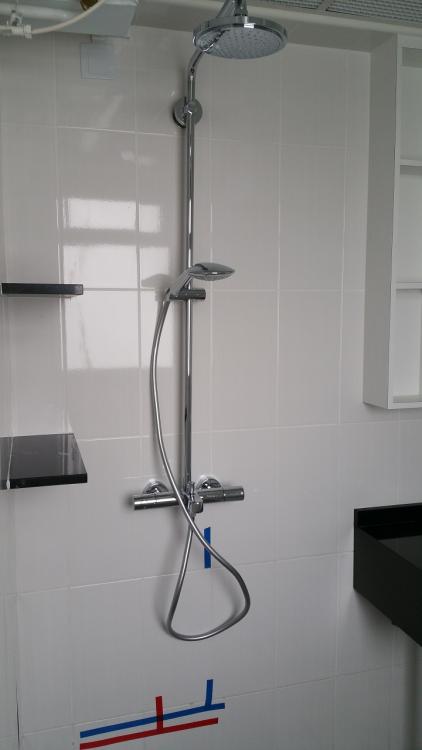
GROHE Shower Head and Mixer
While the thing itself fitted nicely, I'm a little disappointed that Water pressure
from the GROHE Shower Head was just so-so only.
At first I was like "Oh dear...is it because my place water pressure is naturally low?"
(What ive read is that sometimes High floor water pressure is lower then lower floors)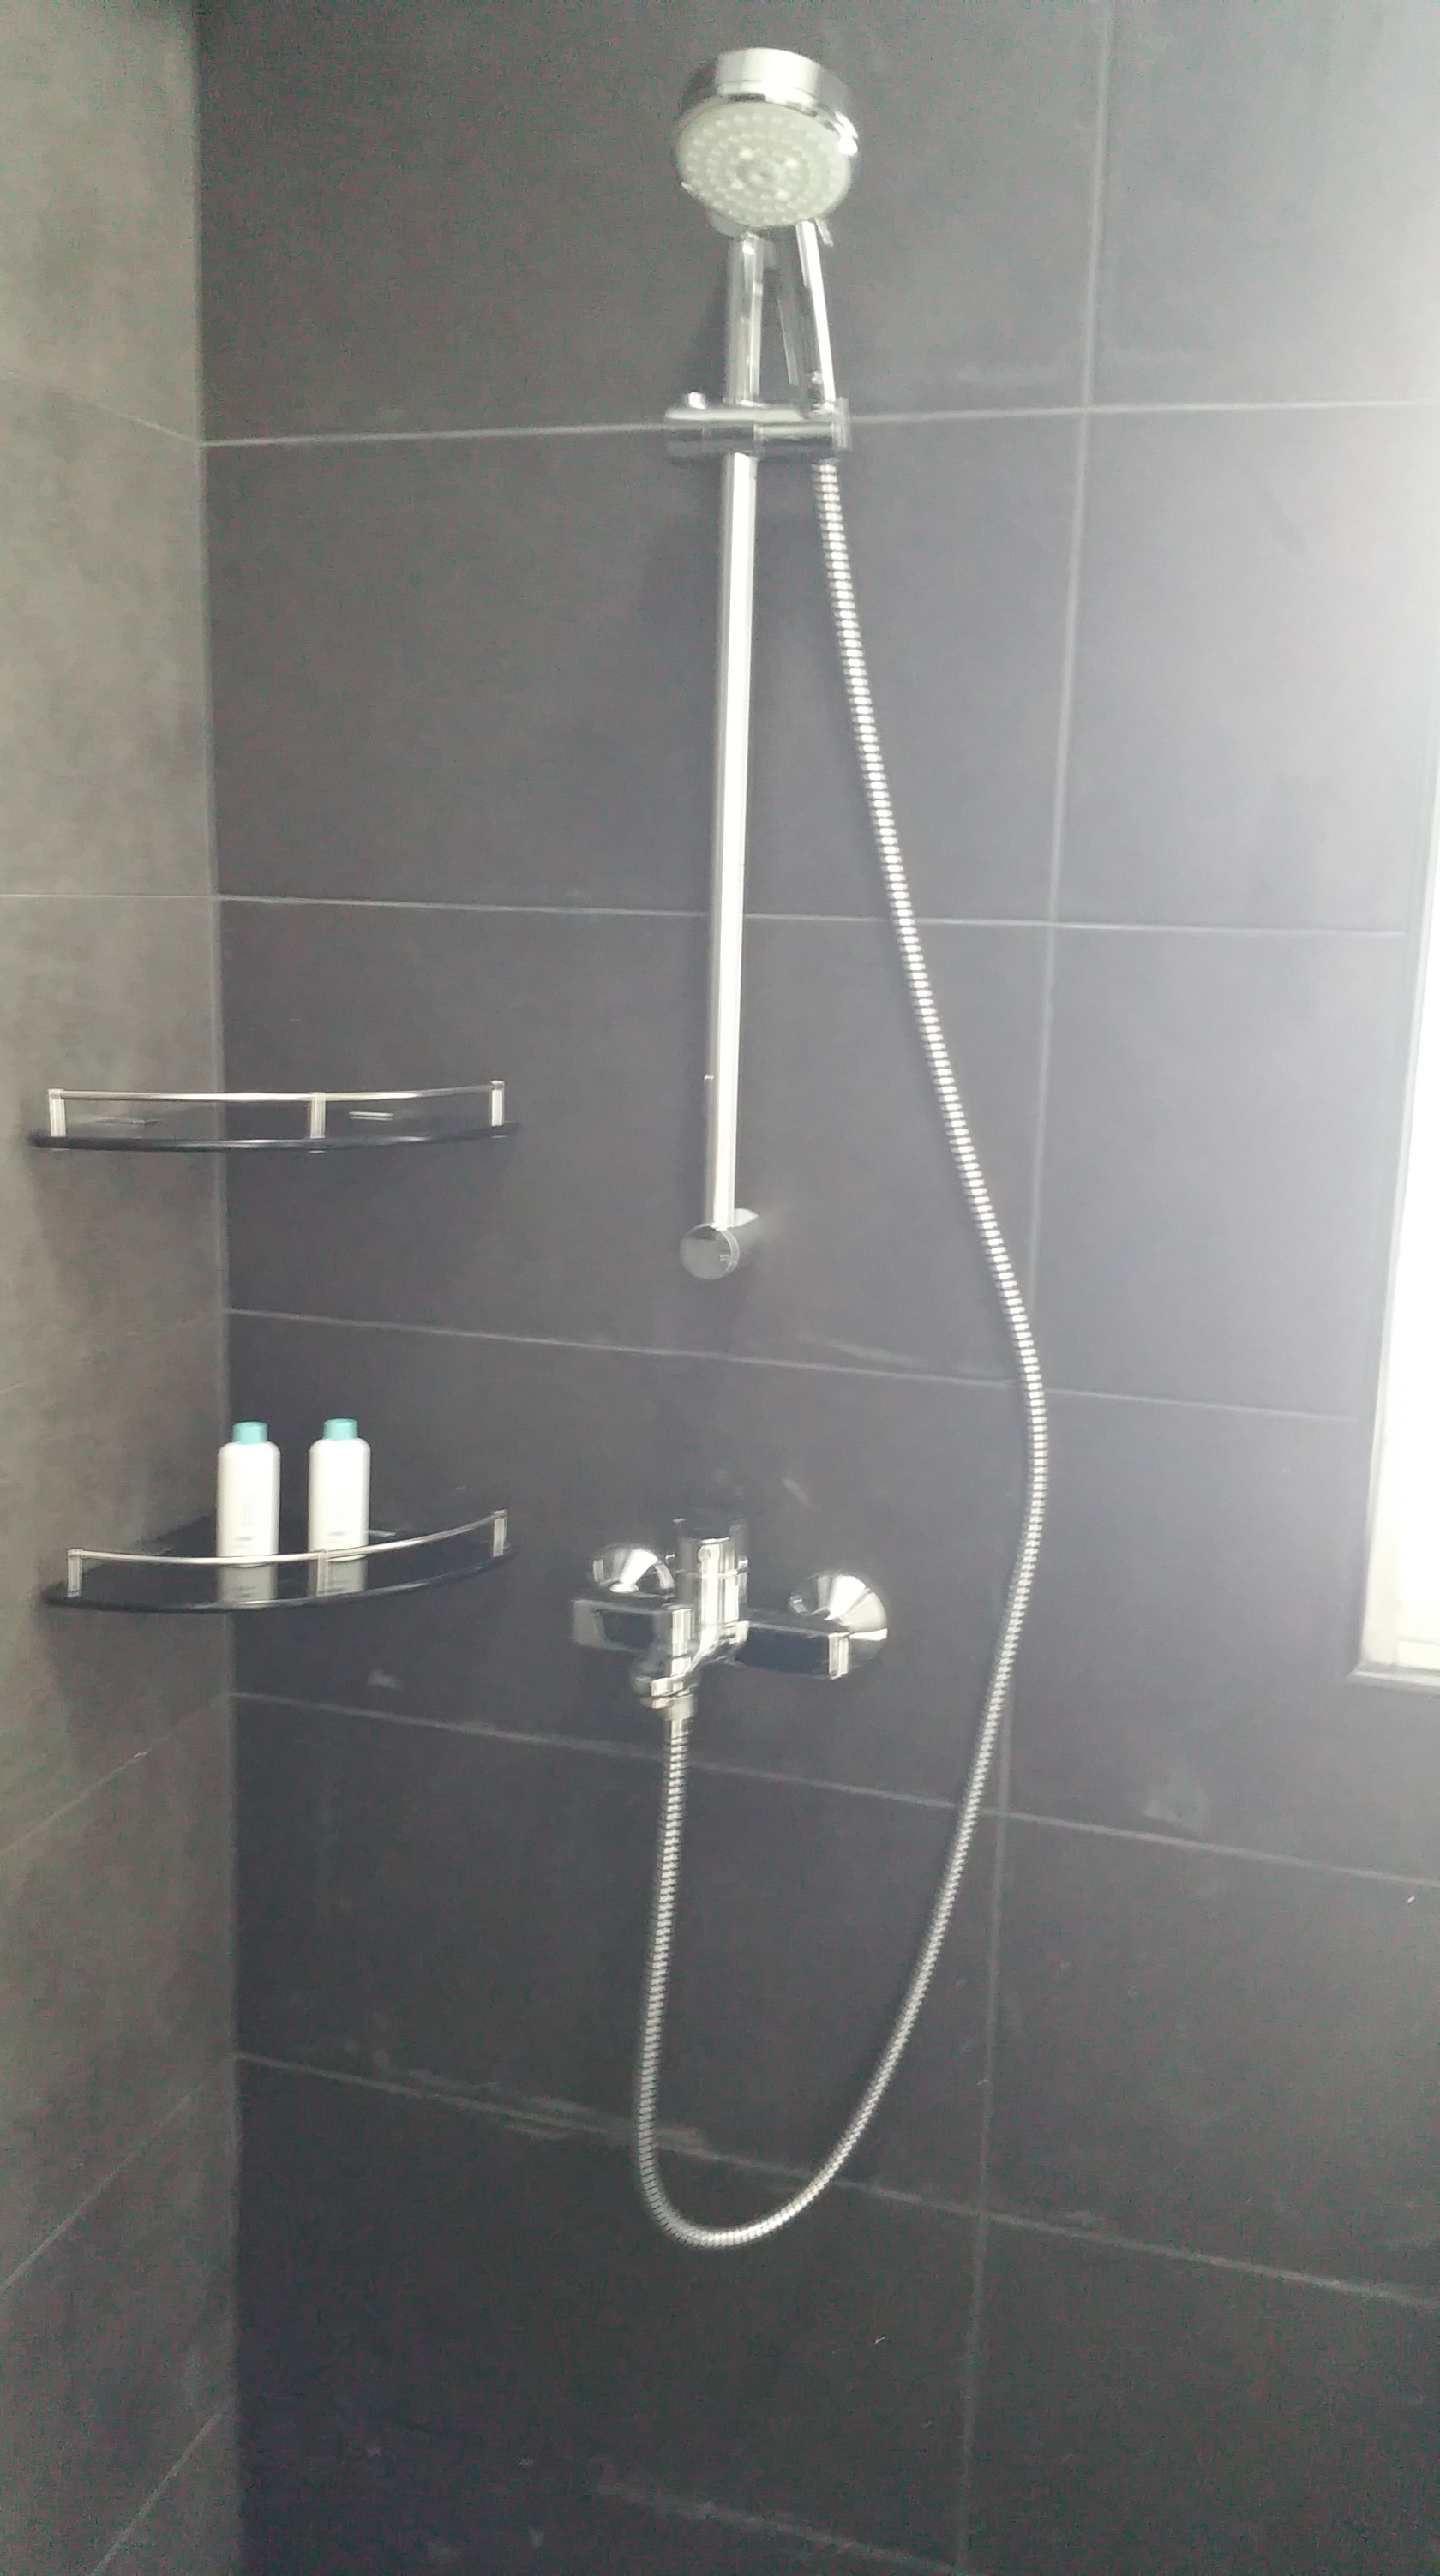
Guess what?
I changed the GROHE Shower Head to HDB's default shower head and to my surprise,
the water pressure was MUCH BETTER!?!? What!?!?
This is the water pressure from the GROHE Shower Head
This is already set at maximum. Feels only so-so.
This is the water pressure from HDB’s Default Shower Head
Notice how much more stronger it is?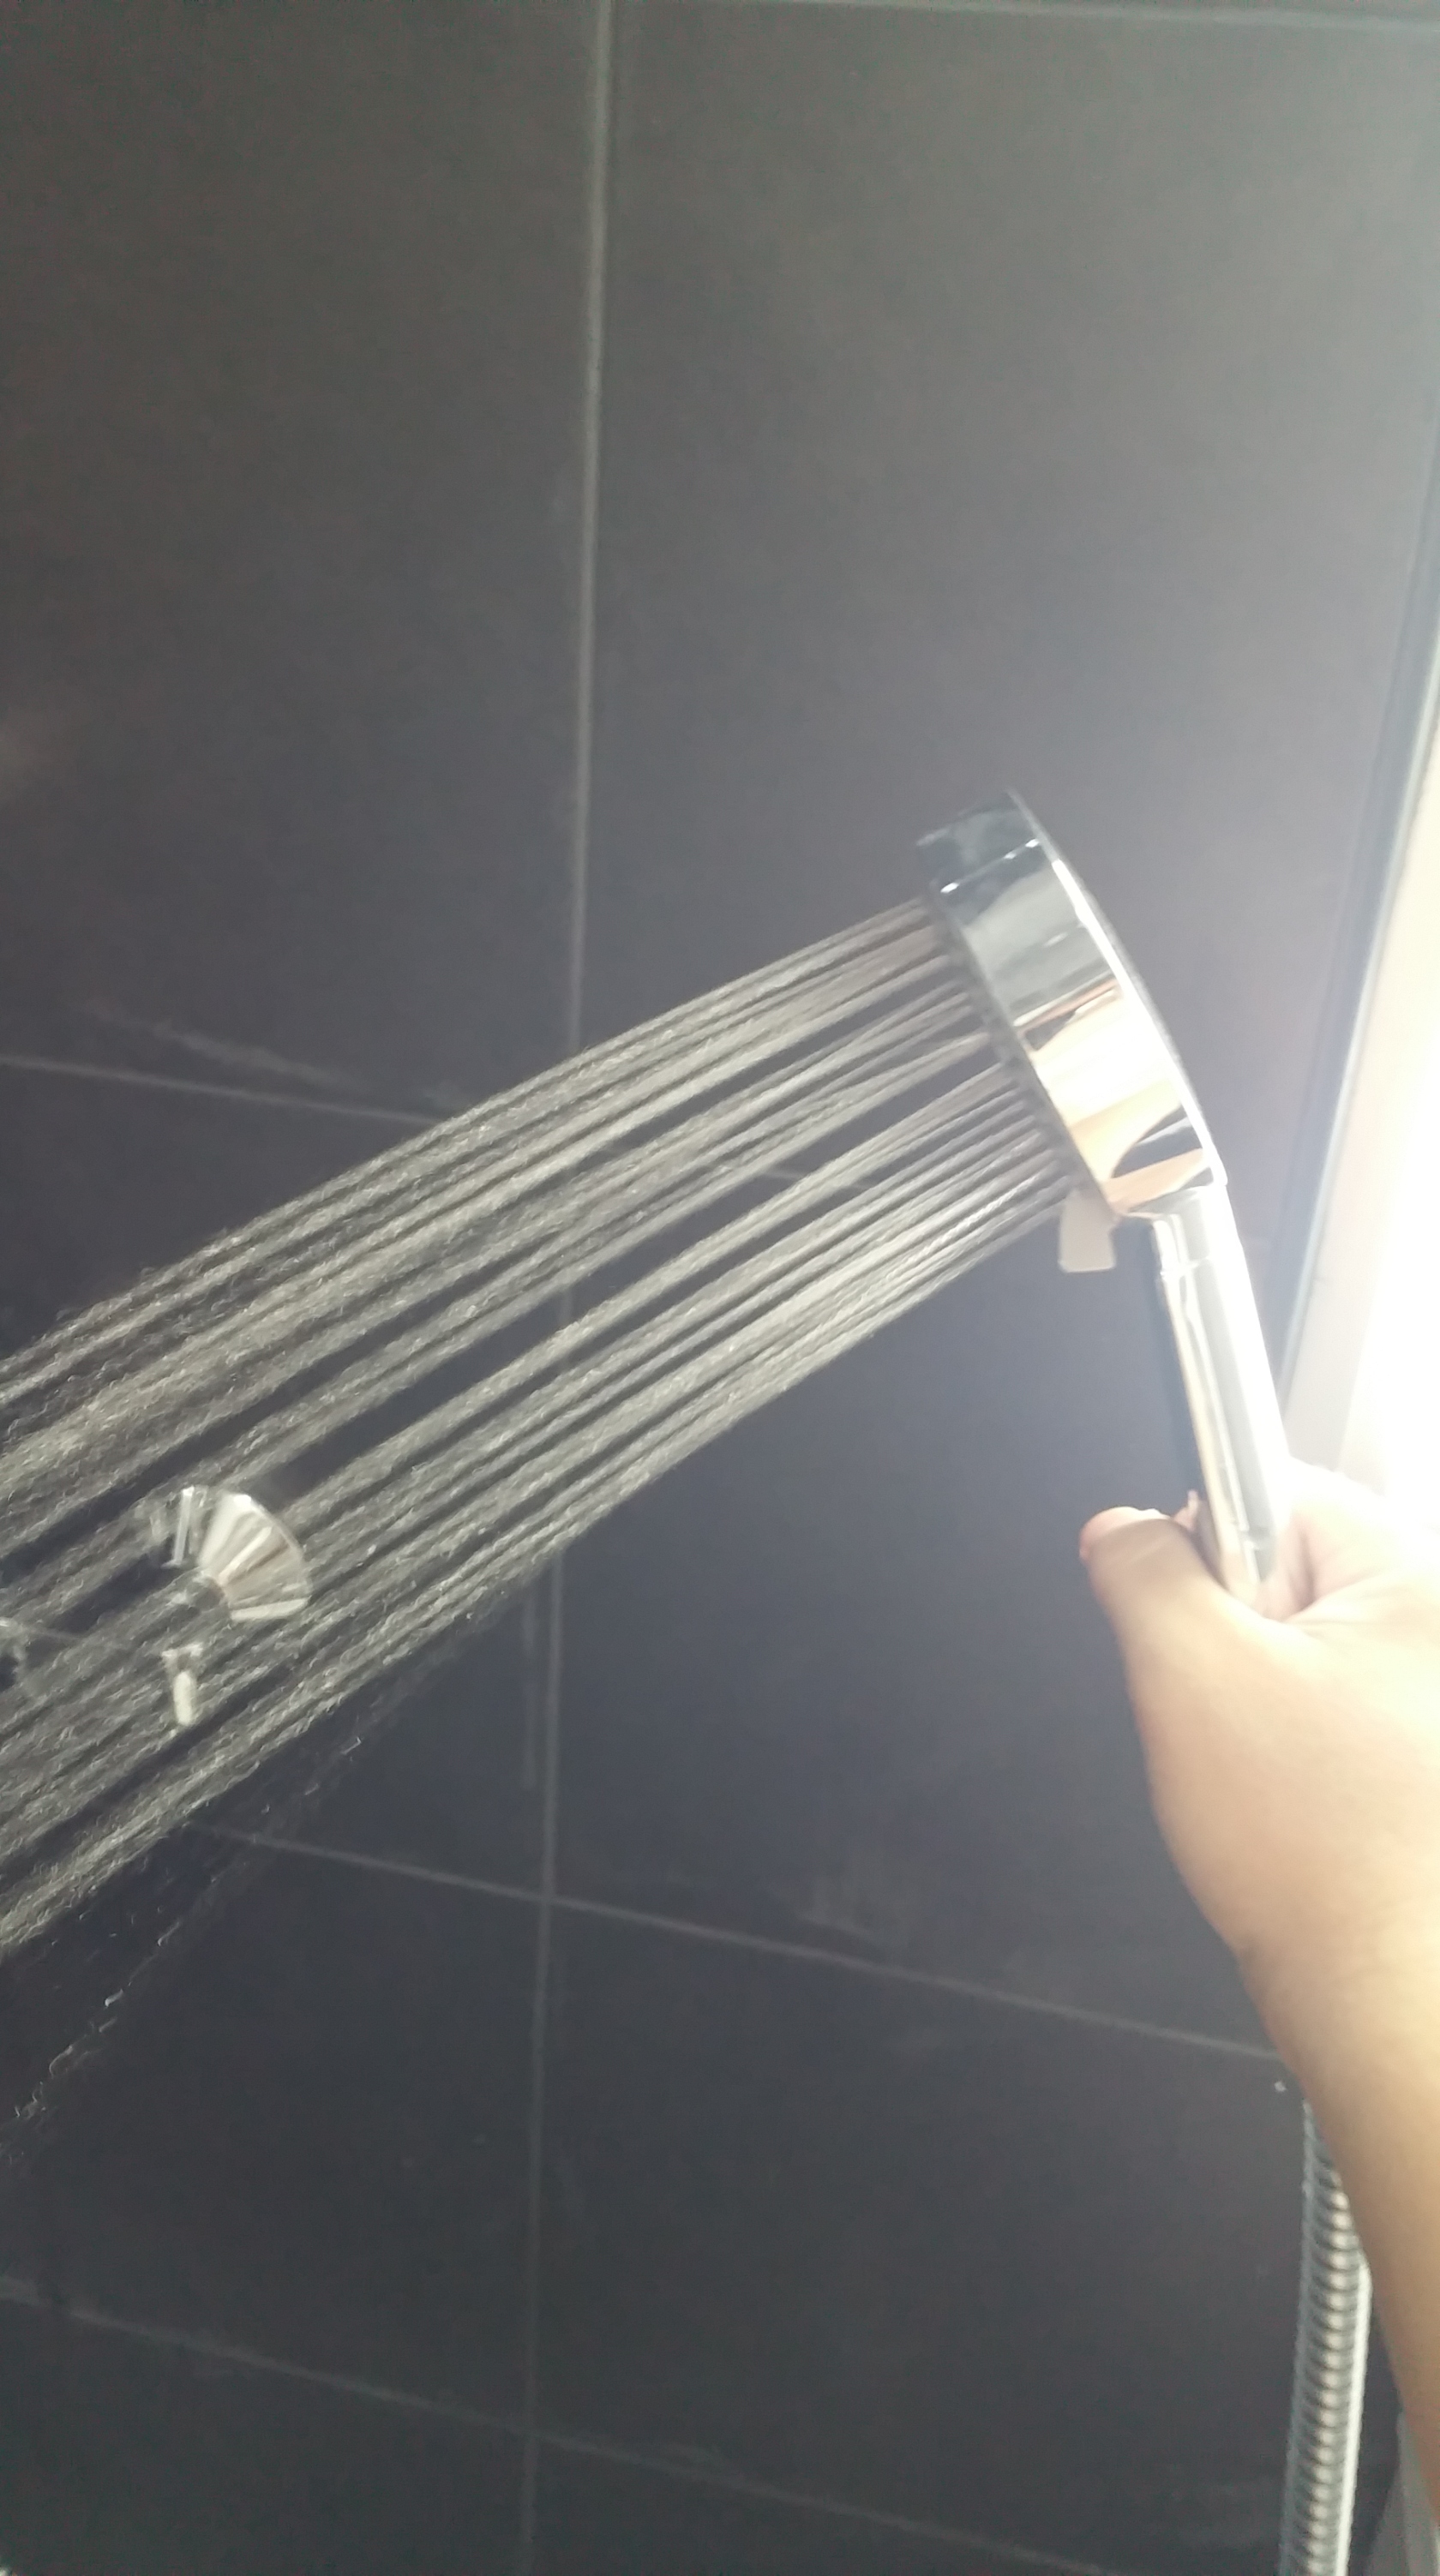
So Dear Readers, Lesson Learnt.
Don't just throw out HDB's default fittings, they may sometimes work better!!
Ariston 20L Andris Slim Storage Water Heater
I really like how it looks so slim and tucked away nicely out of sight.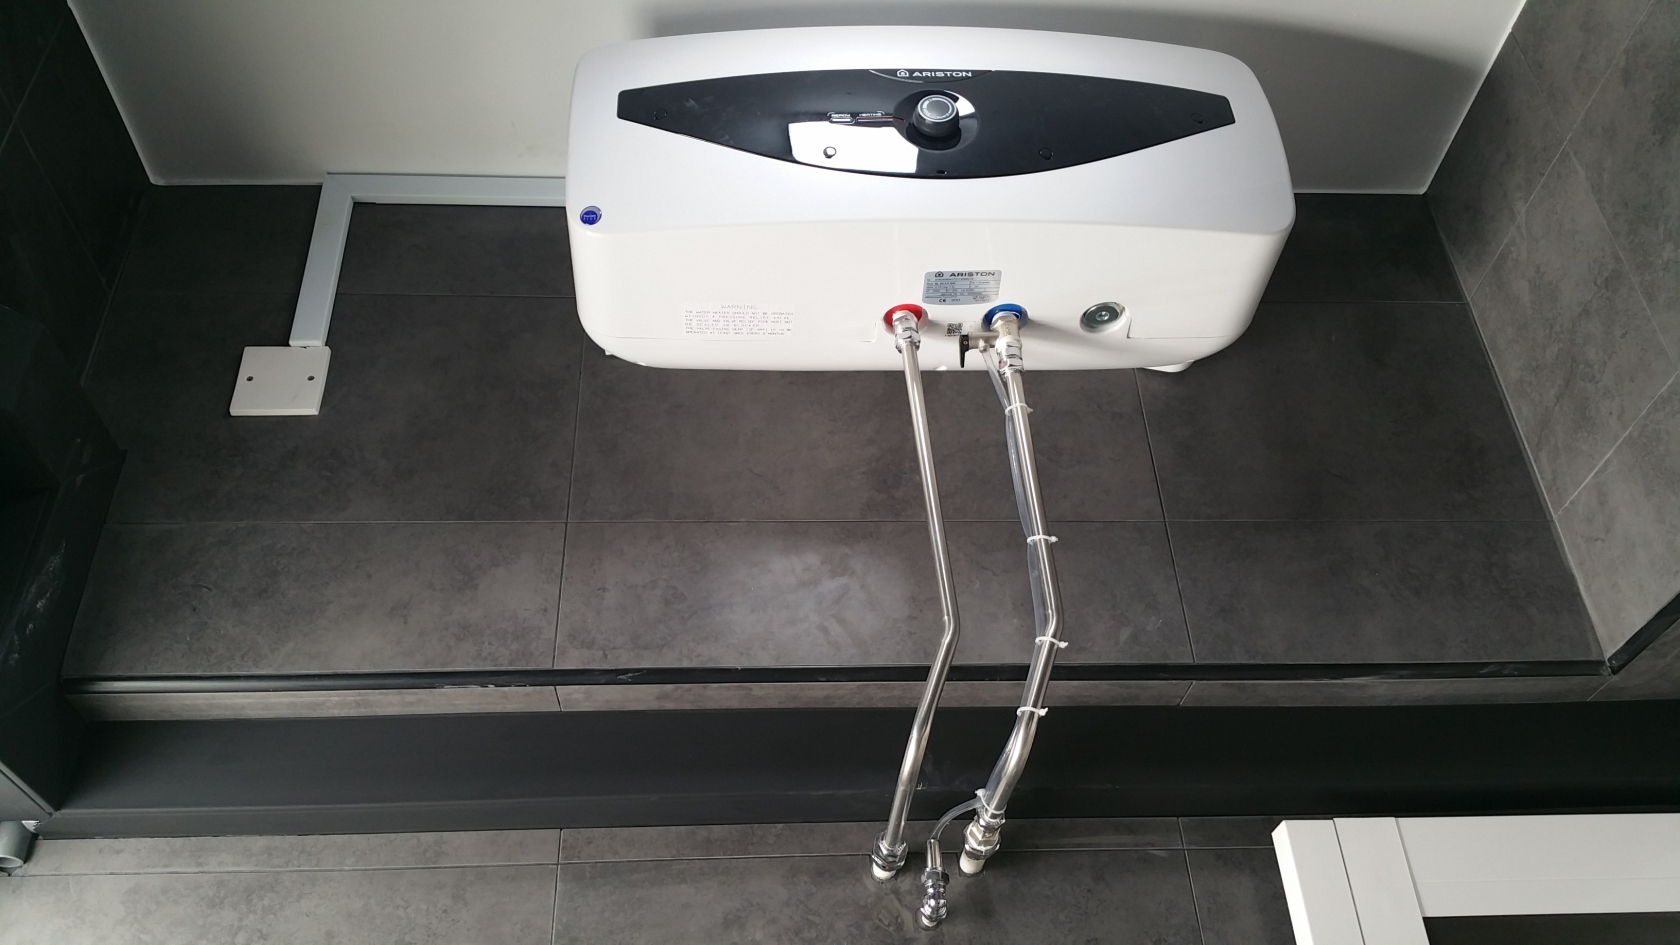
According to official specs, its supposed to take 20 mins for water to actually heat up.
I know right? Who can wait 20 mins so long? In actual usage however, it took only
about 5 minutes or so to feel hot water already. I guess the 20 mins is an estimated
time for maximum heat. (If u want to boil eggs in the bathroom lah!!)
This Bidet Spray I bought is POWERFUL!
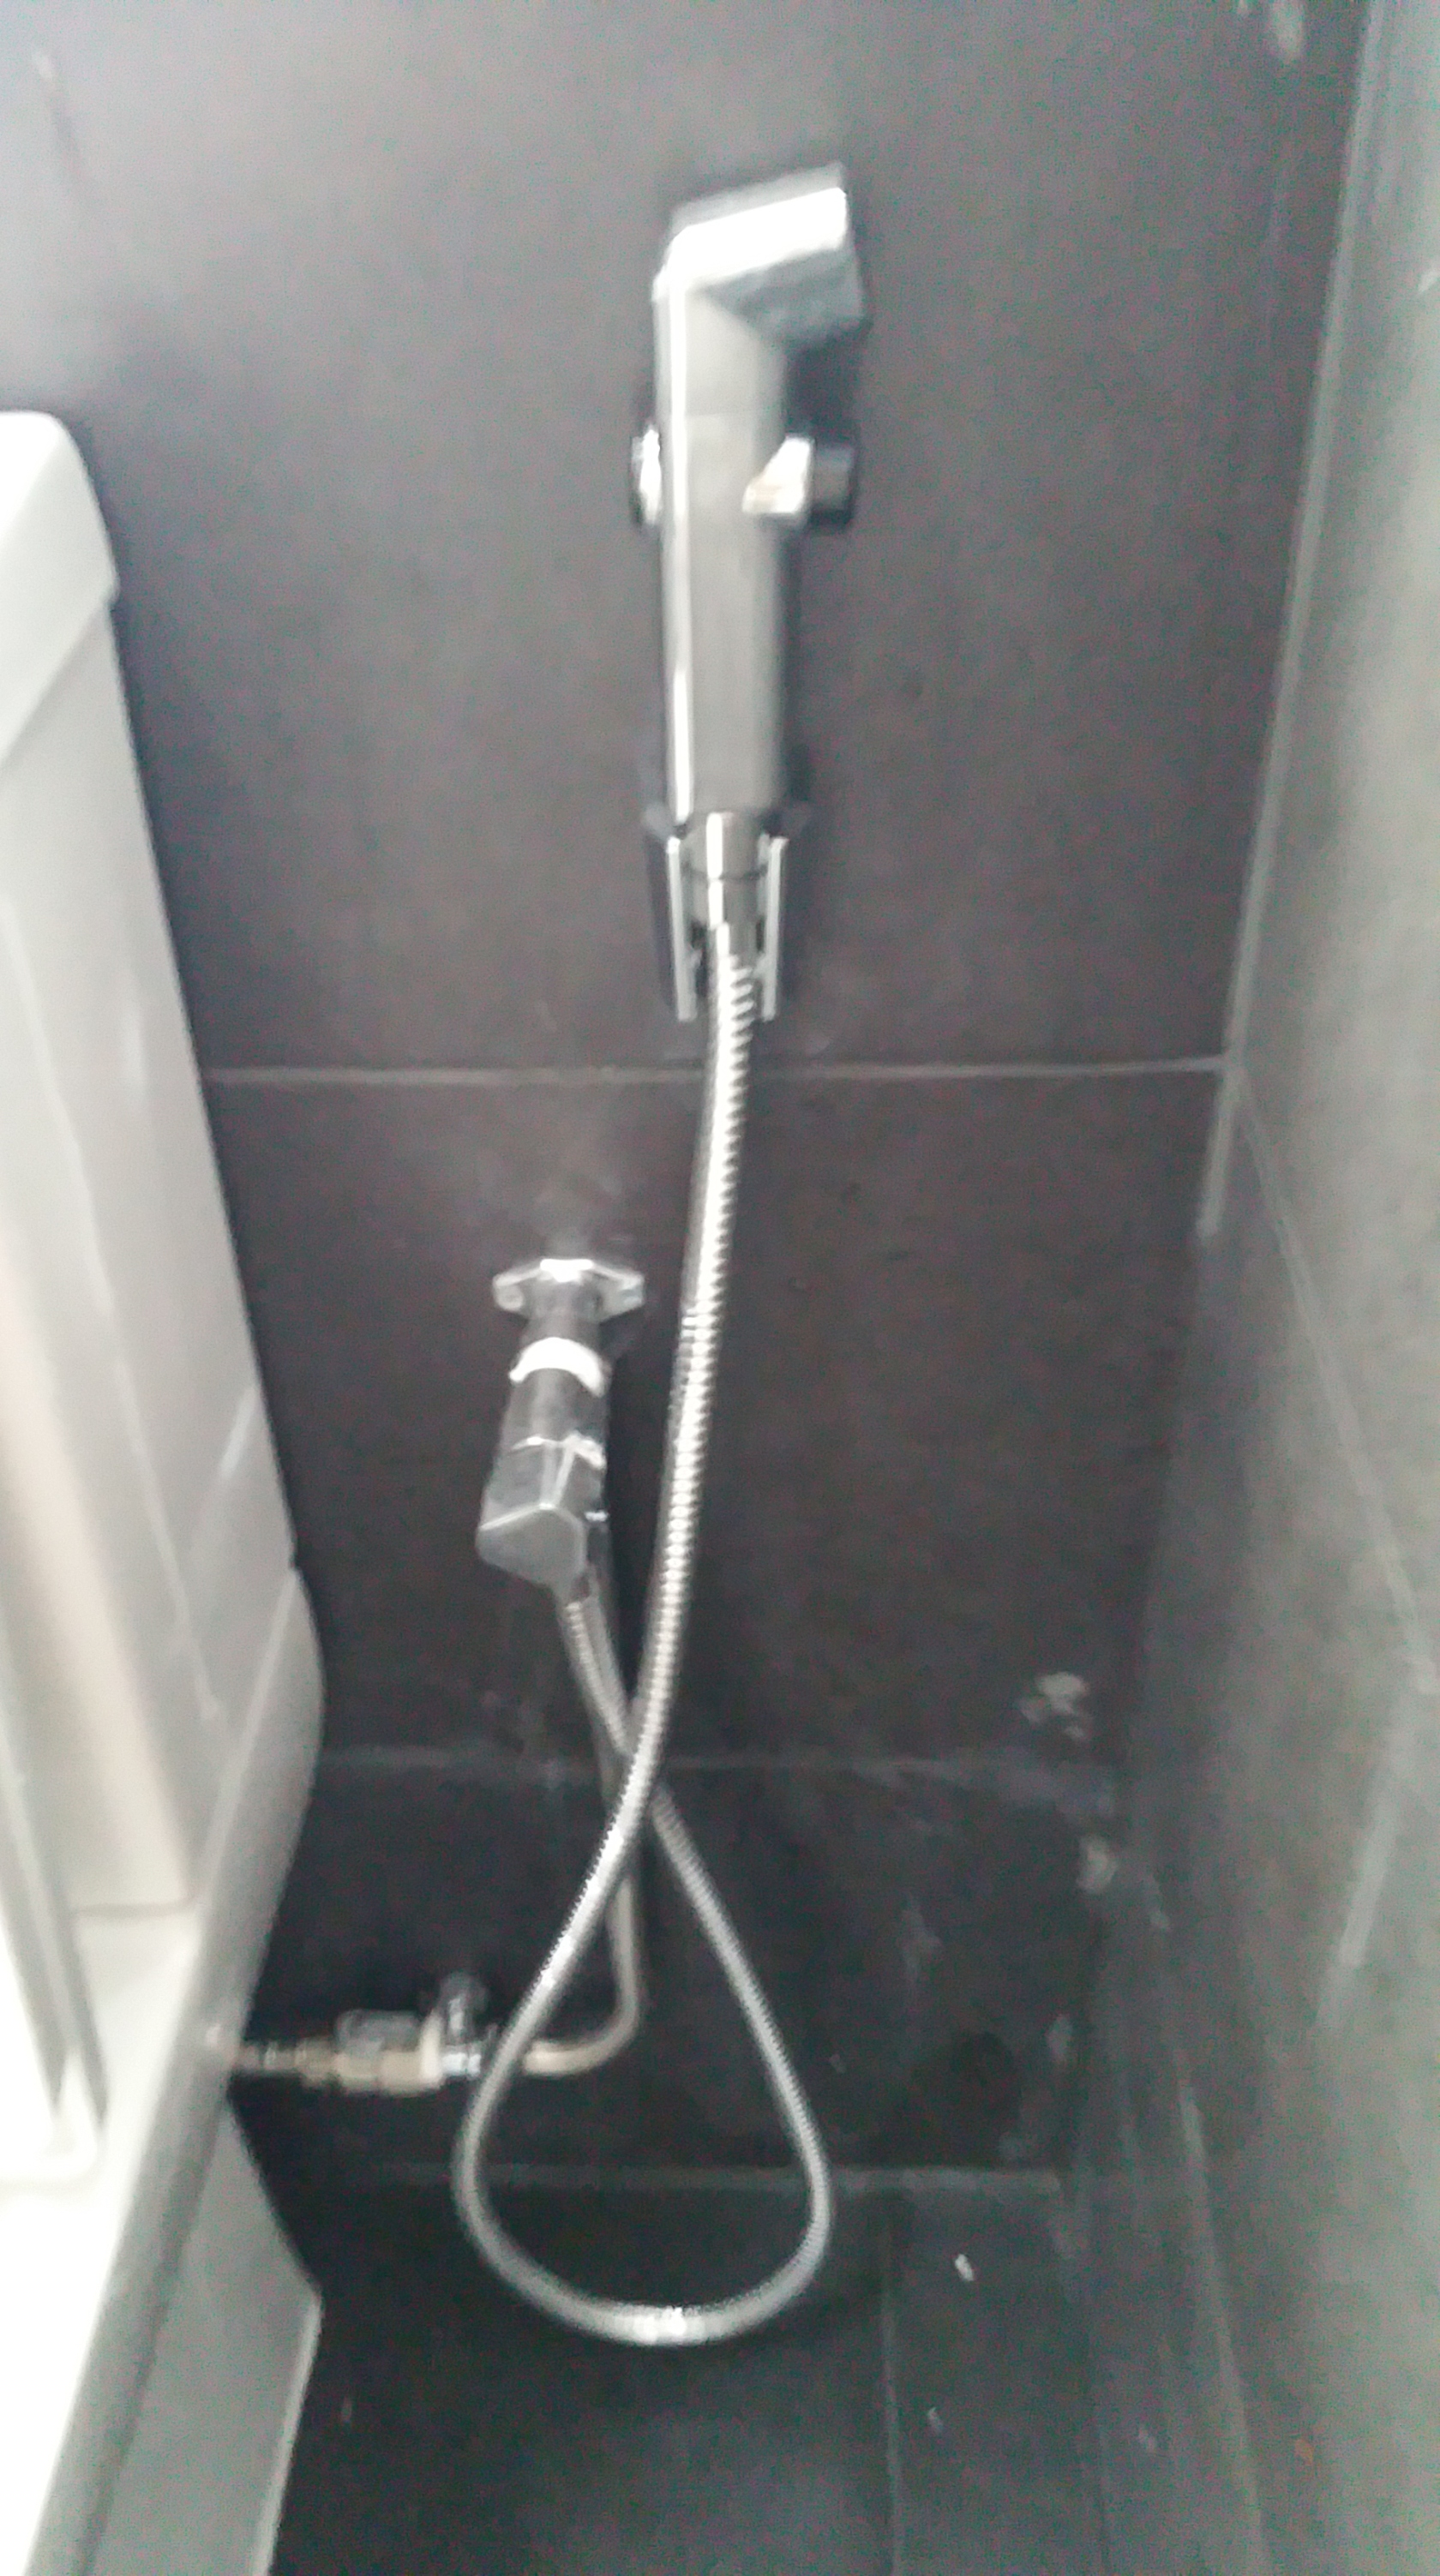
Really no joke, the water pressure on this thing is so strong, confirm no problem getting rid of....ahem....extra residue.
And I like it that I can set it so that it can constantly shoot water continuously without the need to keep depressing the button.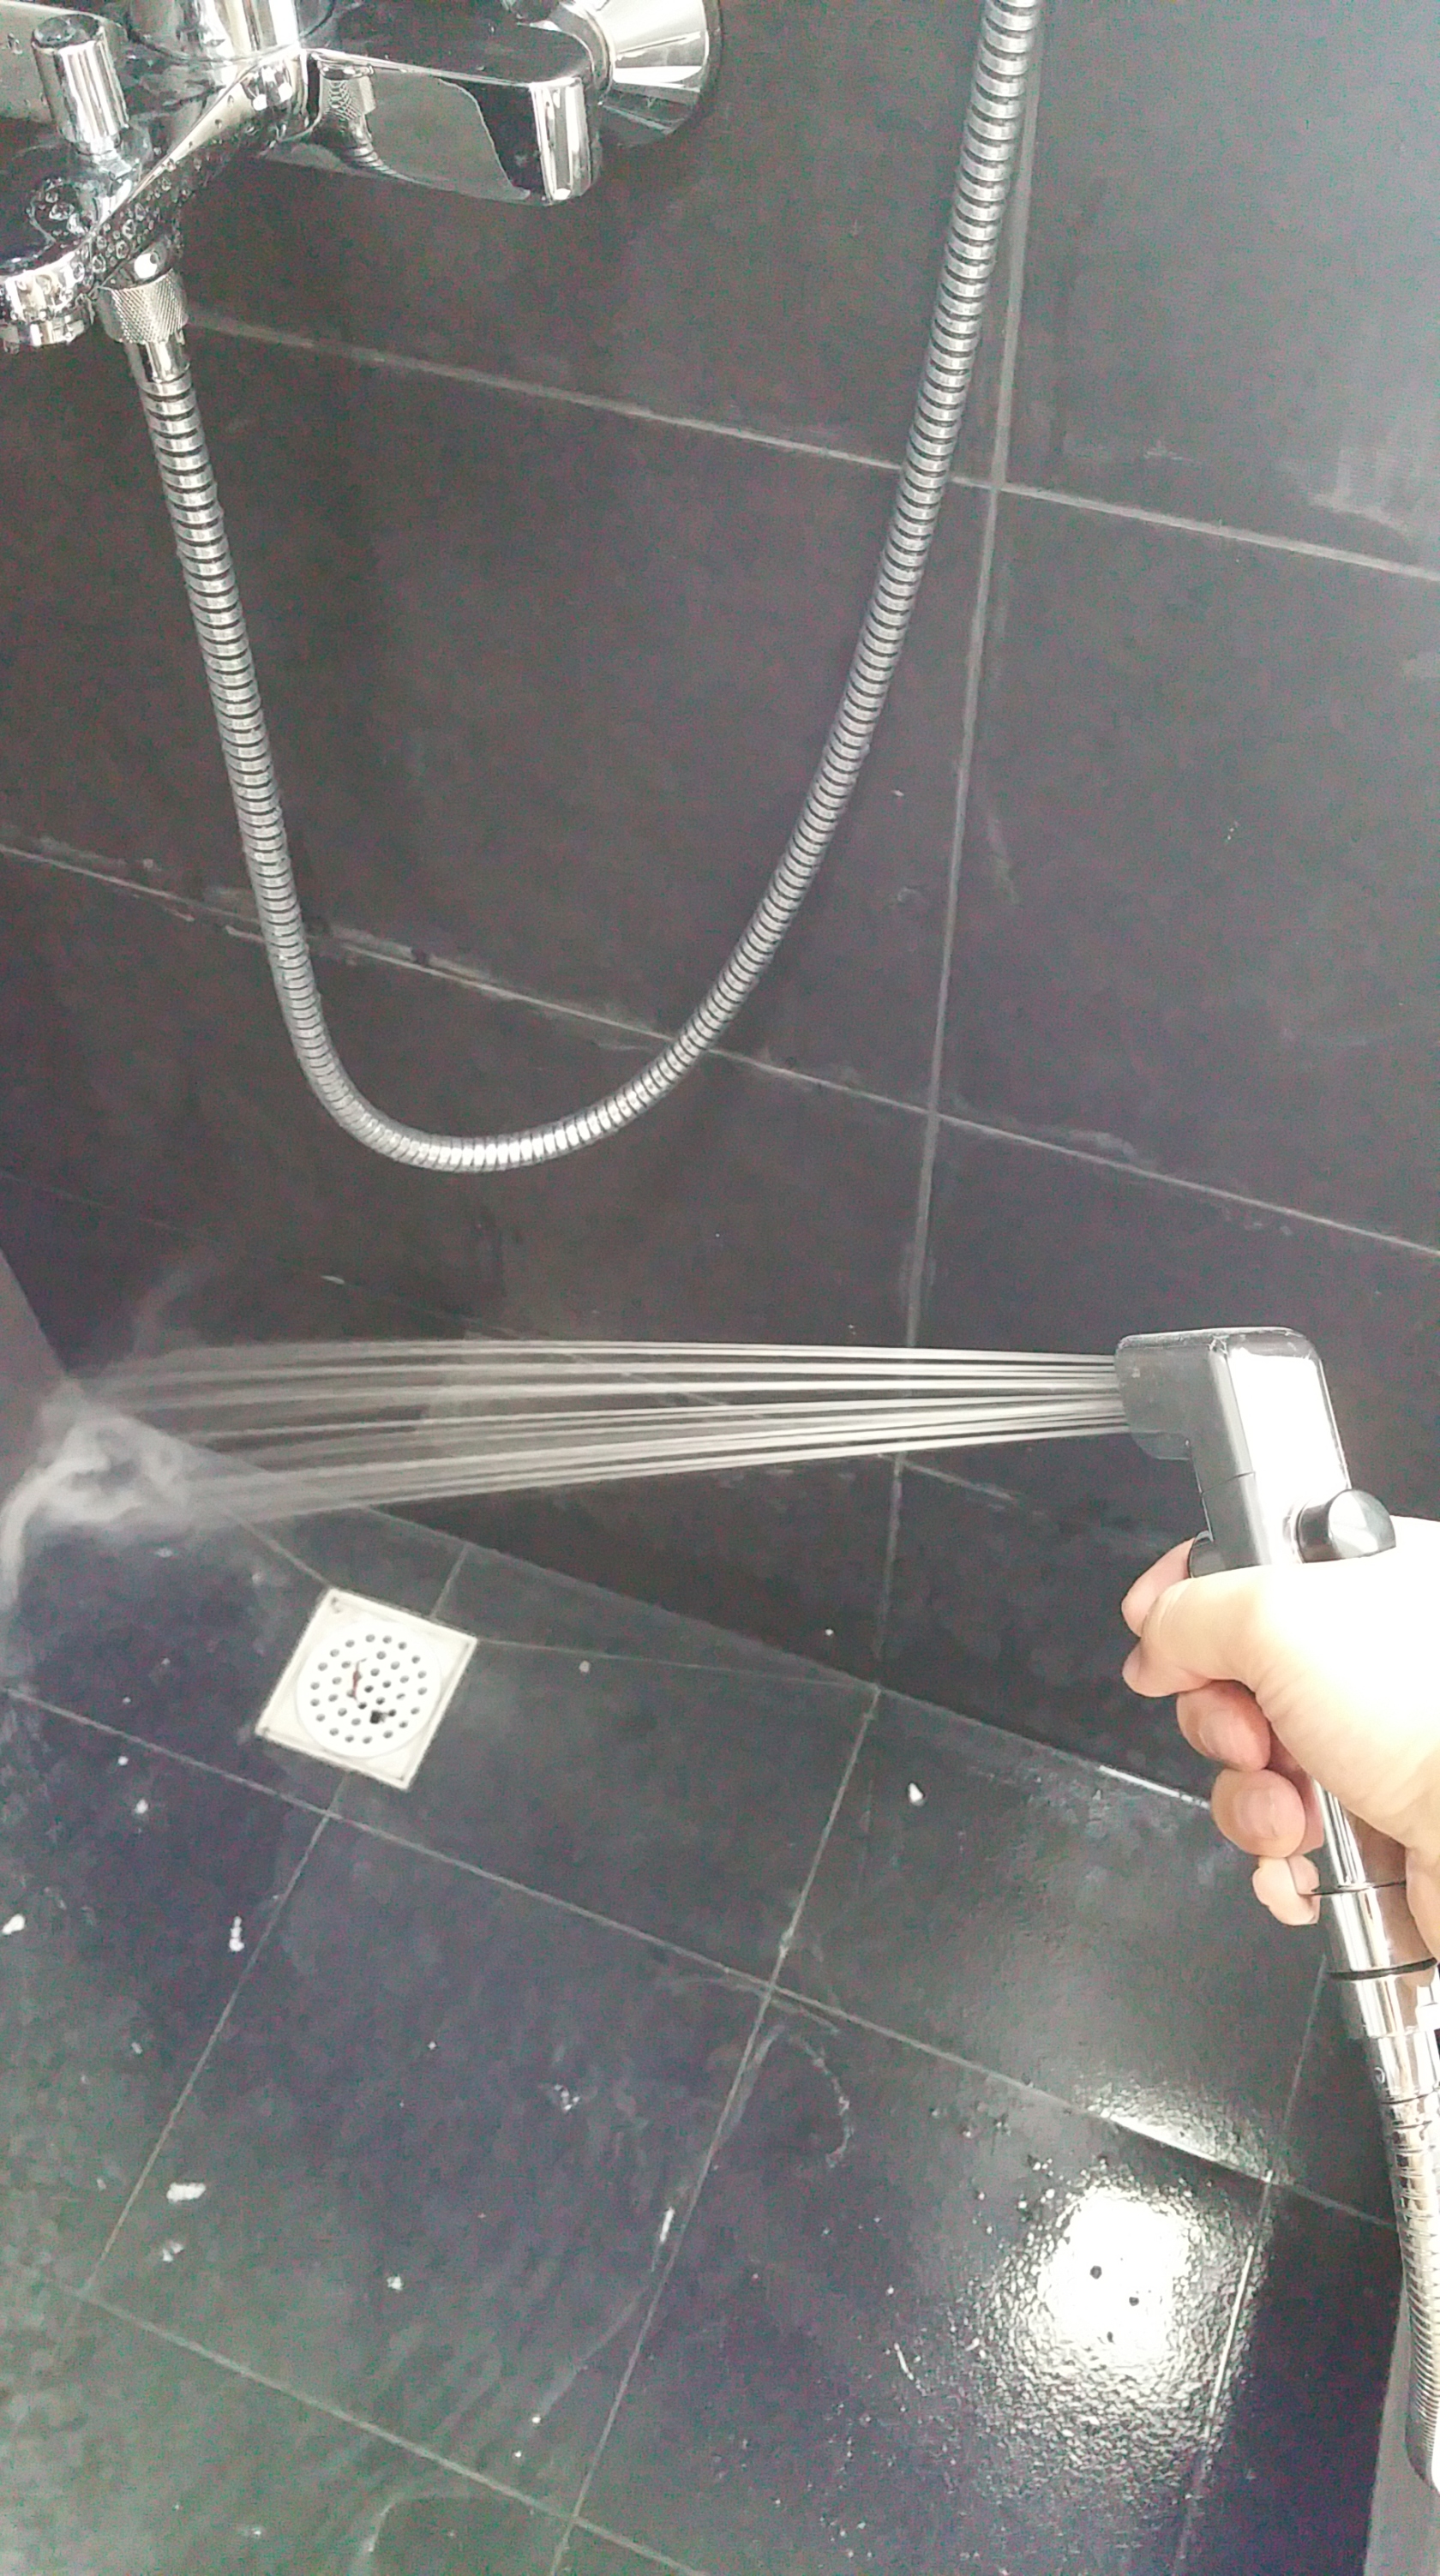
---------------------------------------------------------------------------------------------
Other than Sanitary Fittings, I also engaged the Plumbers to help with Non-Plumbing stuffs, and they also did a very good job.
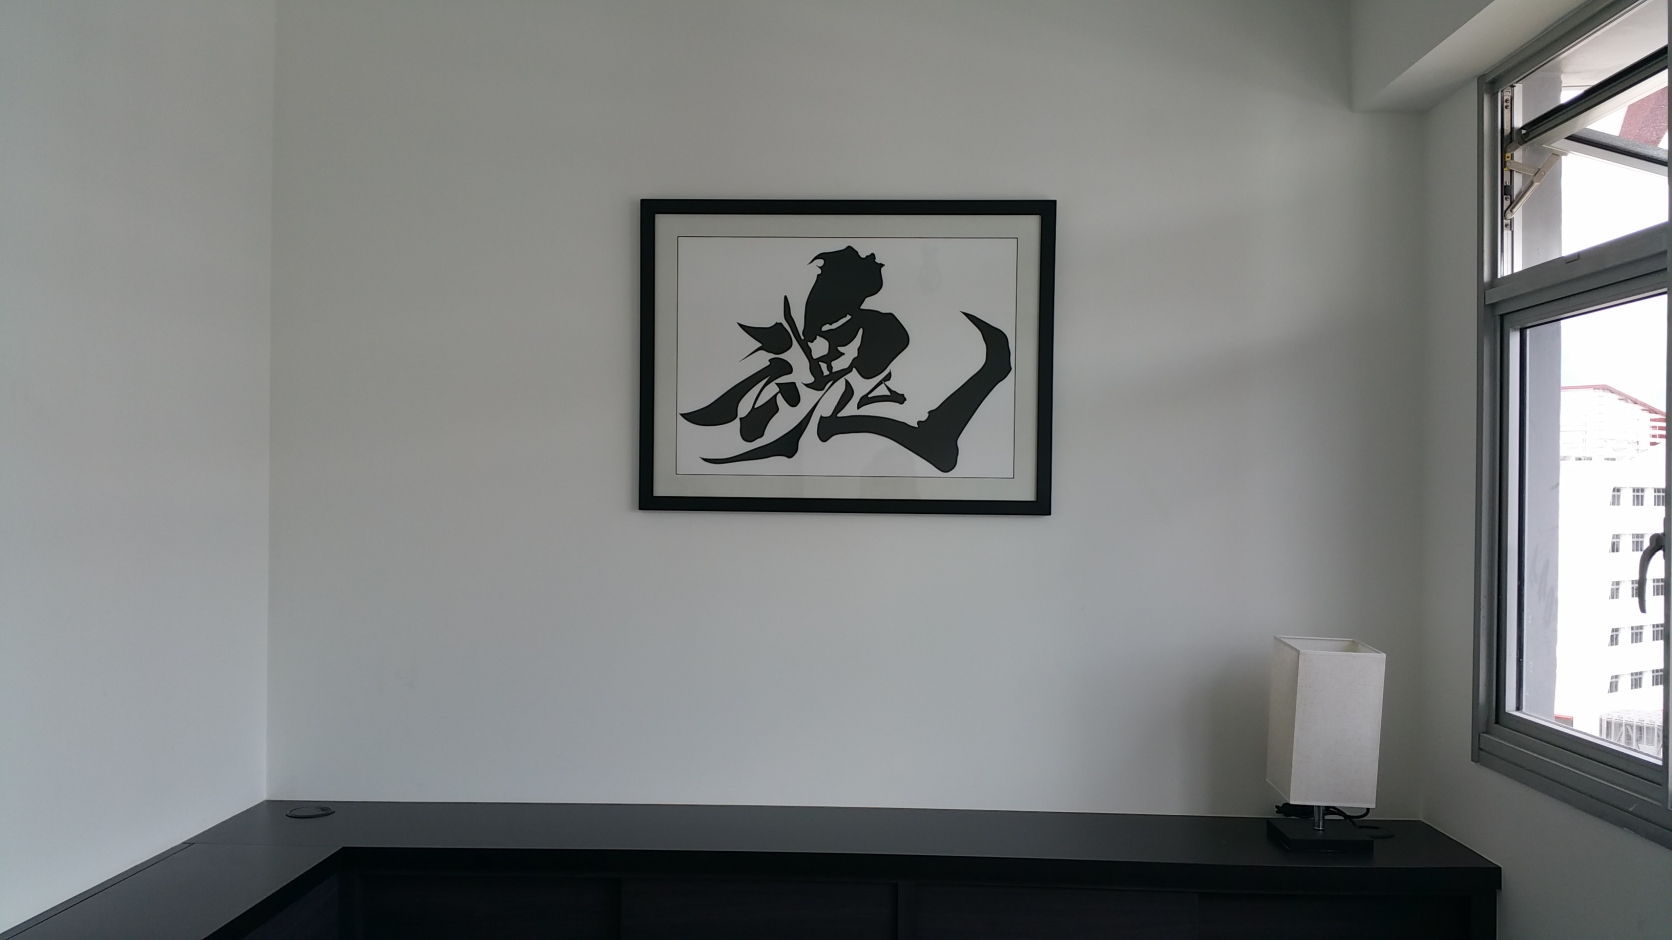
Got them to help measure and hang my 2 paintings nicely.
This guy was so fast, so precise in measurement that the paintings were hung up in no time.
One shot settle, didn't need to adjust again and again. Paintings were also very well secured.
Really must see to believe how fast and skillful he was at measurement and installation.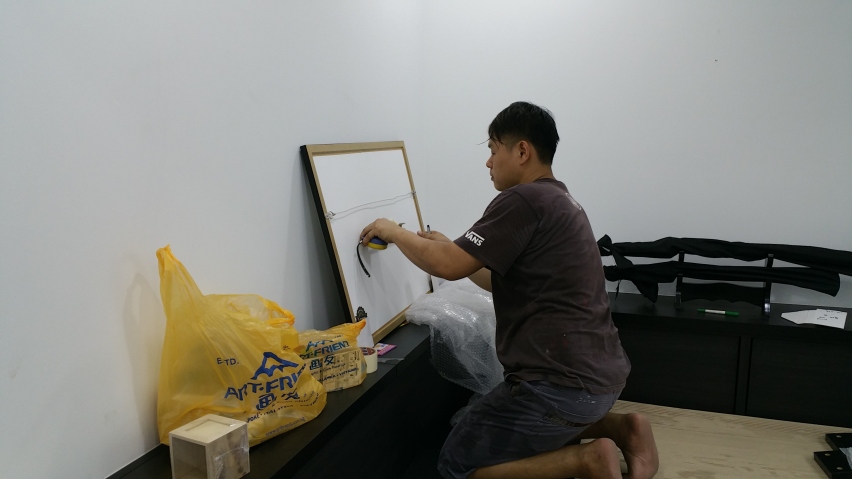
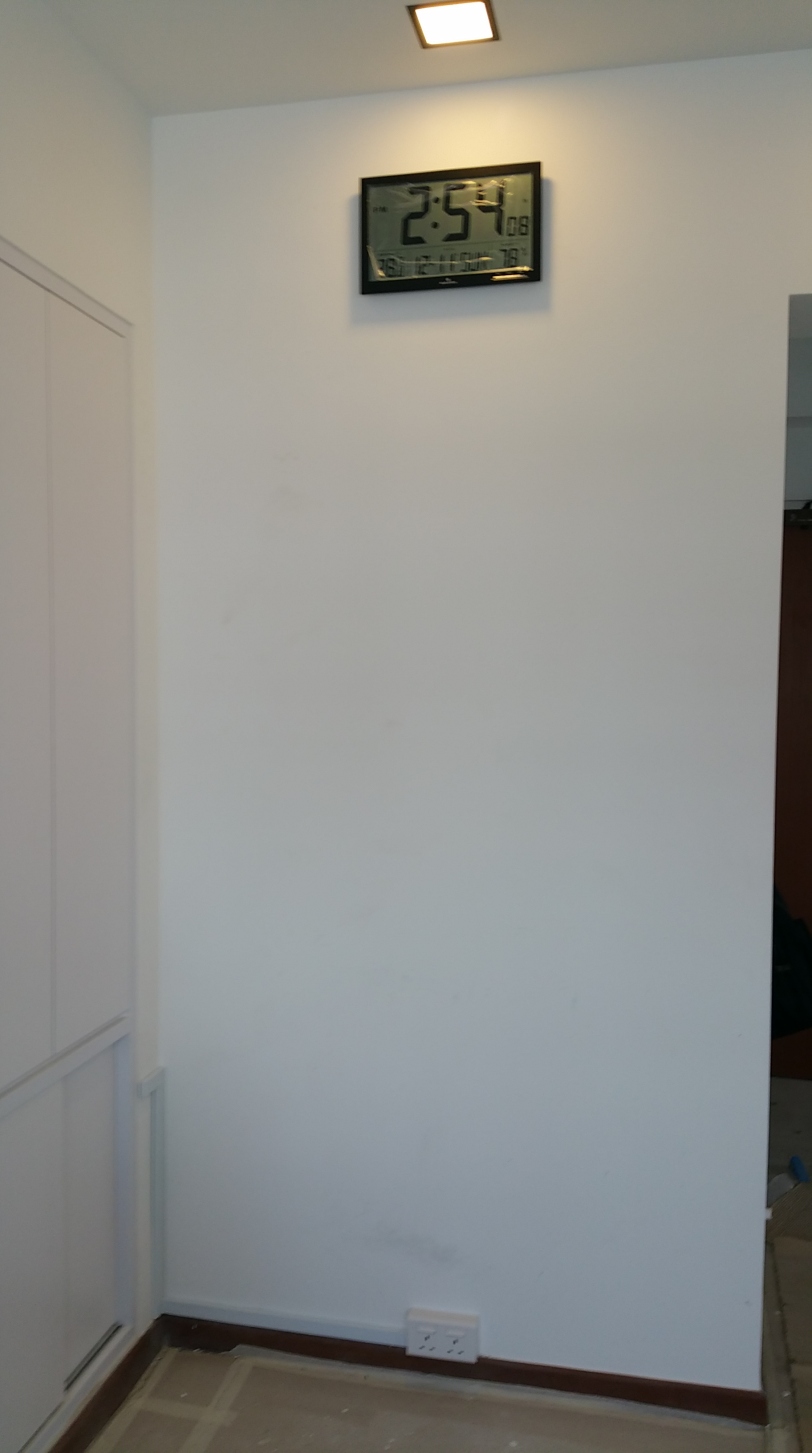
Also, this Marathon LCD Clock that I want installed to the wall.
Not interested in Analog Clocks, and thought this LCD digital one fits in nicely with my aesthetics.
Too bad it doesn't have backlight. Again, installation was fast and accurate.

And of course I got him to install my IKEA Curtain Poles!!
Abit kiasu here, I went and got more L-Brackets and instead of my proposed 3 L-Brackets,
I got him to install 4 L-Brackets on each side, just to make sure the IKEA poles don't fall.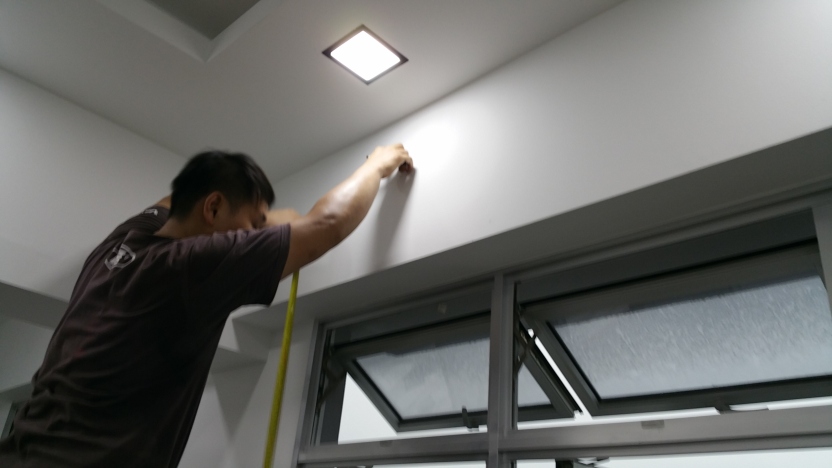
Measurement and installation of the L-Brackets is alot harder then I thought,
and he took abit more time here doing measurements. But the end result workmanship was still excellent.I'll just put in a teaser image here, also I did not hang up the curtains yet because the place is still very dusty.
Anyway more images of curtain installation (complete with curtains) will be uploaded as a separate
Part 3 of my IKEA Curtain Guide. So do stay tuned for the conclusion of that guide!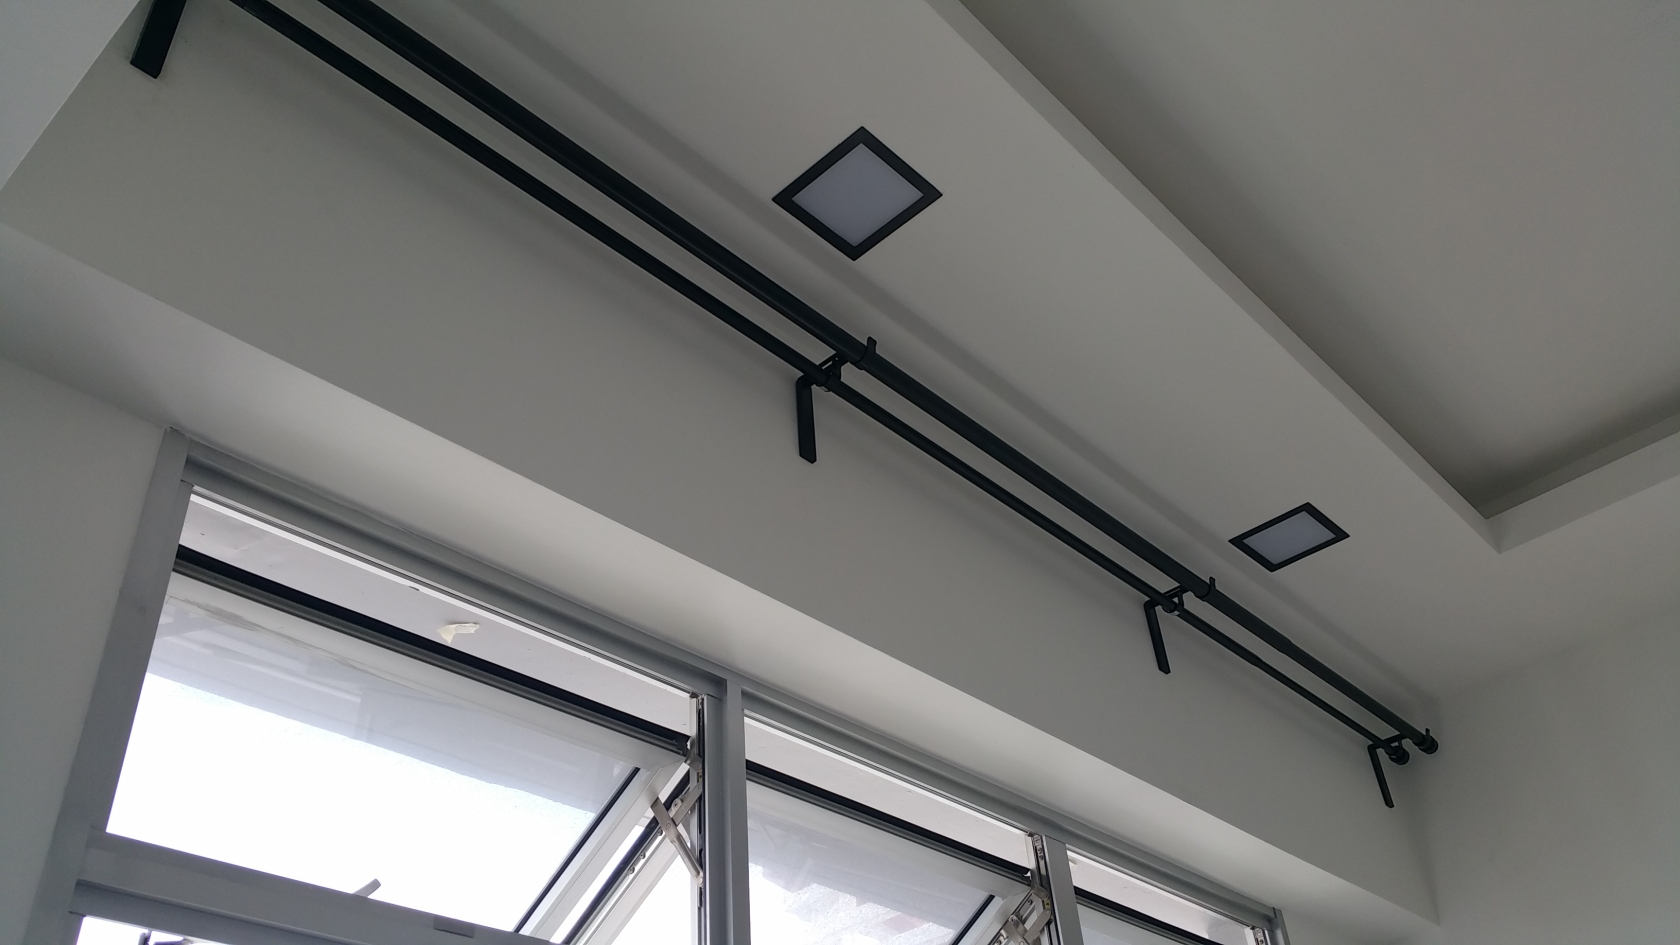
---------------------------------------------------------------------------------------------
Wanted them to install some shelves too, but I was so disappointed with this S-shaped shelves I got from Lazada.
The product is supposed to look like this.
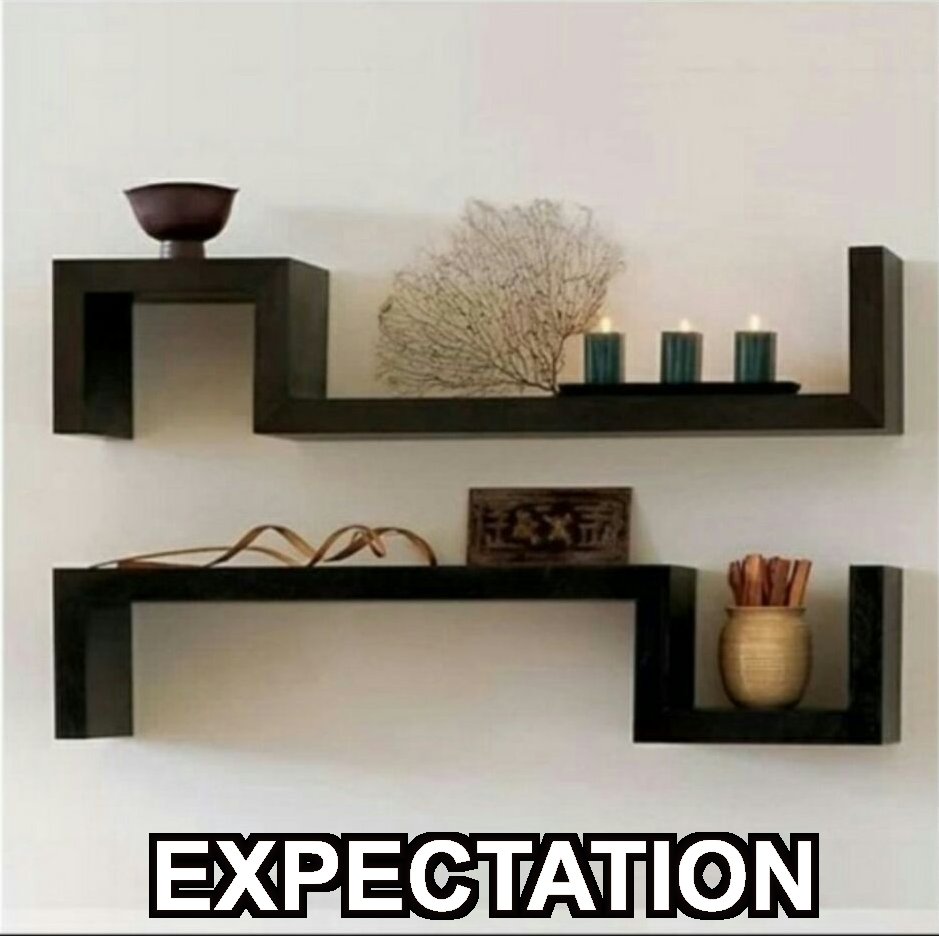
What actually arrived looked like this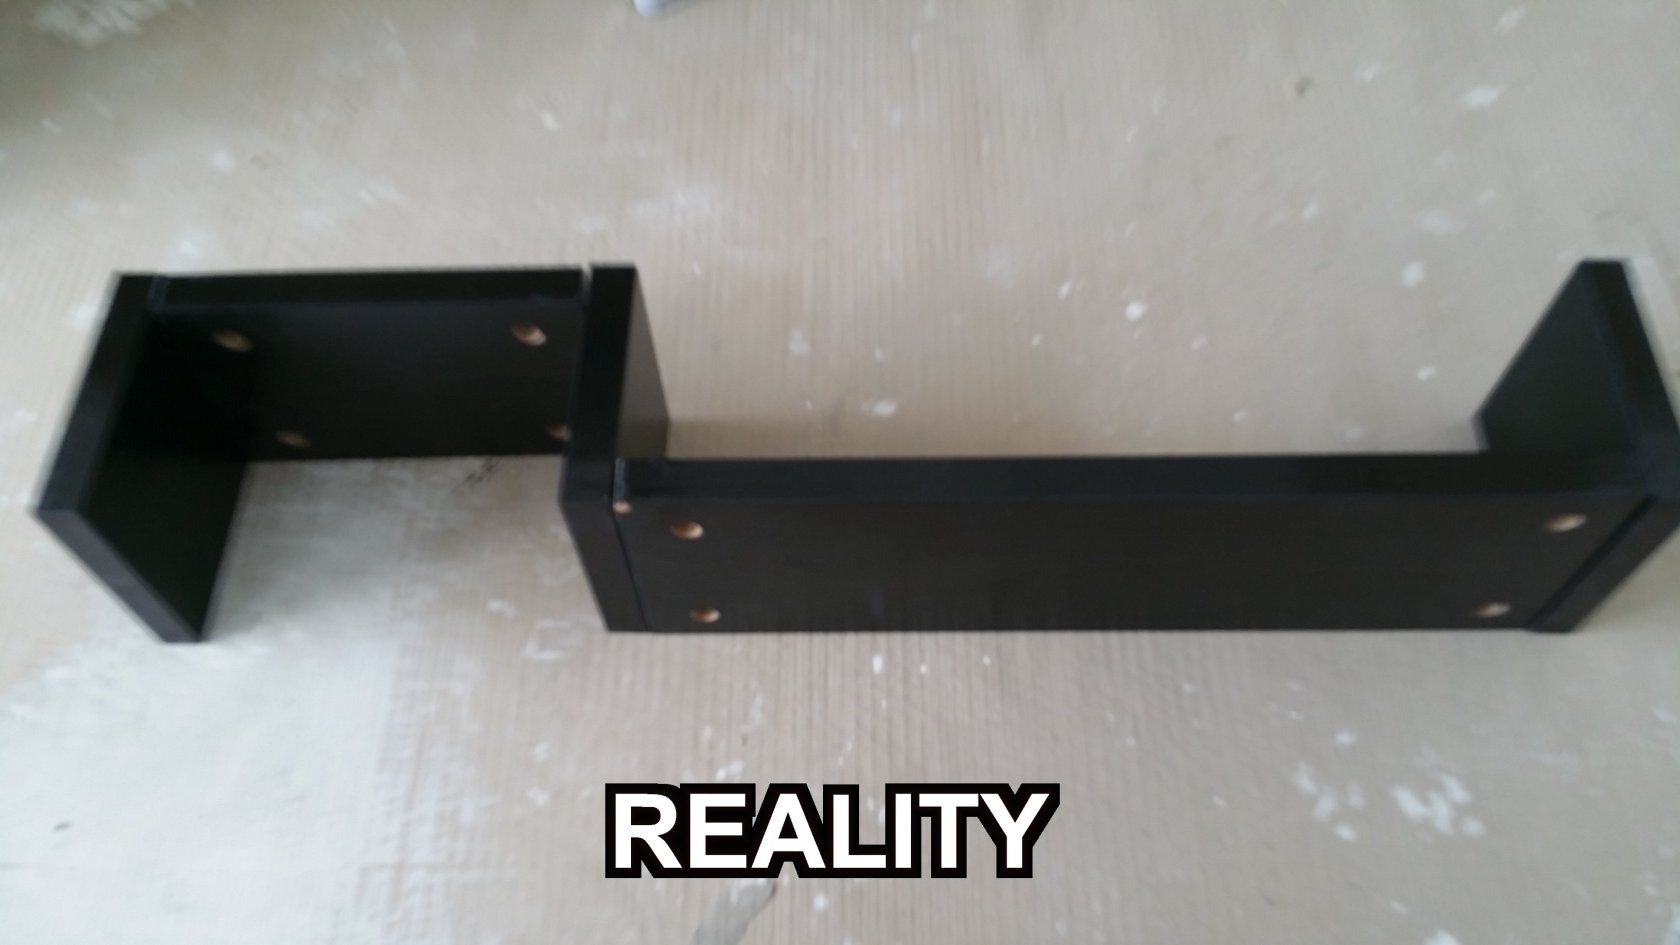
It looked so flimsy and badly worn with laminates chipped off
and the whole thing looked so cheapskate. Bleagh what a waste of money.
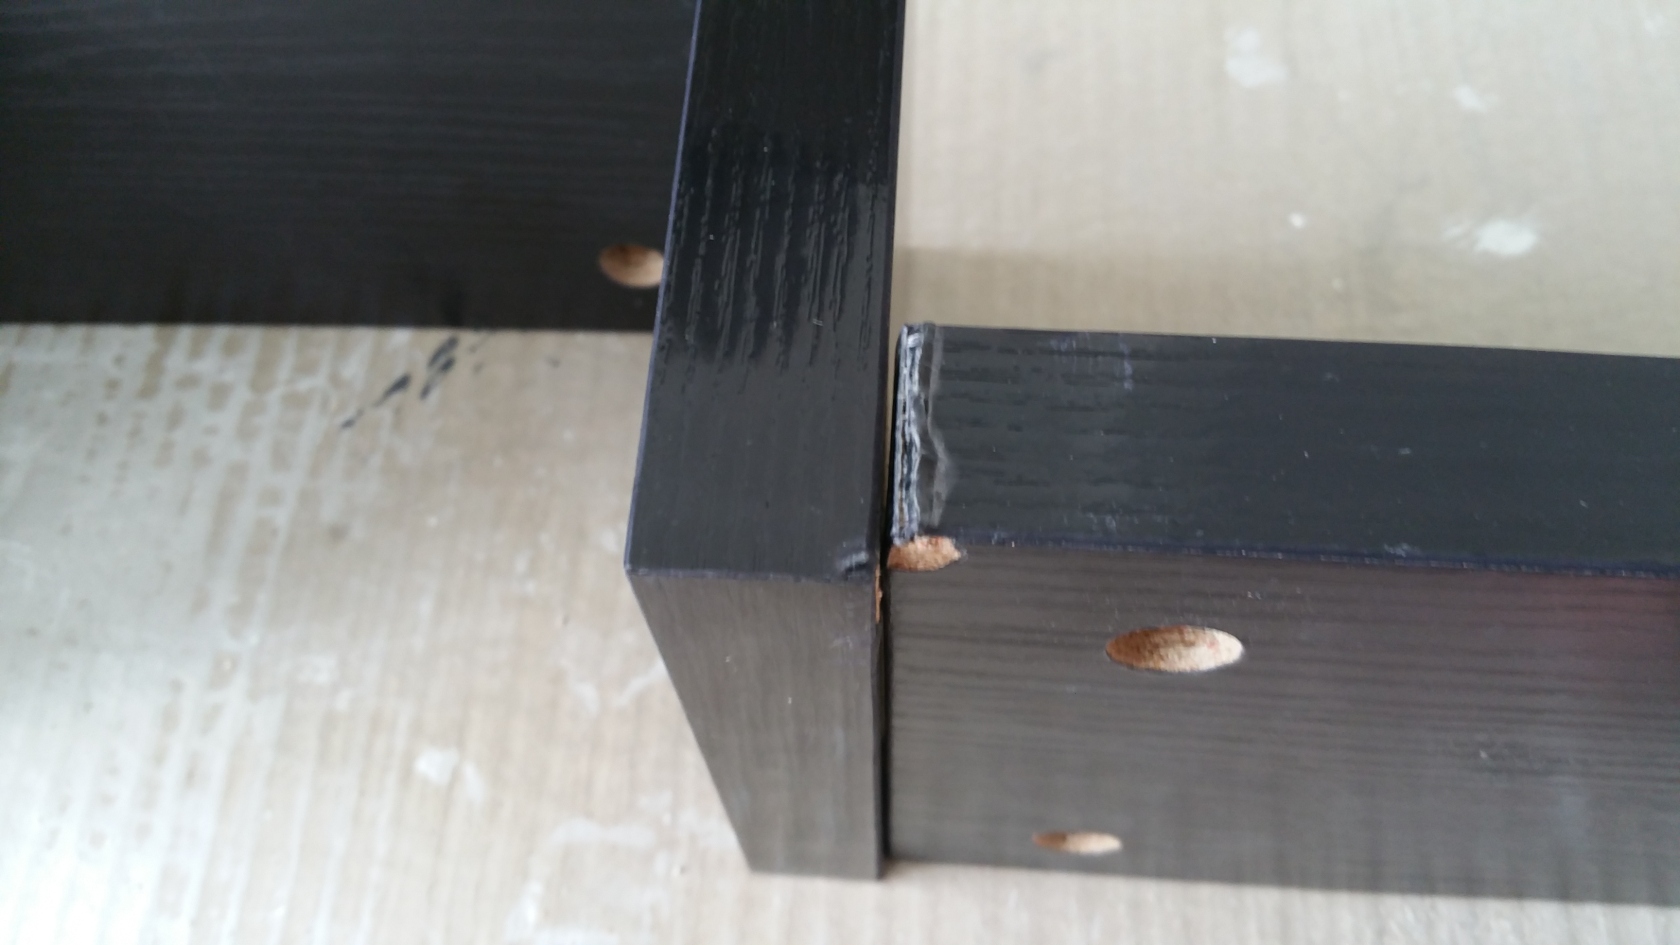
I'd rather not waste my wall space on something so ugly.
I did buy some good looking IKEA shelves but I simply can't picture where I can install them nicely,
so I didn't install them. Better to not install, then install already and regret later.
Meh~ I'm pretty sure I can hire Handyman services to help install any shelves I intend to get later.
Just need to spend abit more money lor.And so thats it for my updates for End of 8th Week, Friday 10th Nov 2017.
What do ya'll think of the workmanship?Stay tuned for the next post!!
Click Here for the Next Blog Entry:
End of 8th Week after Key Collection – Installed shelves for DB-Box, Solving Electrical Issues and a Special Look at the Completed Works so far!!
Click Here to go back to Page 1 - Table of Contents-
1
-
-
17 hours ago, Diluted said:Nice progress on the reno! Coming together very nicely. I agree that the move to change the countertop to black was a good one. Everything seems to blend in nicely!
Btw, I was looking at Ikea’s website for the curtains. Was wondering if the measurement stated there is for 1 piece of the curtain or the entire pair (i.e if it is 250(H) X 140(W), is this for one piece or is it the measurement of two pieces together?) Trying to see here if it is still worthwhile to buy from Ikea if i need at least 2 pairs to cover my windows plus paying a seamtress to join one pair to become a longer piece.
Thank you very much!!
As for your other enquiry, very good question.
Unfortunately I'm not able to answer it as of now as i packed my curtains away already.
I'll try my best to answer it when I post the conclusion of my curtain guide when I install everything at the end of the renovation. -
7 hours ago, neutronstar said:My ID is Brendon Koh from Kejico Interior Design. Reno haven't start so cannot comment on their workmanship yet.
Everyone do note that ezbuy have already stop buyforme service for the 11.11 TaoBao event.
Oh dear...but you bought so much things thru EZBuy....
Are you still able to get your items?? -
8 hours ago, pandacel said:Good move to change to black counter top! Really gels well with the other surfaces. My common toilet is very dark like your kitchen so I'm interested to see how it turns out! Your induction hob looks very cute lol.
Thanks very much! Yes I also think the Black Counter Top looks alot nicer too.
Initially I thought my Kitchen was too Orh Luu Luu, so i chose something brighter like Grey to at least give abit of colour contrast.
Looks like Jason's advice to switch to a Black Coloured one was a good choice.
Actually both my Kitchen and Toilet are dark coloured.
My Induction Hob looks very cute? Thanks!
Hehehe this is the first time I've heard someone describe an Induction Hob as cute
That said, I'm supposed to post a new Blog Entry today because my Sanitary Fittings are up,
but down with abit of flu lah, tomorrow i'll be posting my latest blog entry
Thanks for supporting! -
Blog Entry Date: 9th November 2017 Thursday
Click Here to go back to Page 1 - Table of Contents
8th Week after Key Collection - My Quartz Counter Tops are Up.
Also Updated Schedule till End of RenovationPhew! We’re now almost at the end of 8th Week!
Before I talk about the Quartz Counter Tops as mentioned in the Title,
let me give you an updated schedule I got from Jason from now till the End of the Renovation.10 Nov 2017 (Friday)
Plumbers will come to install all Sanitary Fittings and misc stuffs11 or 13 Nov 2017 (Sat or Mon)
Electricians will come up and finish up lightings and electrical work.14 and 15 Nov 2017 (Tuesday and Wednesday)
Clear Rubbish and Bulky Trash16 Nov 2017 (Thursday)
Chemical Washing (This is un-officially the End of the Renovation)20 Nov 2017 (Monday) tentative
Planning to get all my furnitures and electrical appliances delivered.
21 Nov 2017 (Tuesday)
Air Con InstallationPretty Packed schedule. Especially for next week.
-------------------------------------------------------------------
And so, lets talk about the Quartz Counter Tops that came up today.
Remember way back in the beginning of the blog, I selected my Neutra Quartz Top as this Greyish colour? (NQZ 506)
Even my 3D drawings showed this Grey Quartz Top.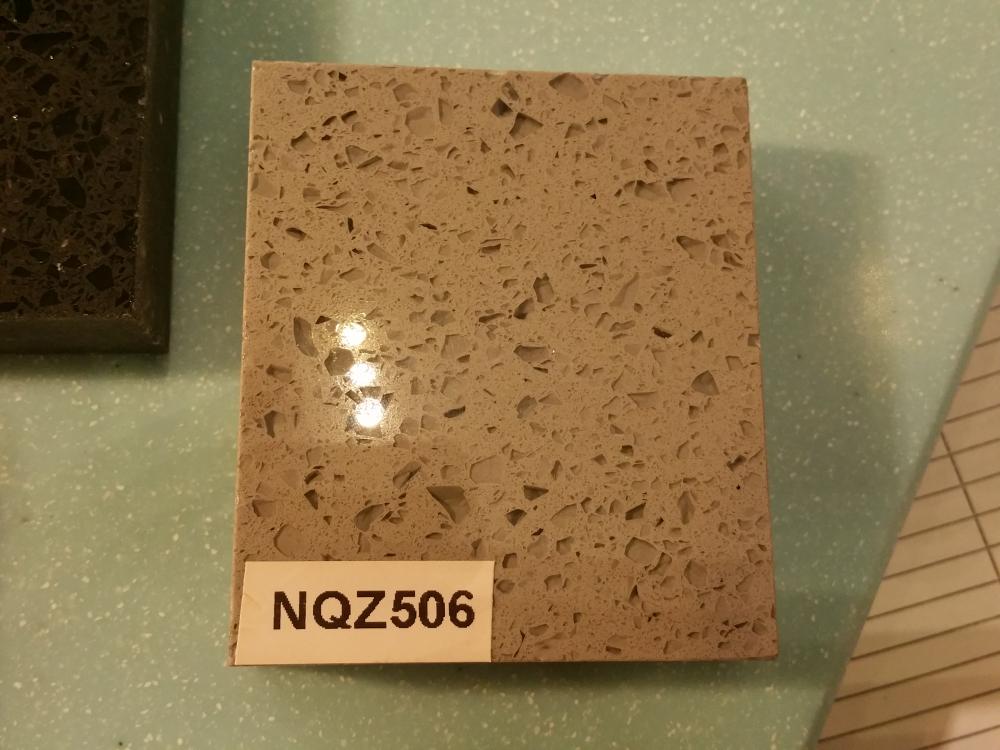
Well, that has been changed. Quite a last minute change too.
Jason thought a Black Coloured Quartz Top would fit much better for my Design.
And so, he chose this NQZ 503 Black Quartz which I also approved of.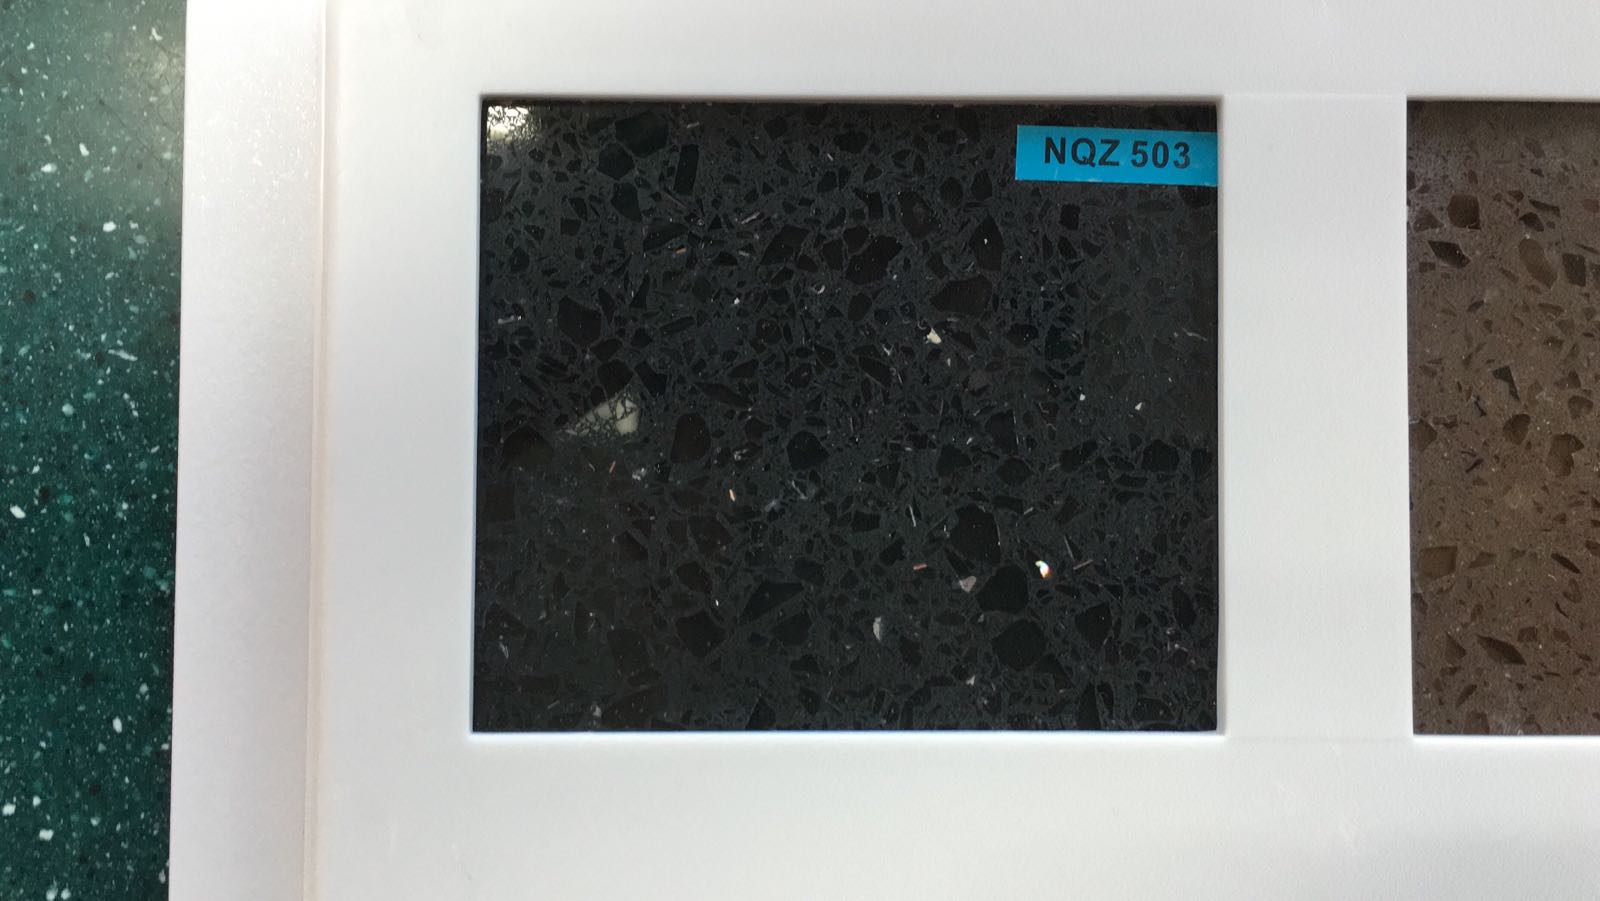
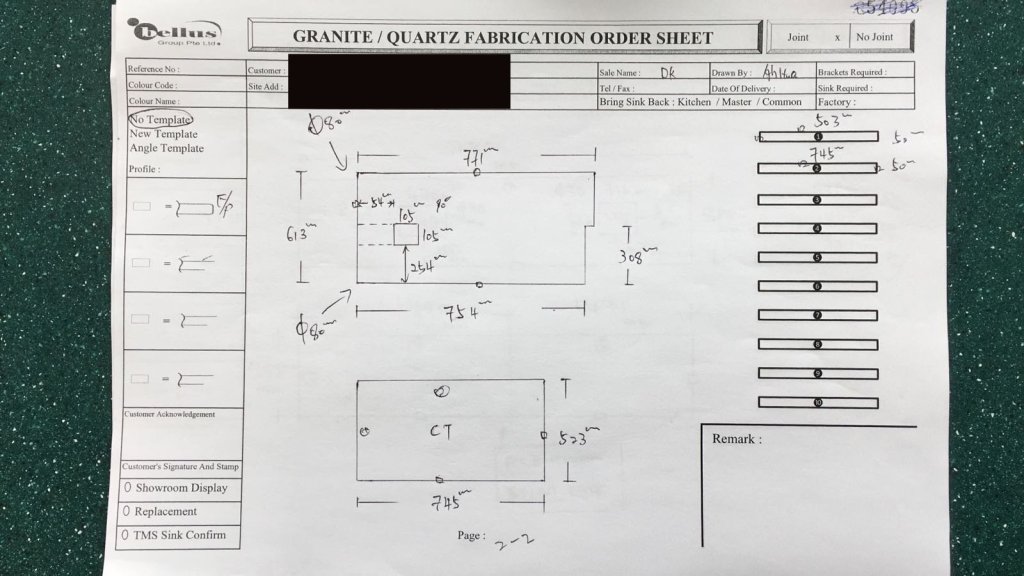
Below are some of the fabrication plans that were made for the Quartz Top
Jason showed me after my approval. (Looks very technical doesn’t it?)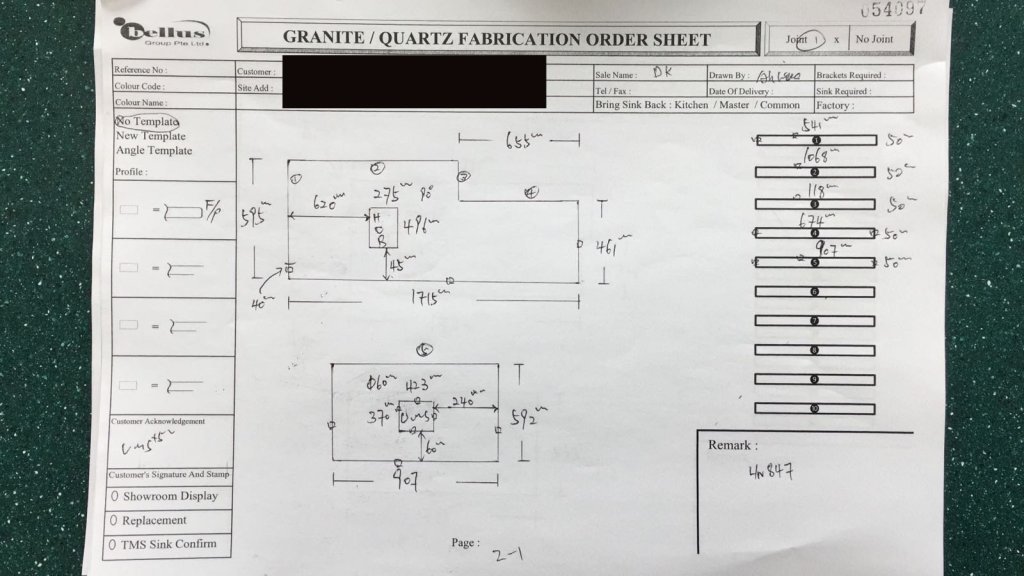
-------------------------------------------------------------------
Here are the updated pictures I took:Kitchen
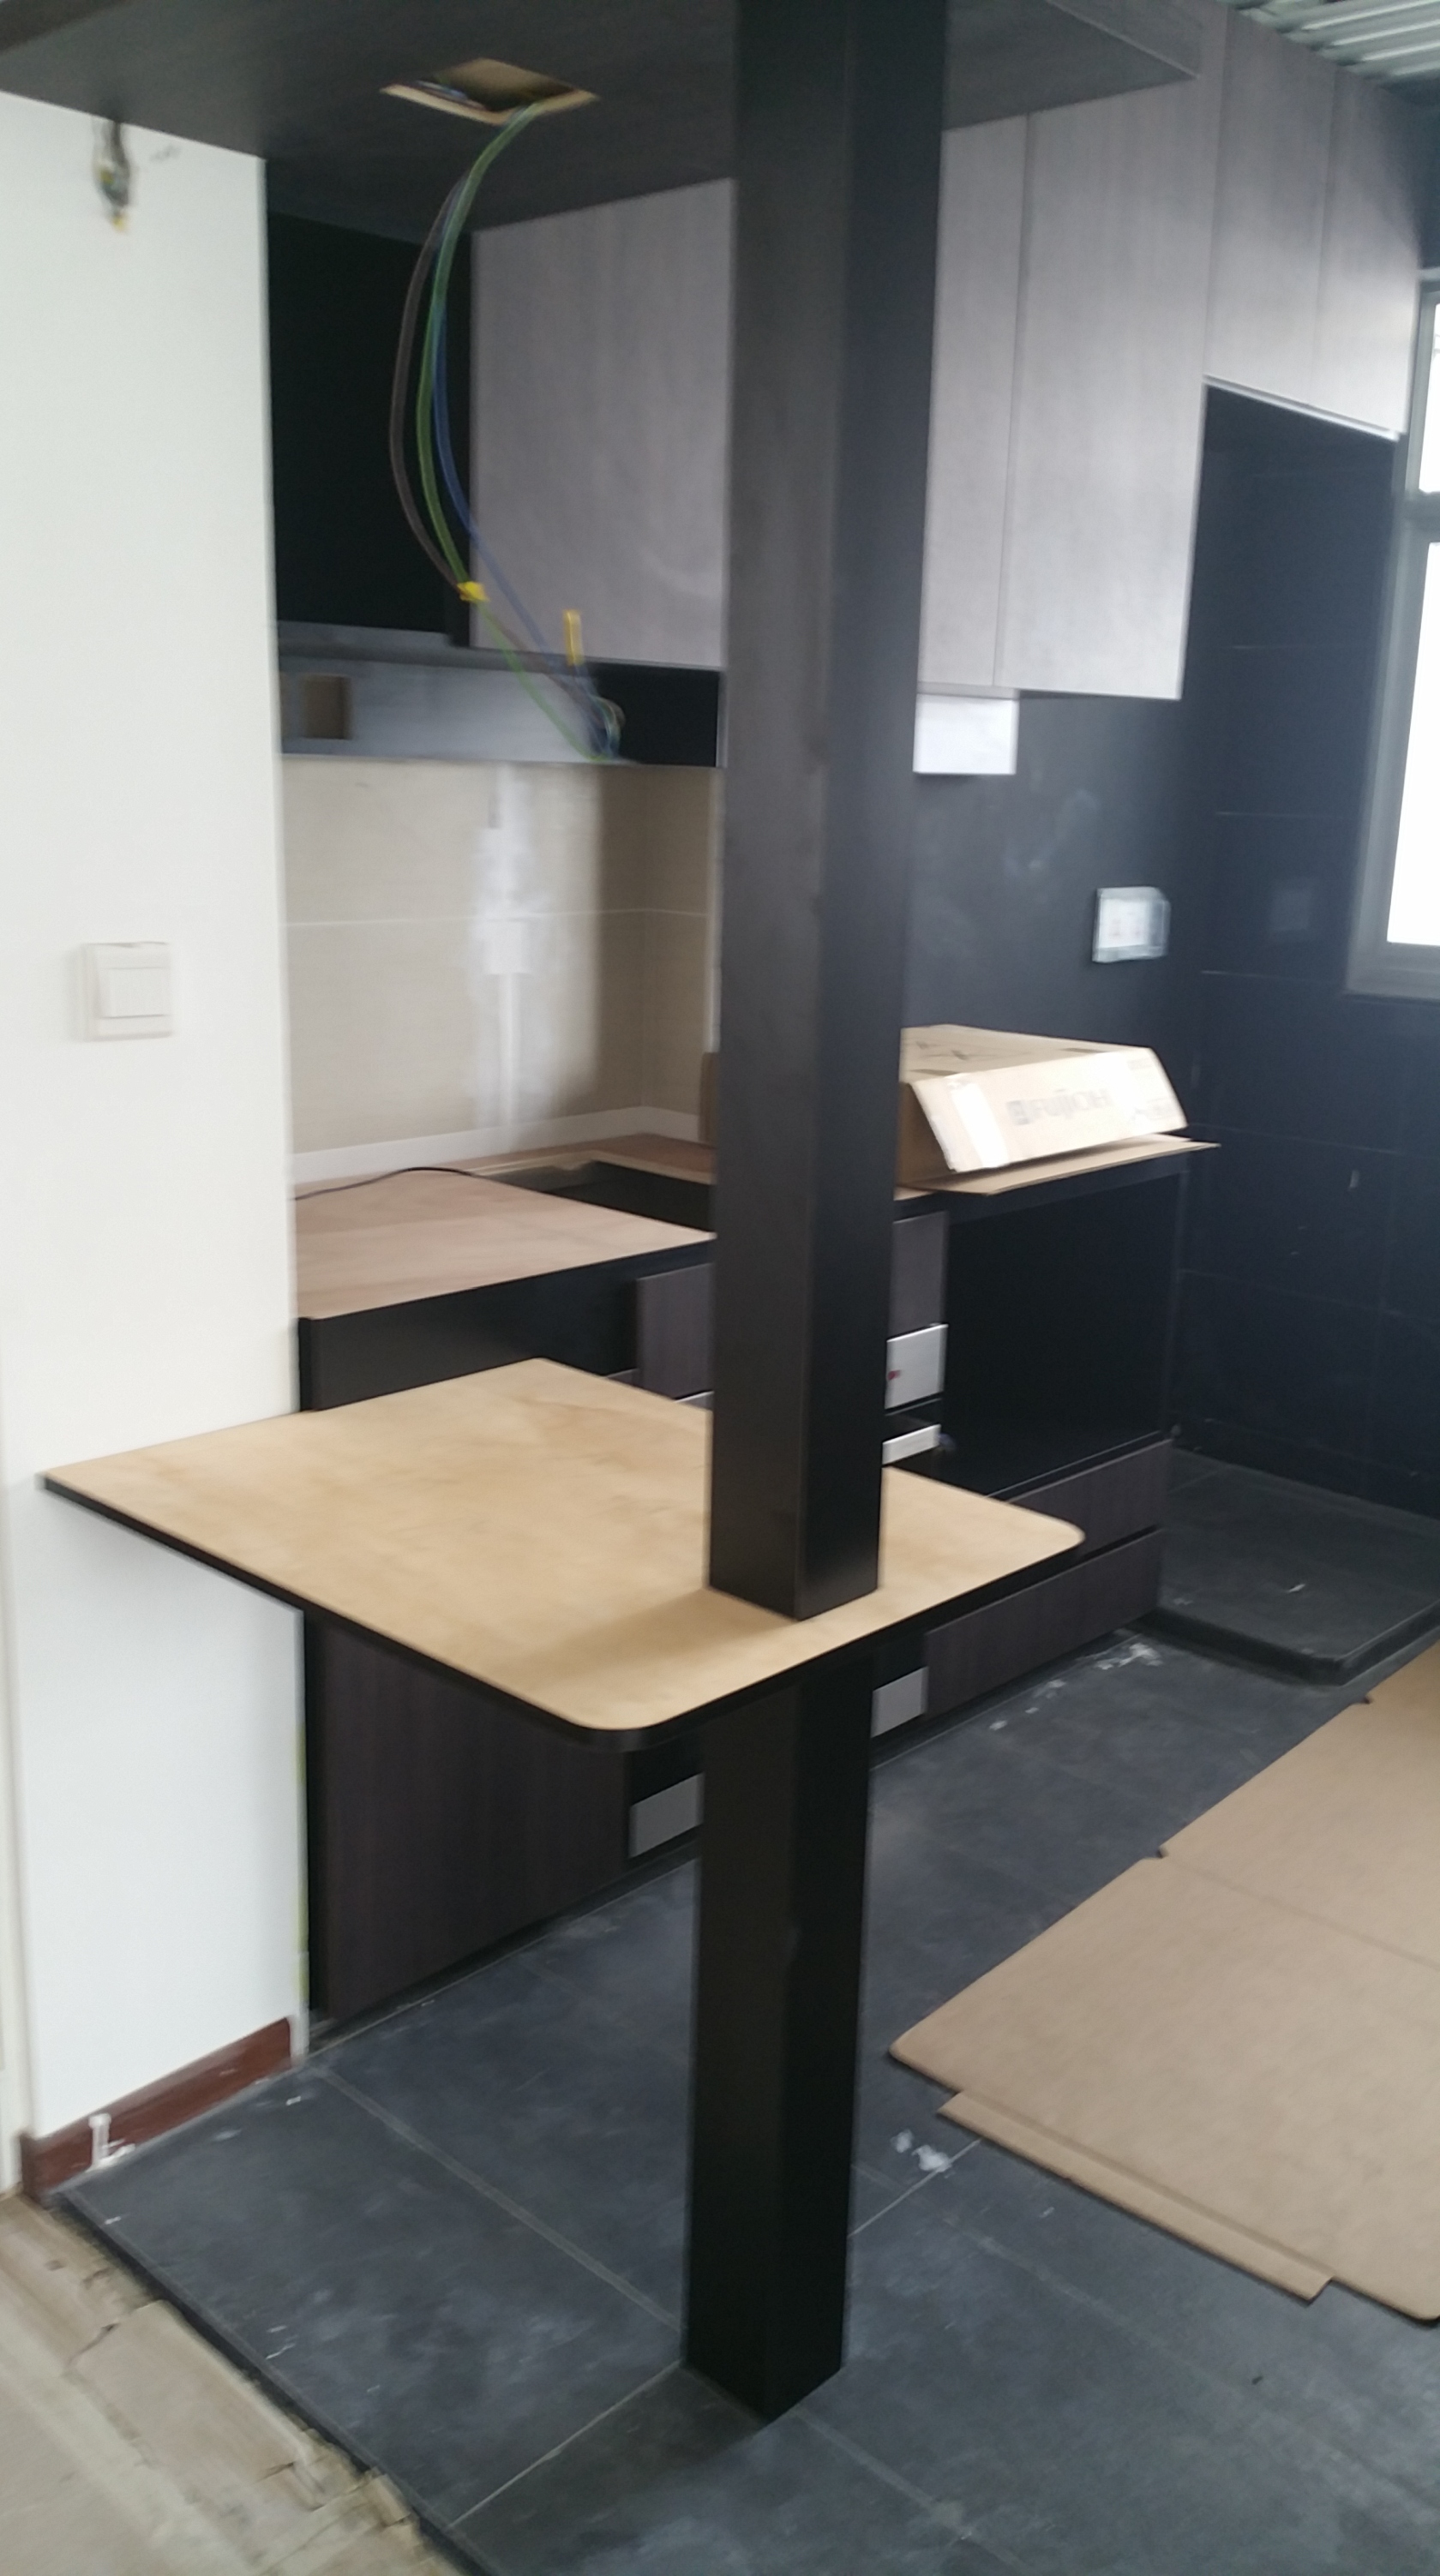
They also added this stainless steel barrier bar at the roof of my dining table. Nice right?
I intend to put plant pots here, especially those type that flows down to give it a “Hanging Garden” look.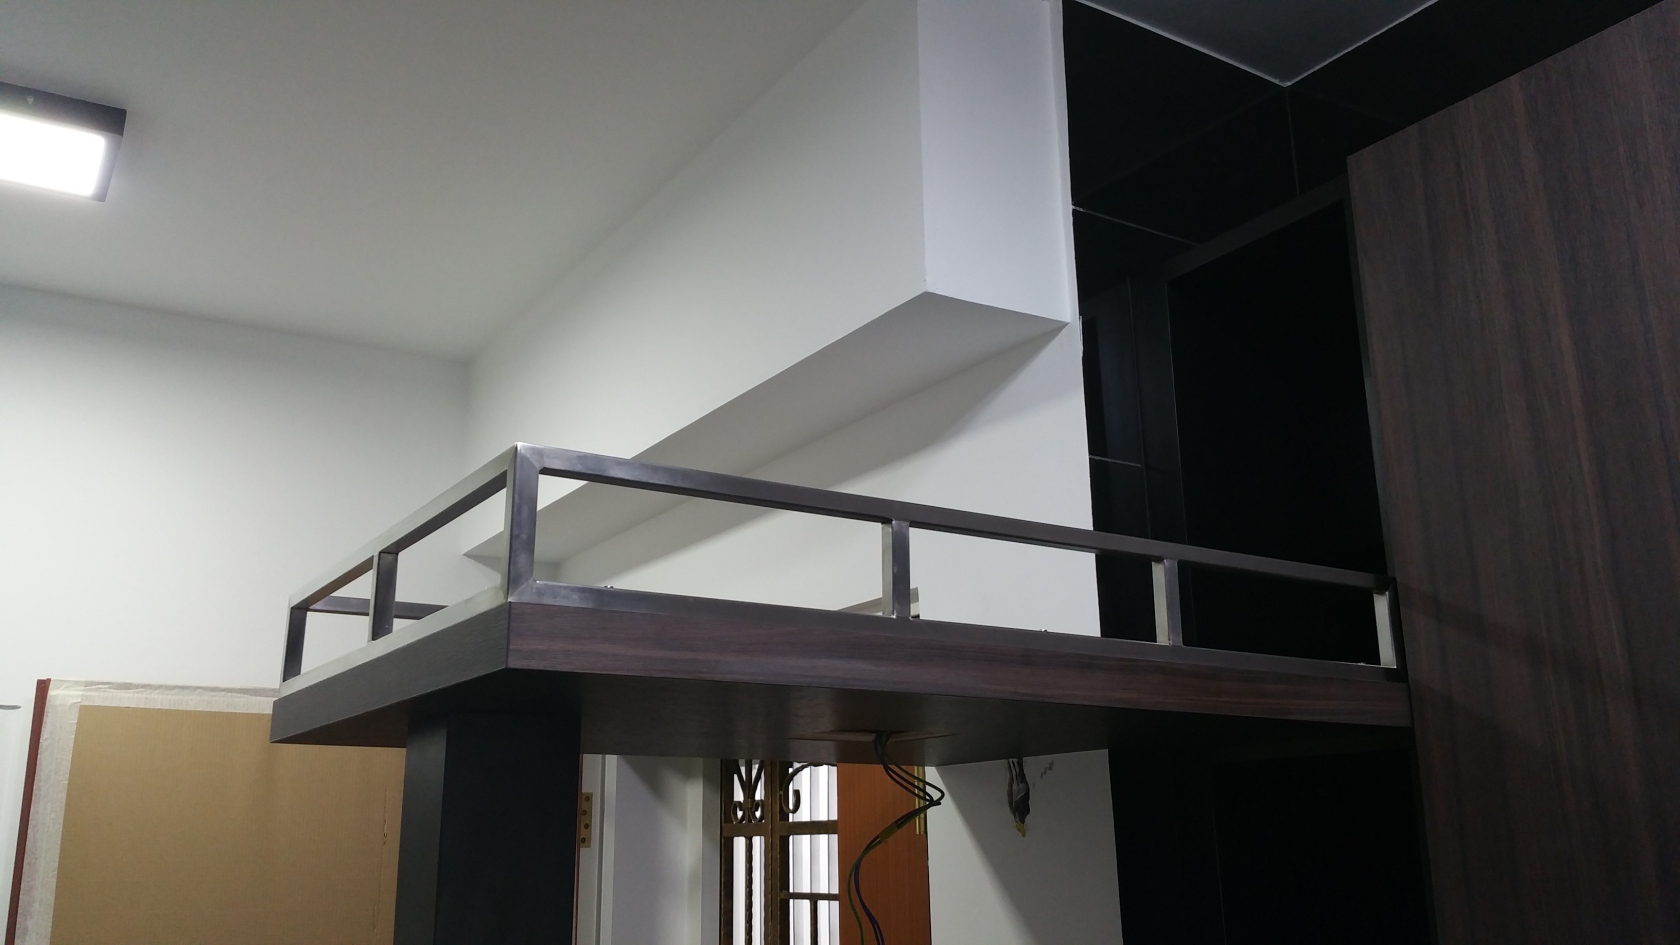
View of the Integrated Dining Table at Kitchen
Really love this Integrated Dining Table. Love it even more with the Quartz Counter Top!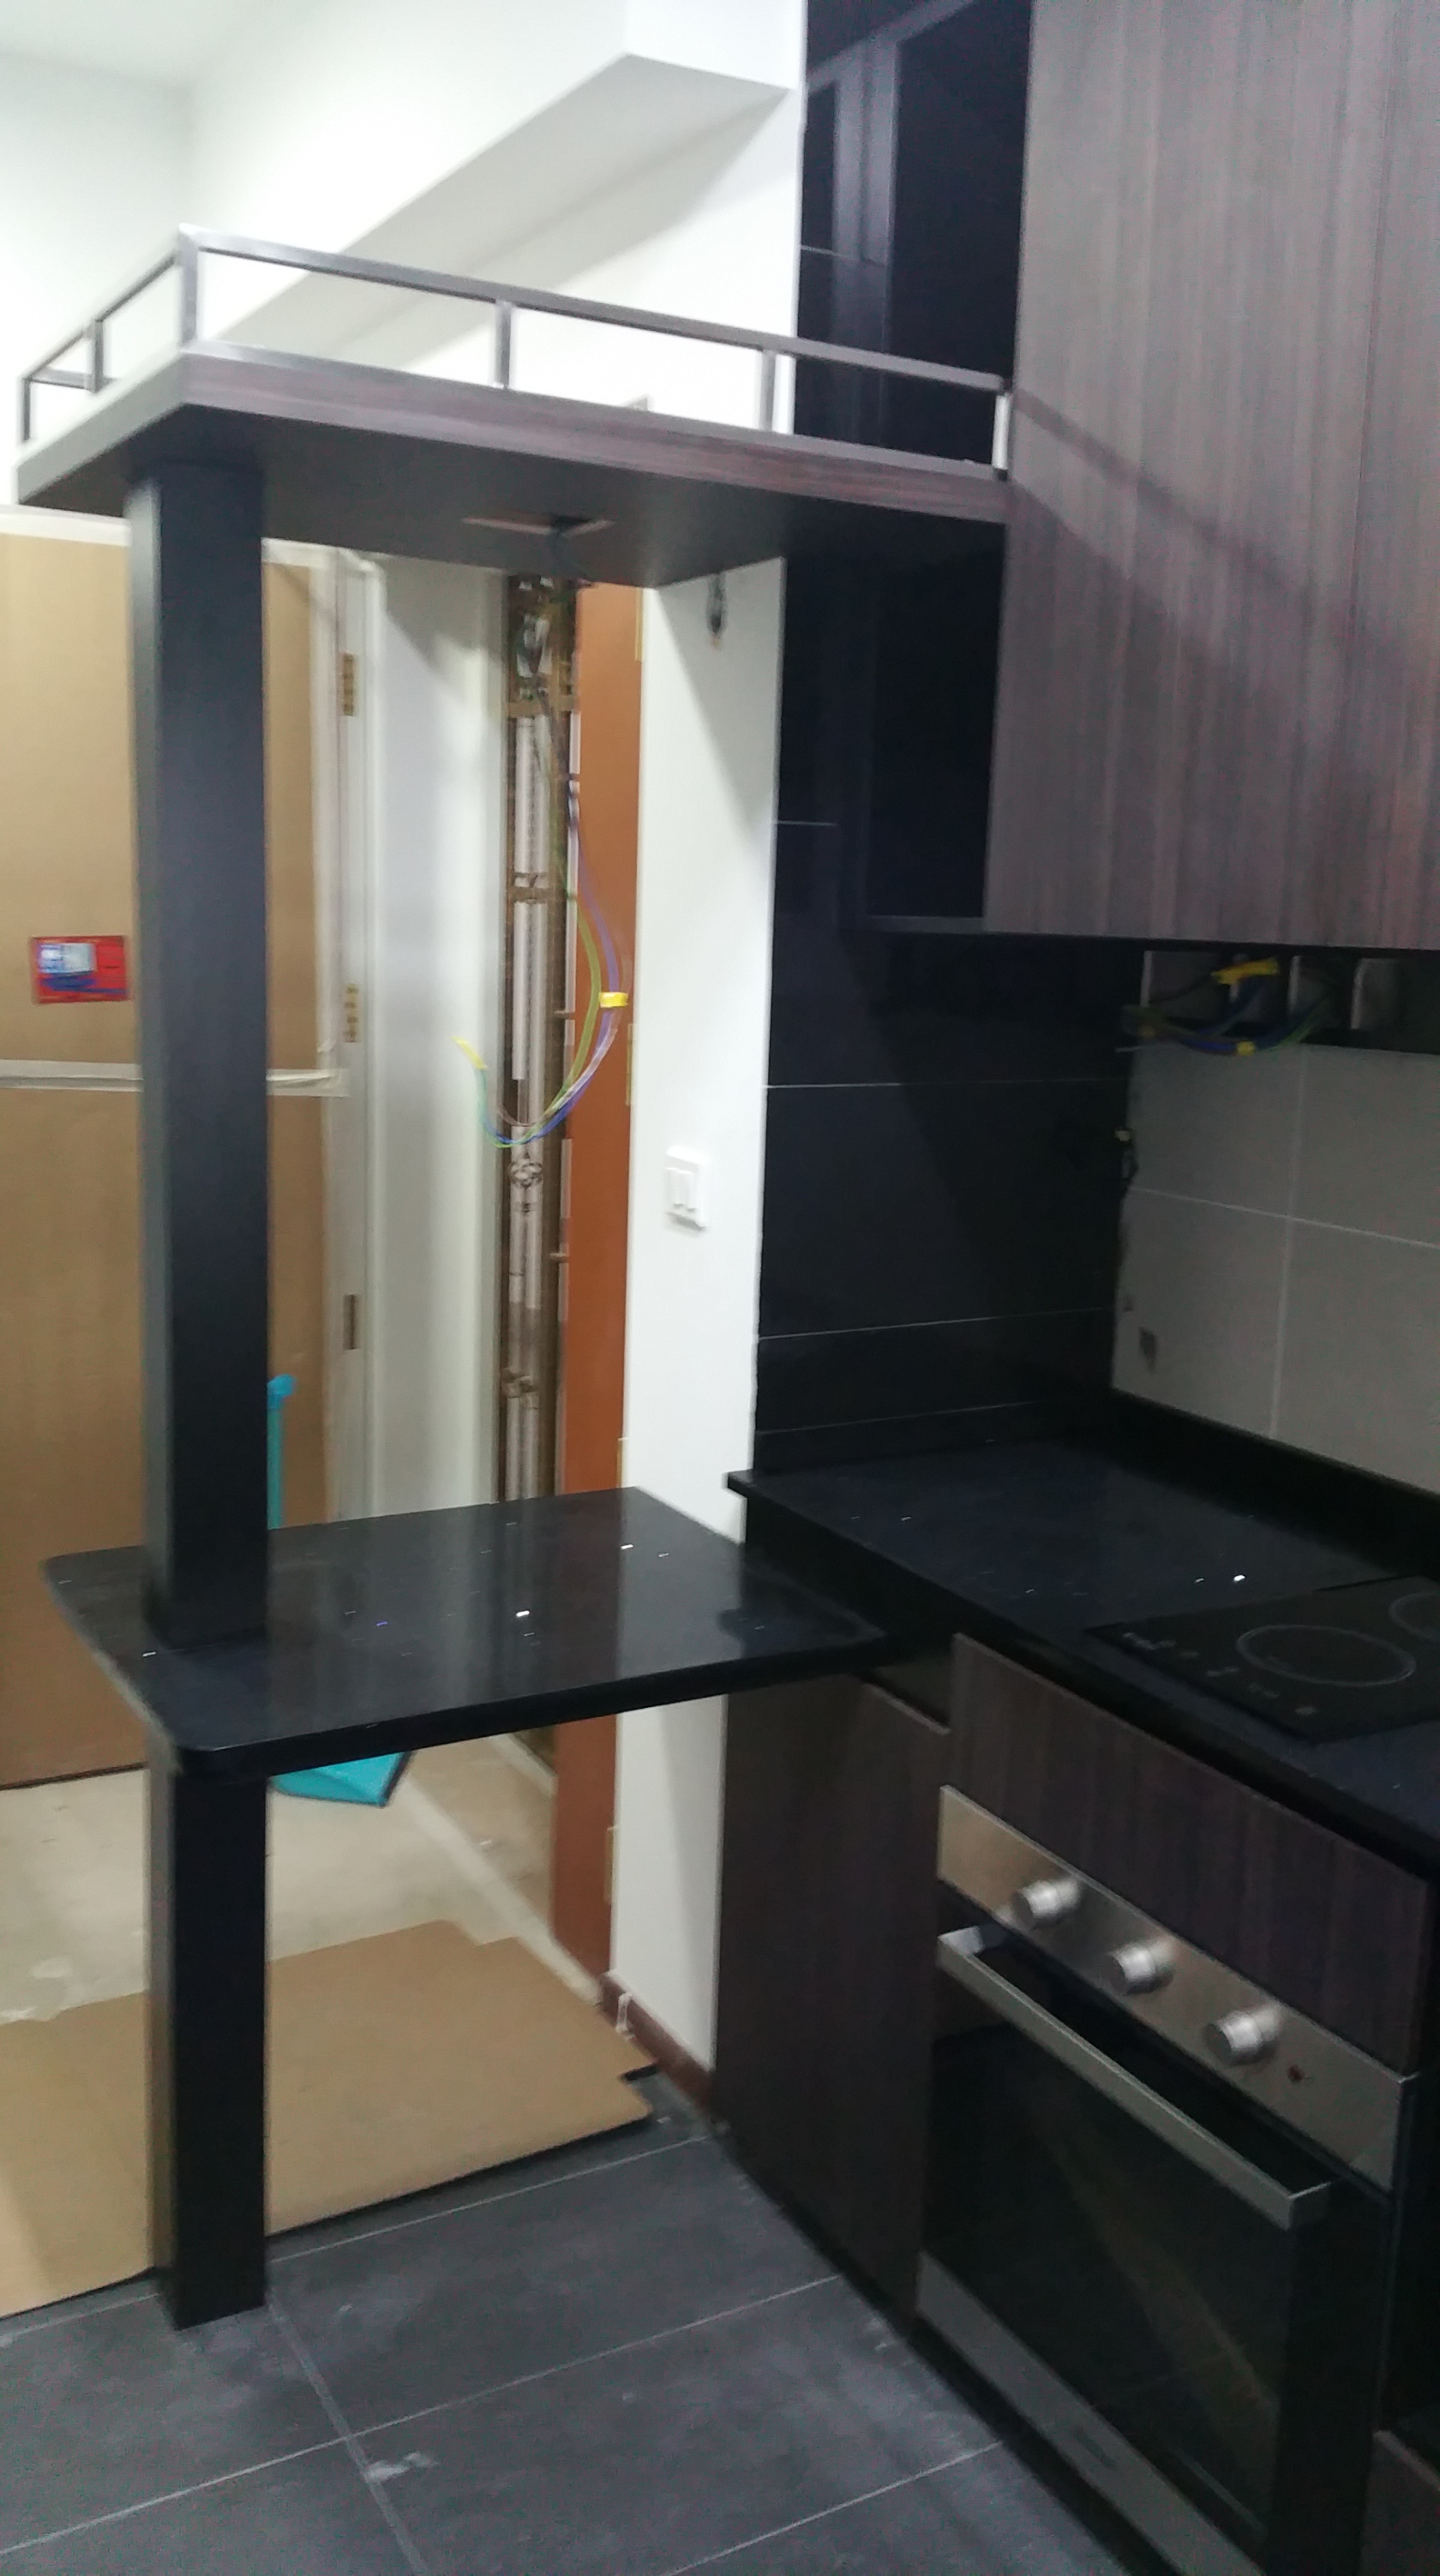
View of the Cooking Area of my Kitchen
They installed my Fujioh Induction Cooker too!
Originally wanted to have a 4 Ring type but was advised that because my kitchen is very small, it would be better
to get a 2 ring type instead as I can gain more counter top space that way which I agreed. More practical lah.
My Kitchen Sink Counter Top.
I like the contrast between the silver and the black counter top.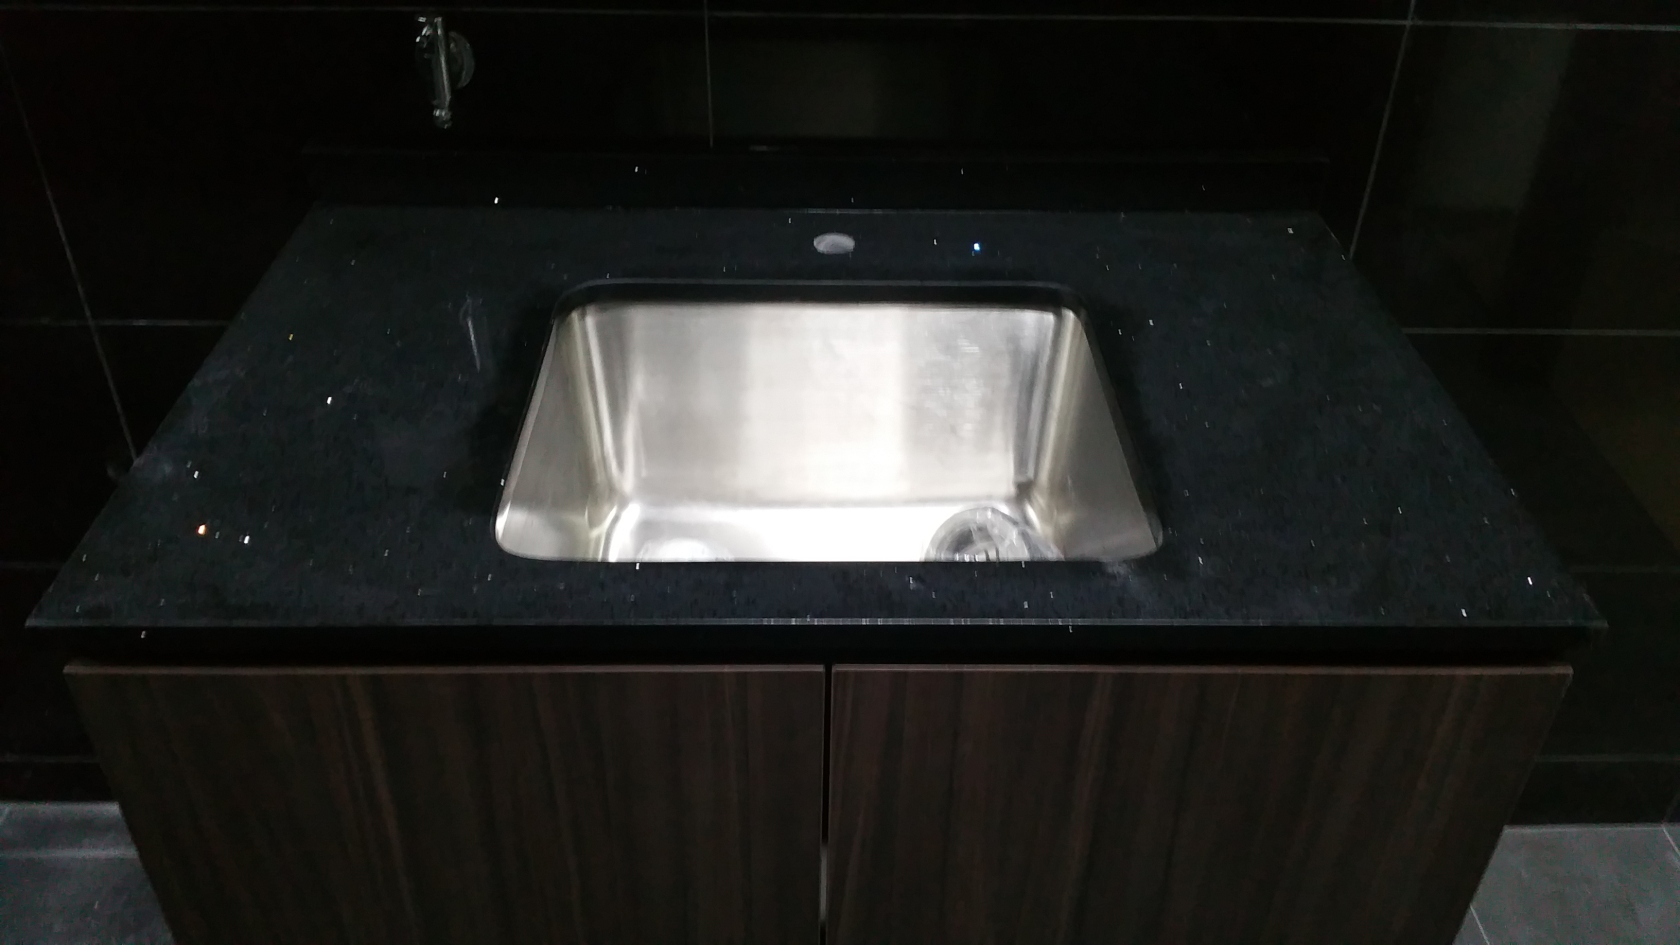
Bathroom Vanity Storage Counter Top
Took my stone sink too to pose. (It’ll be installed tomorrow) I like how nicely it fits in with the Quartz Counter Top.
Its a little small, but that means I have more space to put barang barang all over the counter top lol.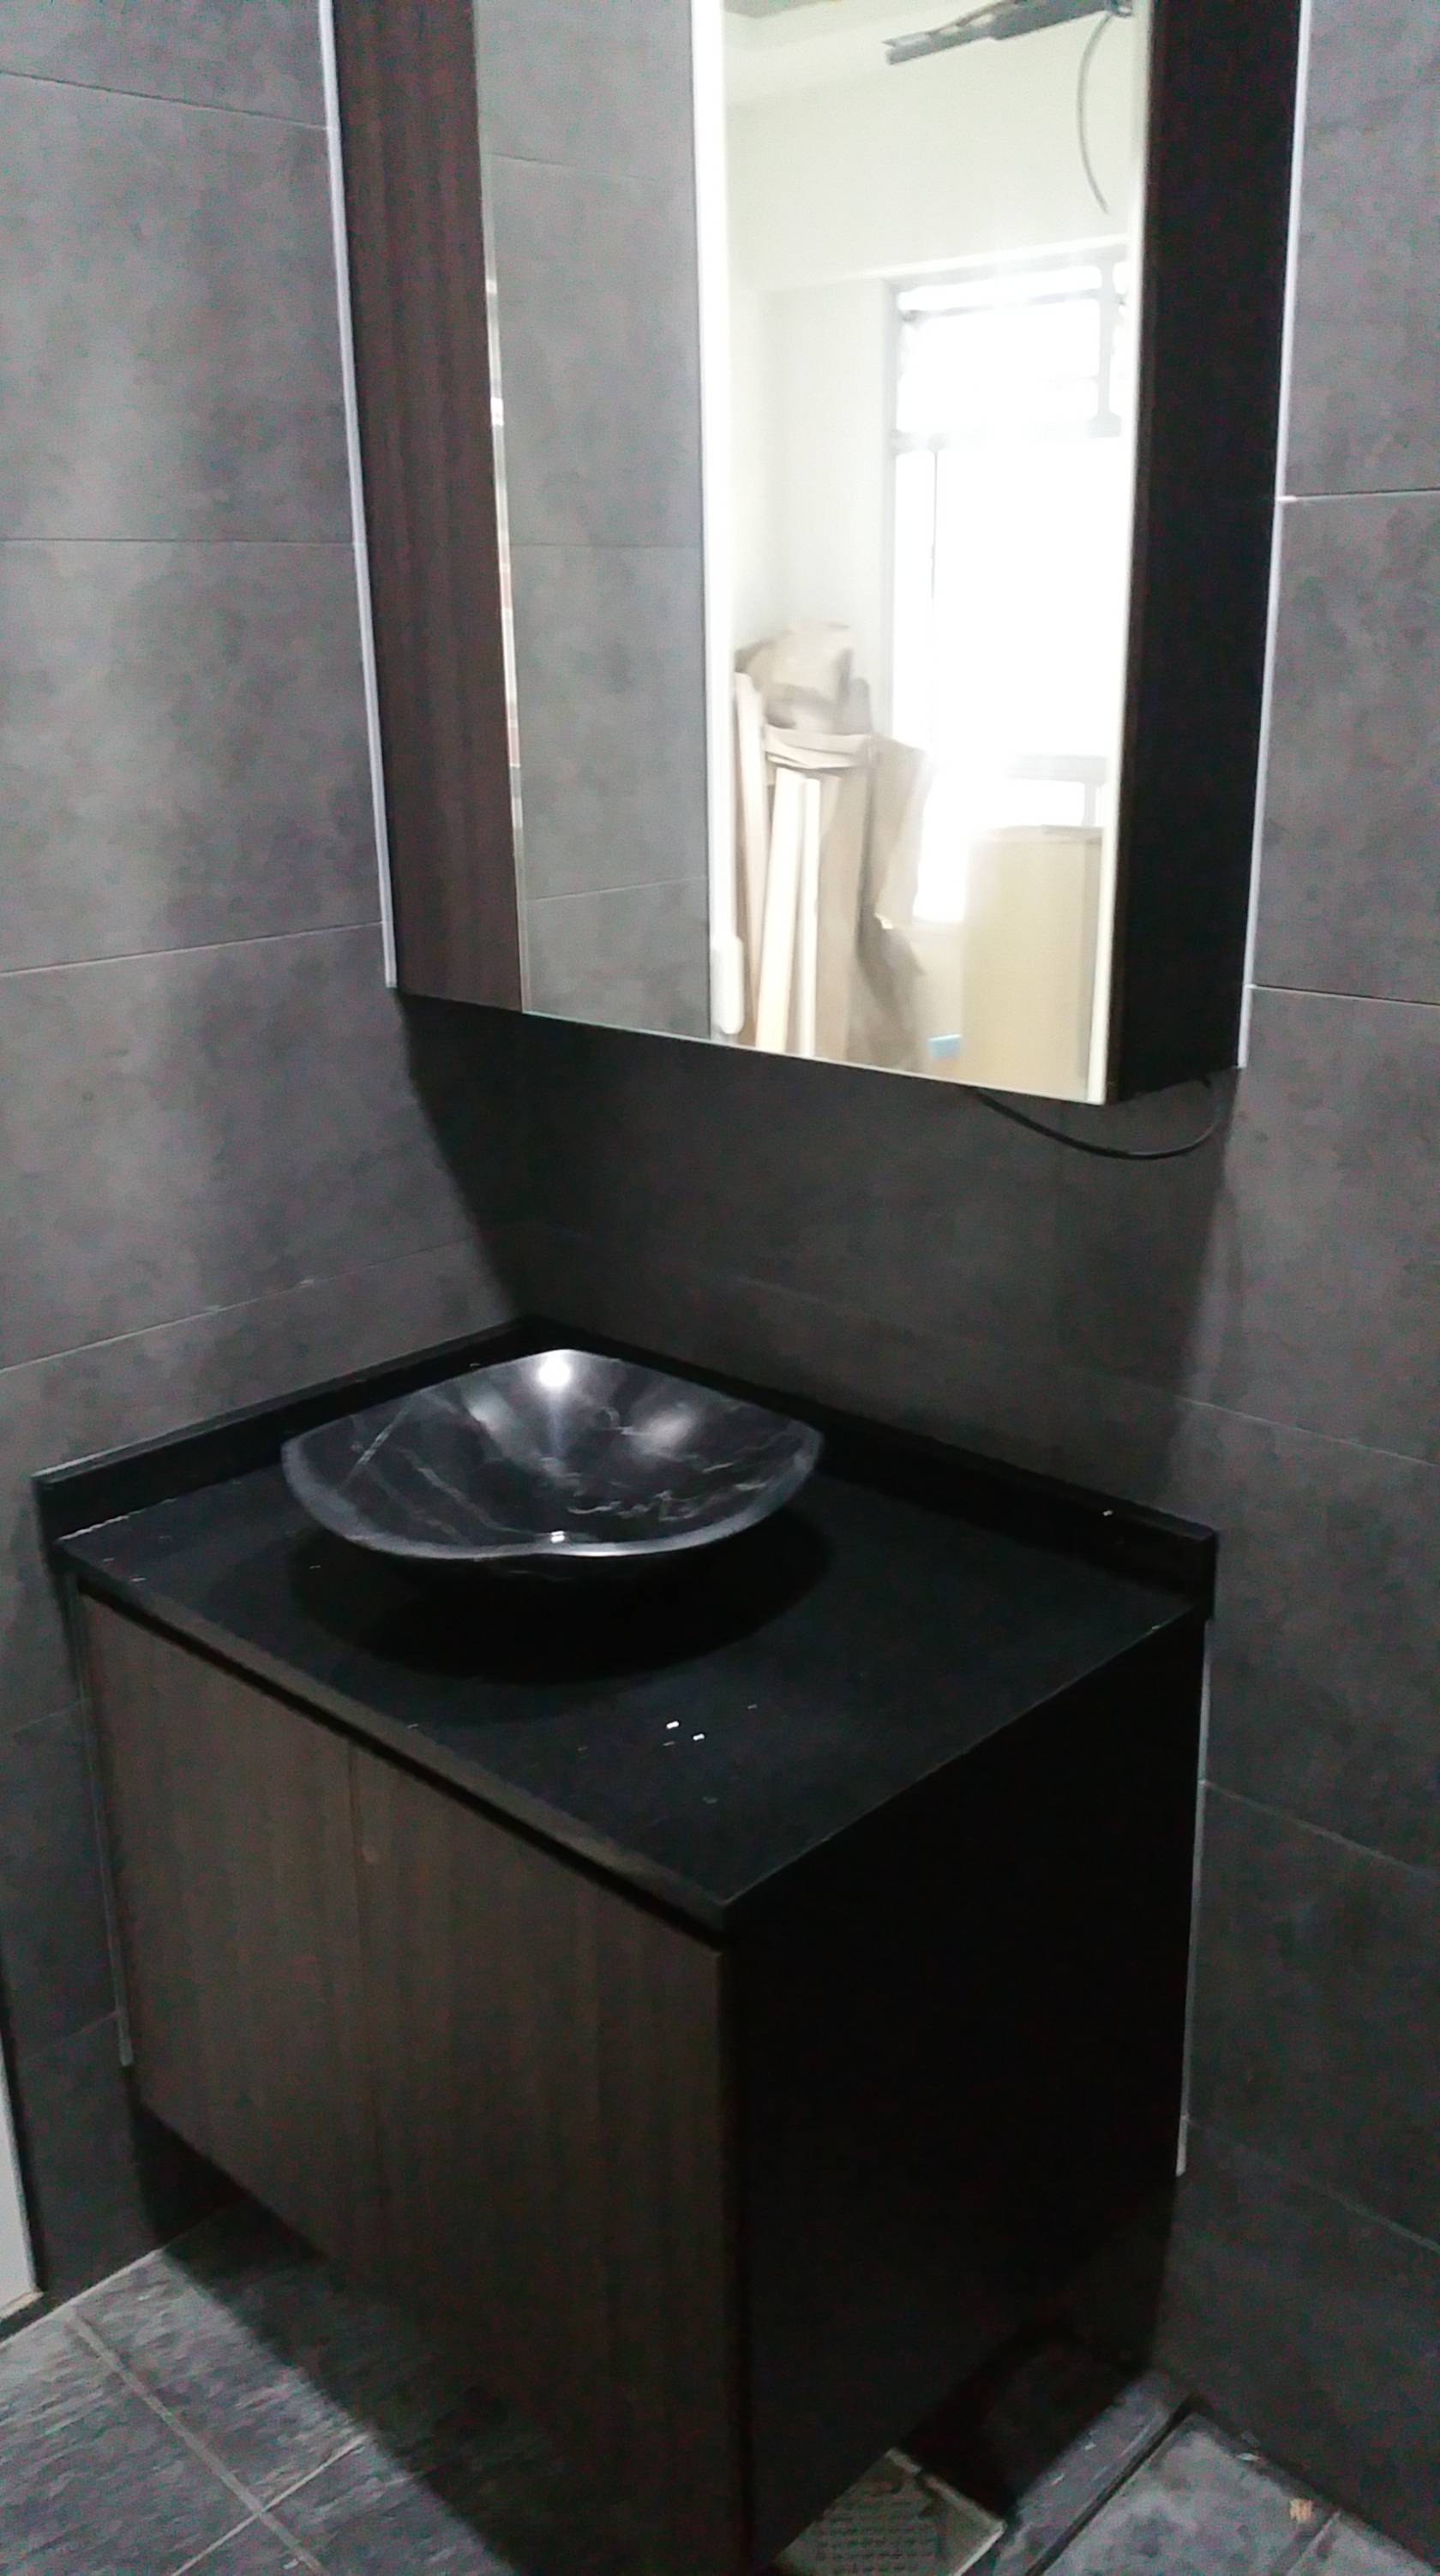
Some Close Up Looks at the Workmanship on the Counter Top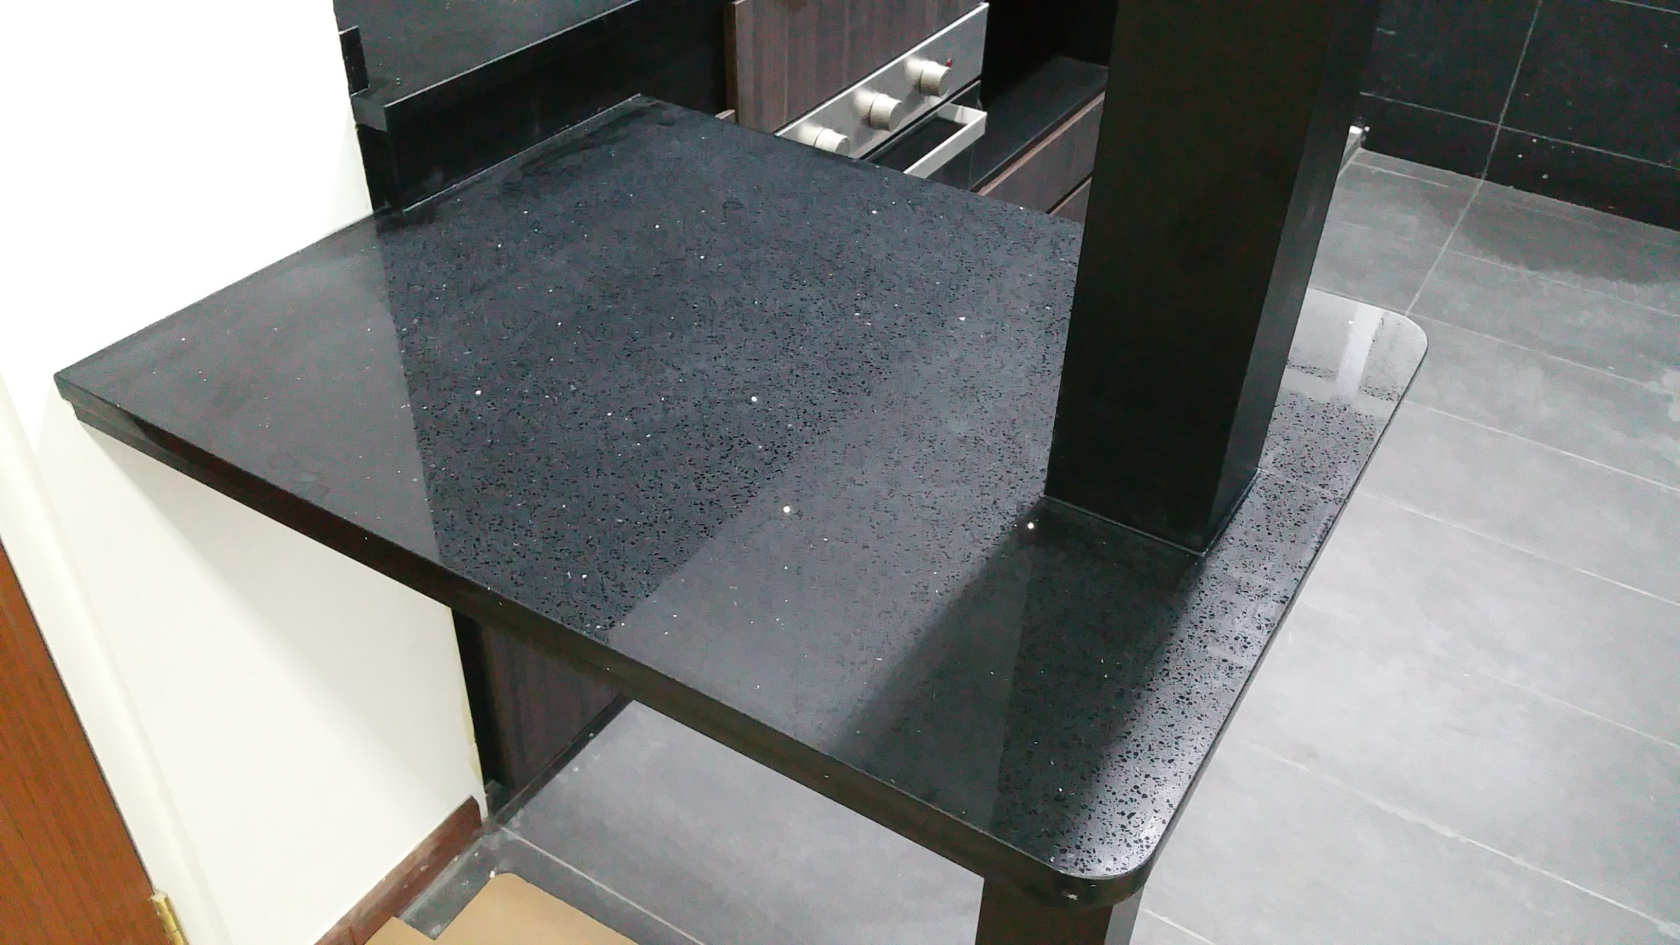
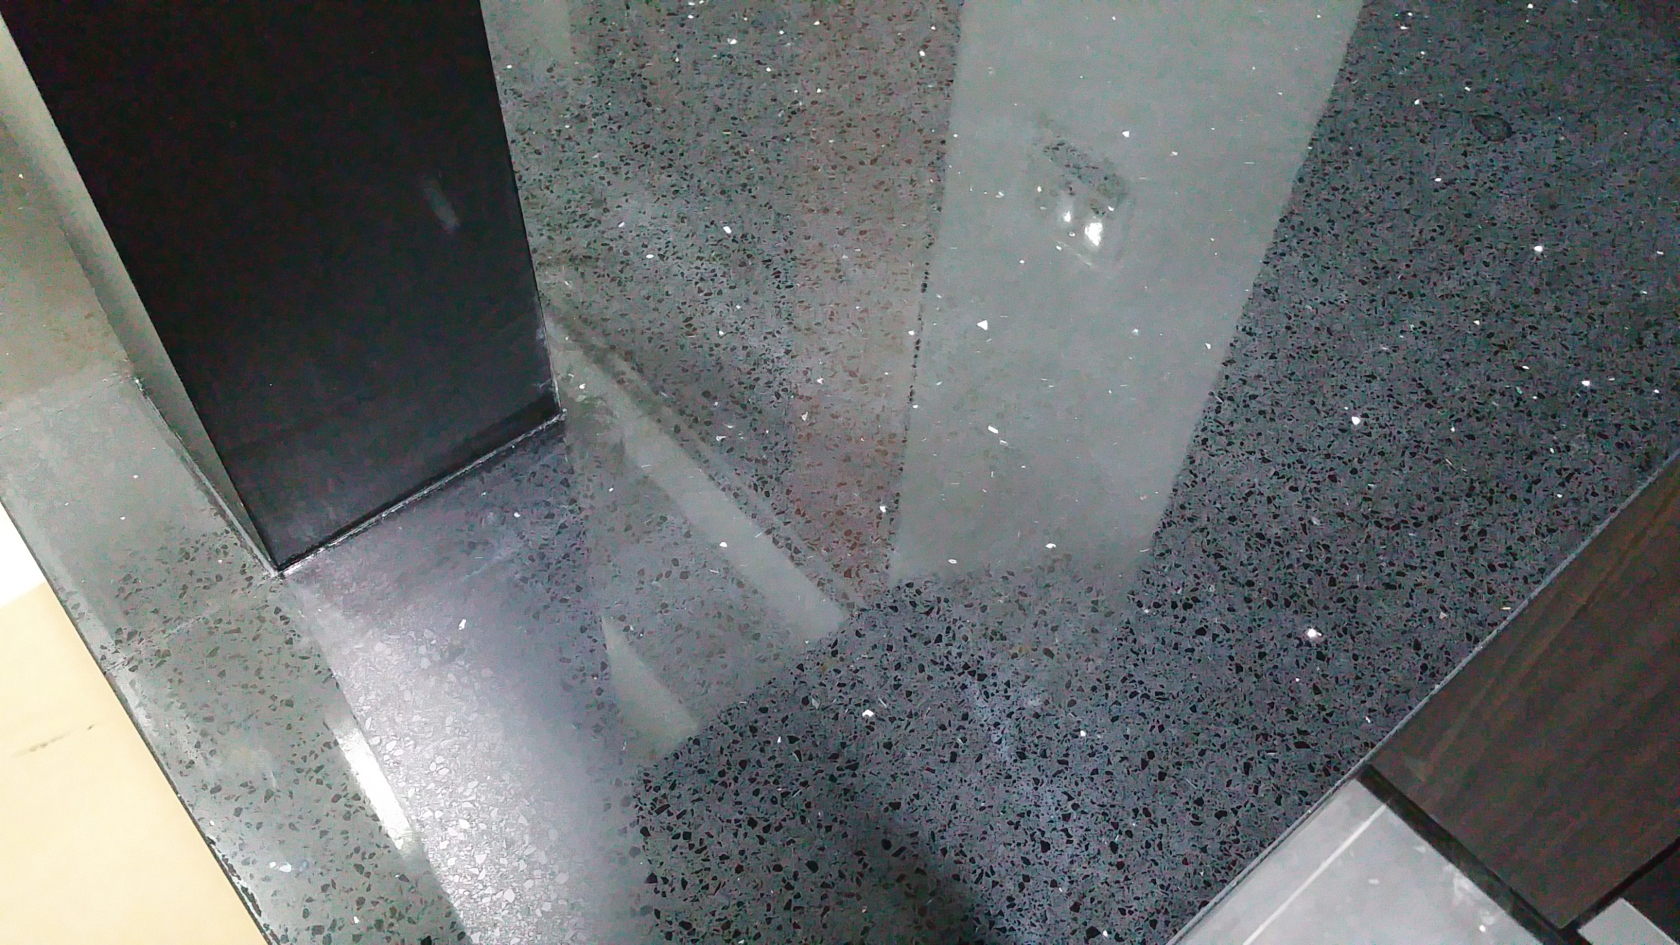
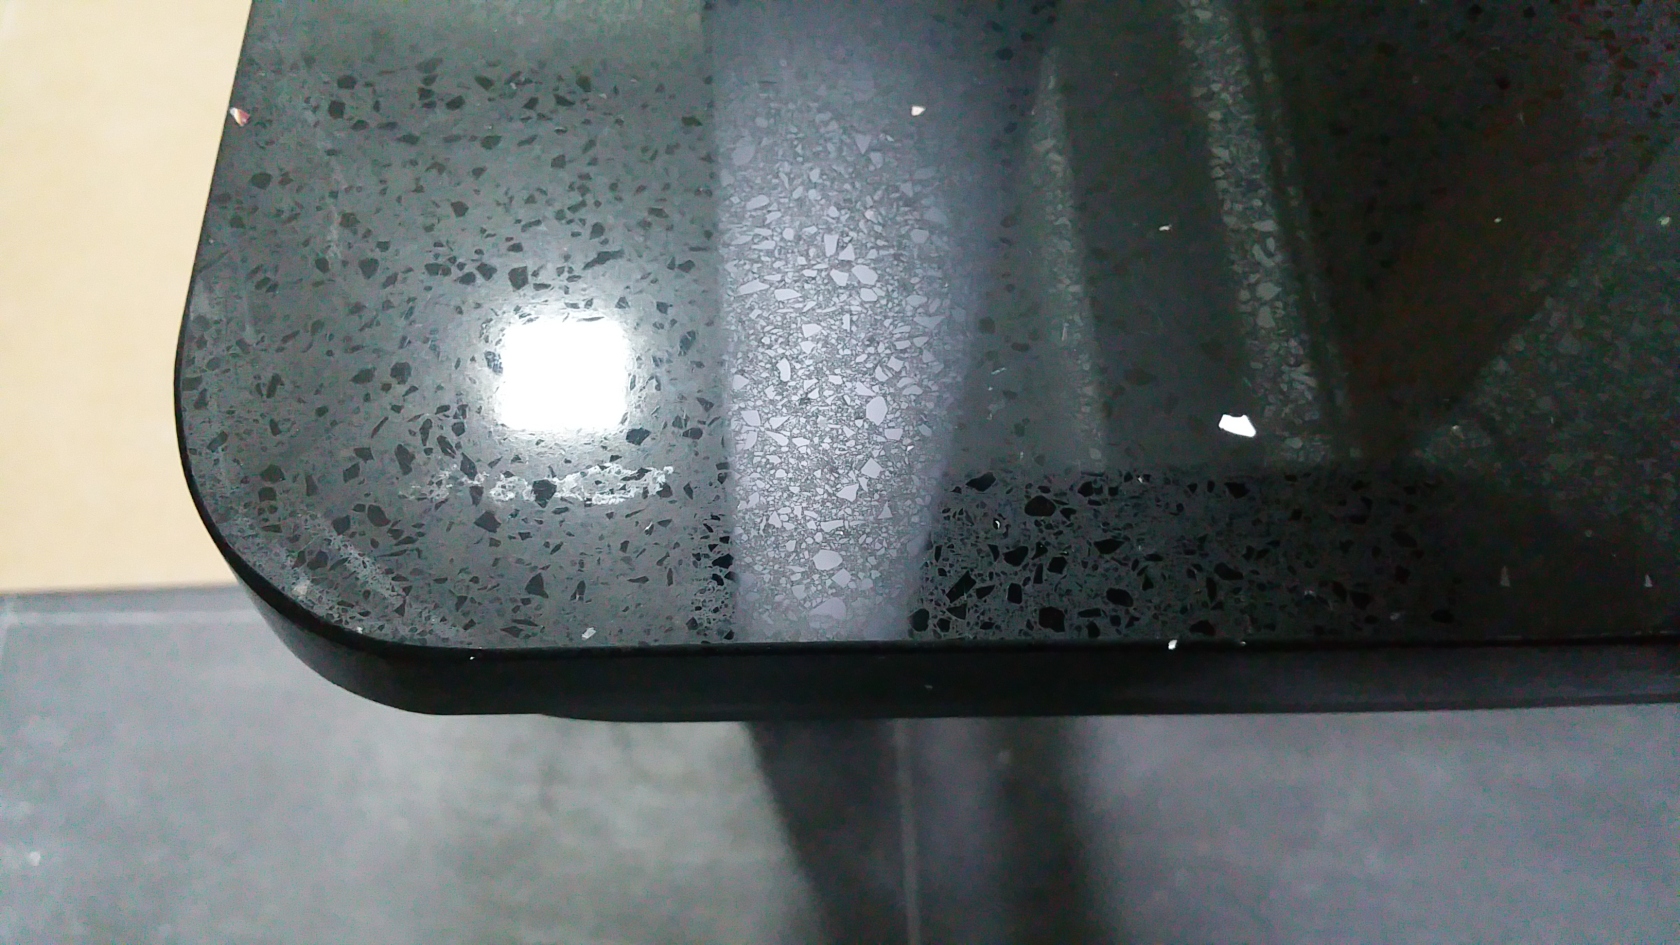
I title this picture: “Touching the Stars”
This Black Quartz Counter Top is so PreeeetttyyyyyY!!!!!!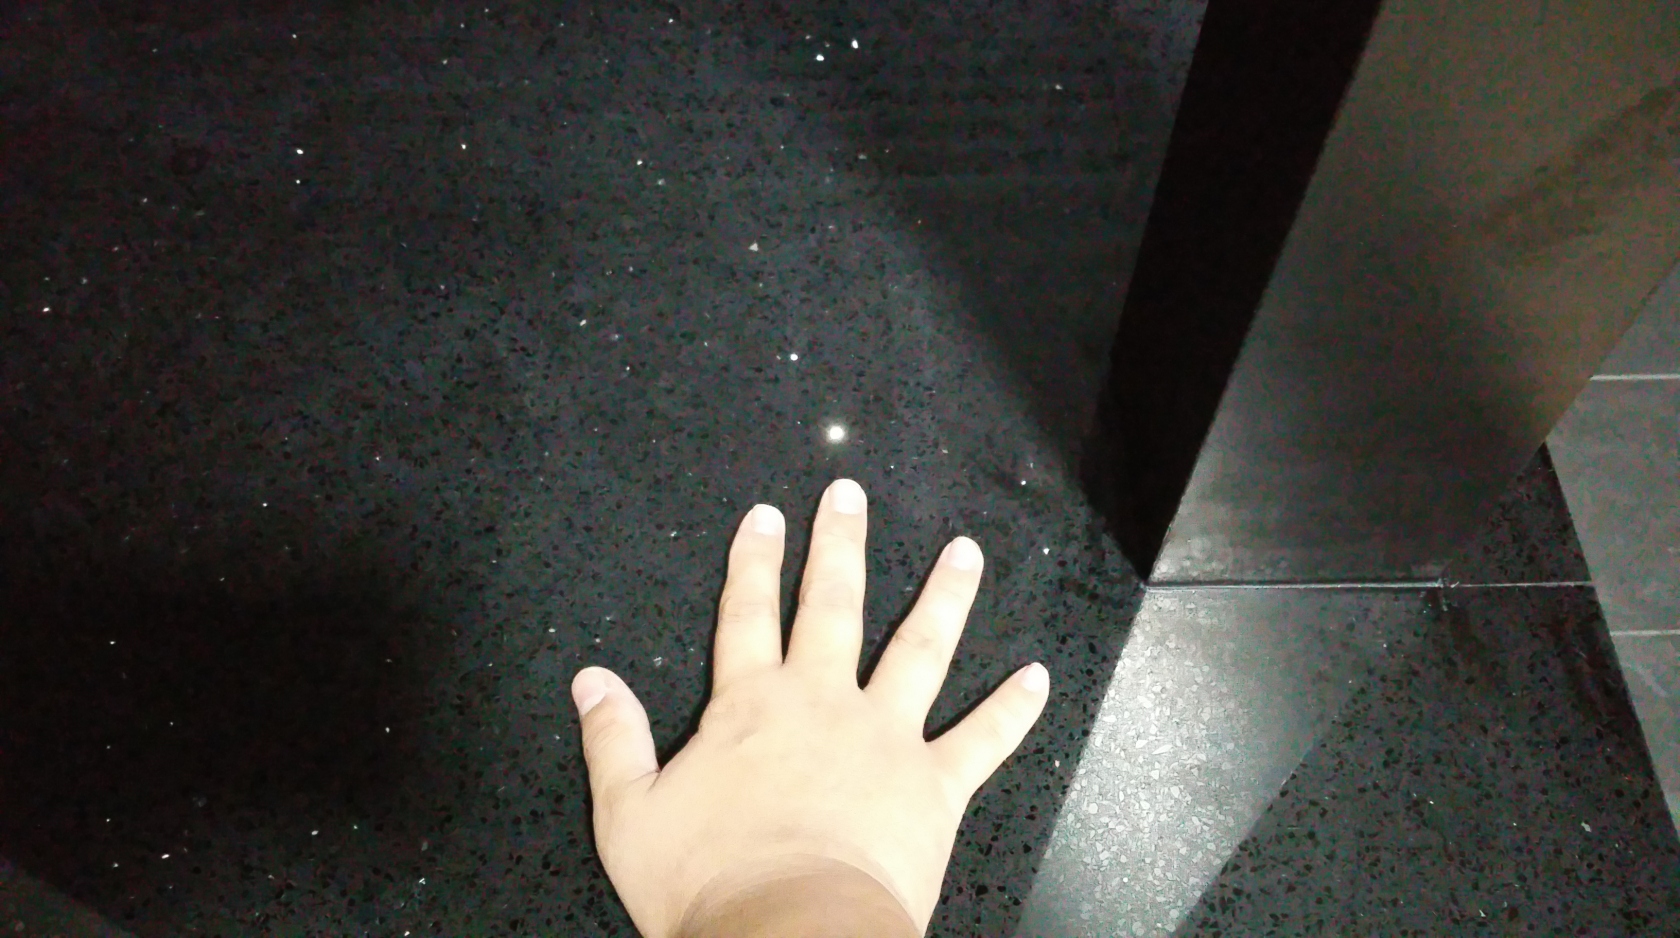
And so, here we go. Quartz Counter Top is finally up!
Tomorrow will be the plumbers installing all the sanitary fittings,
including Storage Tank, Sinks, Taps, and the barang barang things I bought.
I’ll be supervising them onsite for this one.I’ll see ya’ll for tomorrow’s updates!!
Click Here for the Next Blog Entry:
End of 8th Week after Key Collection – Glass Measurement, Plumbers installed Sanitary Fittings and More
Click Here to go back to Page 1 - Table of Contents-
1
-
-
One suggestion, do you mind change the scrolling, so that oldest post is on top, and newest post is at bottom?
Its more natural to scroll down to see new posts, rather than scroll up to see new posts. Thanks.-
 1
1
-
-
12 minutes ago, MiniBean said:Very nice ! You have a cozy kitchen and I like the platform bed with storage. Good to see all is going well
May i know how much is the PD door?
Thanks!
PD Door price was $450 in my quotation. -
Always good to see a fellow 2 roomer start a blog!
Interesting floor plan, no bomb shelter, so much open space for design.
Looking forward to seeing more! -
2 hours ago, Diluted said:Thanks for the detailed write up on the parts needed for a day and night curtain set up!
Did you come across any curtain tracks that is mounted on the ceiling at Ikea?
Hi thanks!
Actually yes, I did see some versions that are mounted on ceiling.
This is one of them. There are many more other versions of course.
Hope this helps!
http://www.ikea.com/sg/en/catalog/products/70299092/#
-
2 hours ago, mmoh said:underneath the table or above table? hmm...
Think this is a common request. My ID do it for me foc :x
I've had enough adventures with this dbbox already lol. I don't want to look at it anymore after so much saga on it.
Whether they want to charge money to put shelves, or give me a free unicorn with rainbow farts put inside the DB-Box I also dun care liaoAnyway original idea was those type of mini small broom with dustpan or mini vacuum cleaner
put at bottom side so easier for me to take out and clean my computer table area etc.
(maybe can also put a small cleaning brush / accessories / toys for my future kitty cat too )
Top casement area will put my network router la, mini toolbox and anything technical related.
So drained already though. I will focus my attention on other parts of my apartment and come back to it much much later -
1 minute ago, mmoh said:you can install shelves in the DB box.
Good idea, but for now i think i'm done with my DB-Box lol
Gonna sit back relax abit more before deciding what i'll do with it
Initially thought of using it to keep brooms and cleaning tools. -
Blog Entry Date: 5th November 2017 Sunday
Click Here to go back to Page 1 - Table of Contents
End of 7th week after Key Collection. Carpentry Works - Part 3 / 3
Whoops seems like I've exceeded the maximum image storage limit of 35.12mb in Renotalk.
Well, when you have 30 blog entries (And Counting), it adds up
Lucky I had a backup blog hosted on Wordpress, so i'm gonna link my images from there.
That said, just a gentle reminder, I have an exact copy of the same blog hosted on Wordpress,
in case this blog in Renotalk gets taken down for any reason in the future.
The Wordpress one is also a preferred link, if you prefer reading the blog from beginning to end with no interruptions.
So once again, the web address for the Wordpress version of my Blog is at:
https://hdb2roomrenovation.wordpress.com/
--------------------------------------------------------------------------------So … Day 3 of Carpentry.
Not much different to report from Day 2 honestly, but since the Workers don’t work on Sunday,
I thought this would be a good time to capture some images of Carpentry done so far without them around.
This blog entry will just be a Carpentry Photo Collection I guess.
--------------------------------------------------------------------------------
Living Room DB-Box
This is a re-post of the DB-Box picture I’ve posted yesterday.
Didn’t think its necessary to retake any more pictures of it.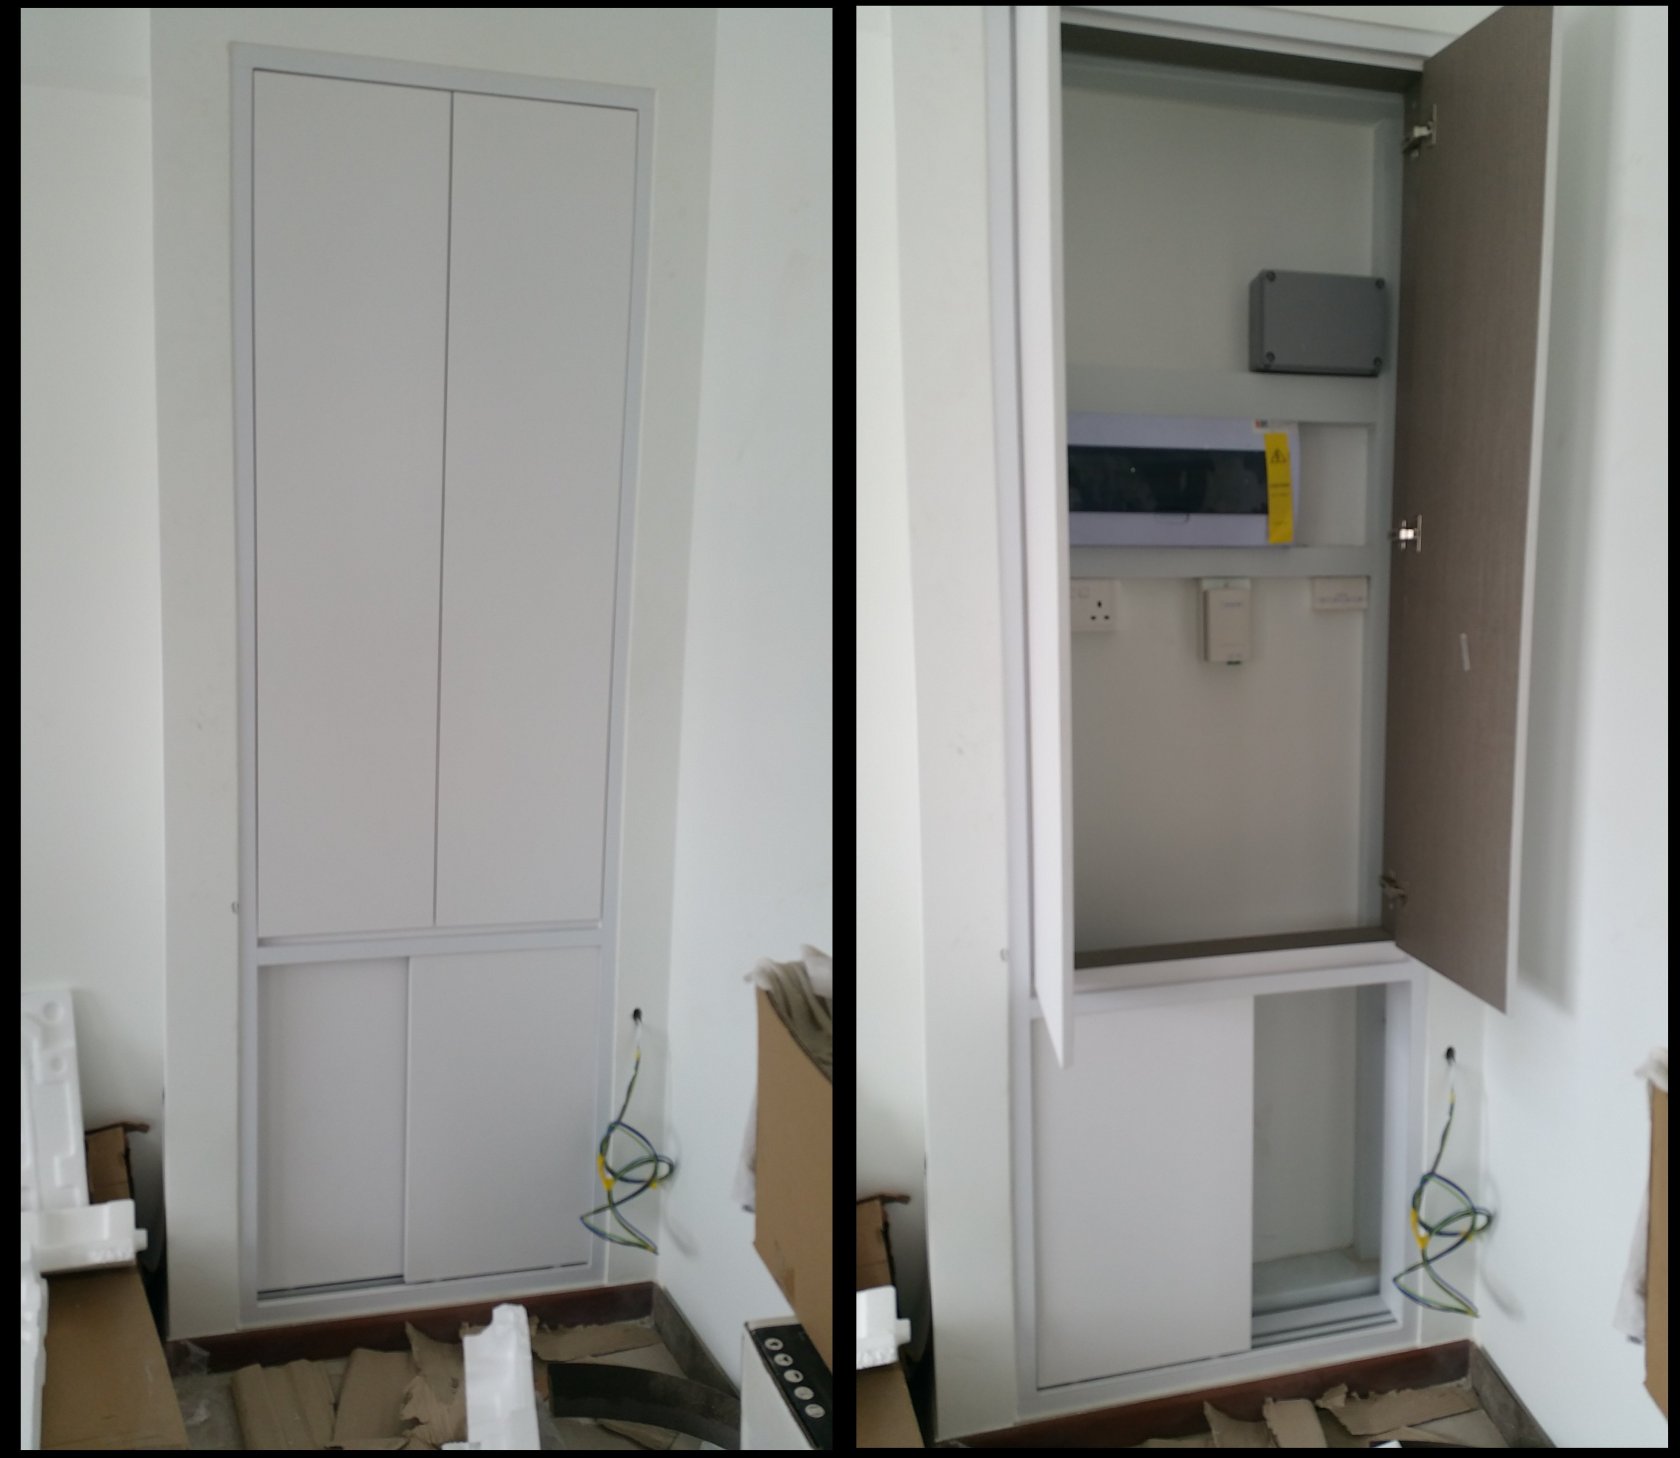
Bathroom Vanity Storage Cabinet
Also a re-post of the Bathroom Vanity Storage Cabinet picture I’ve posted yesterday. Sorry.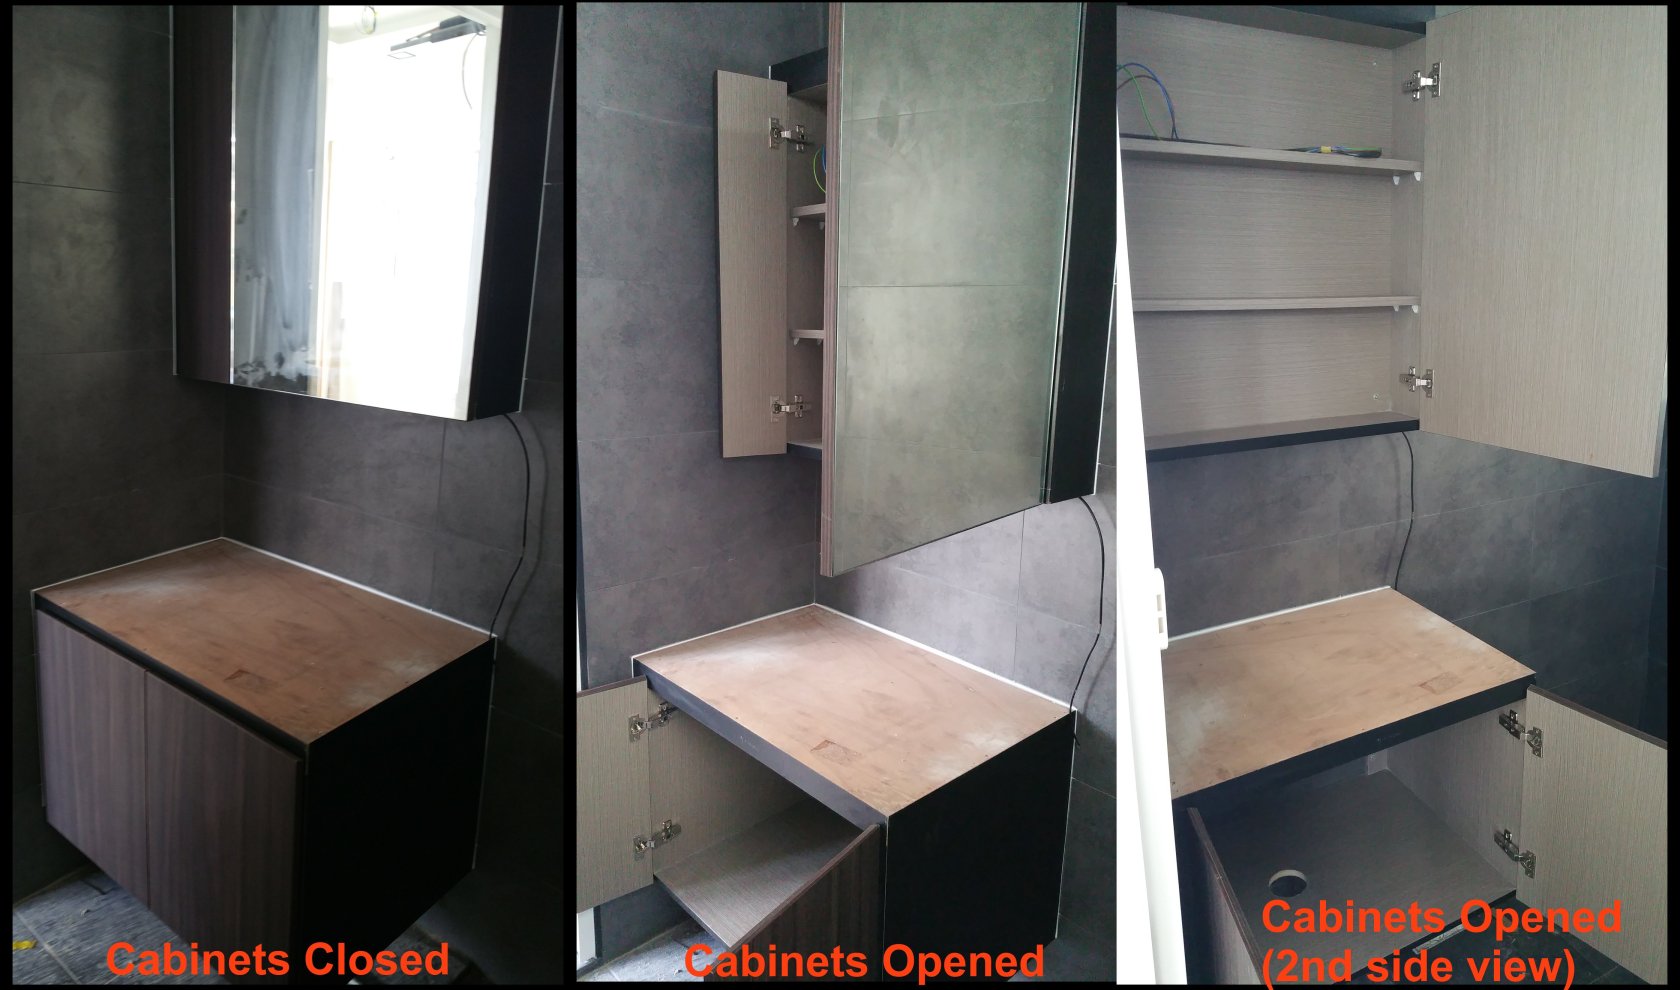
Kitchen Carpentry
This is an overall look of the Carpentry done for my Kitchen.
(Really really love the Integrated Dining Table concept)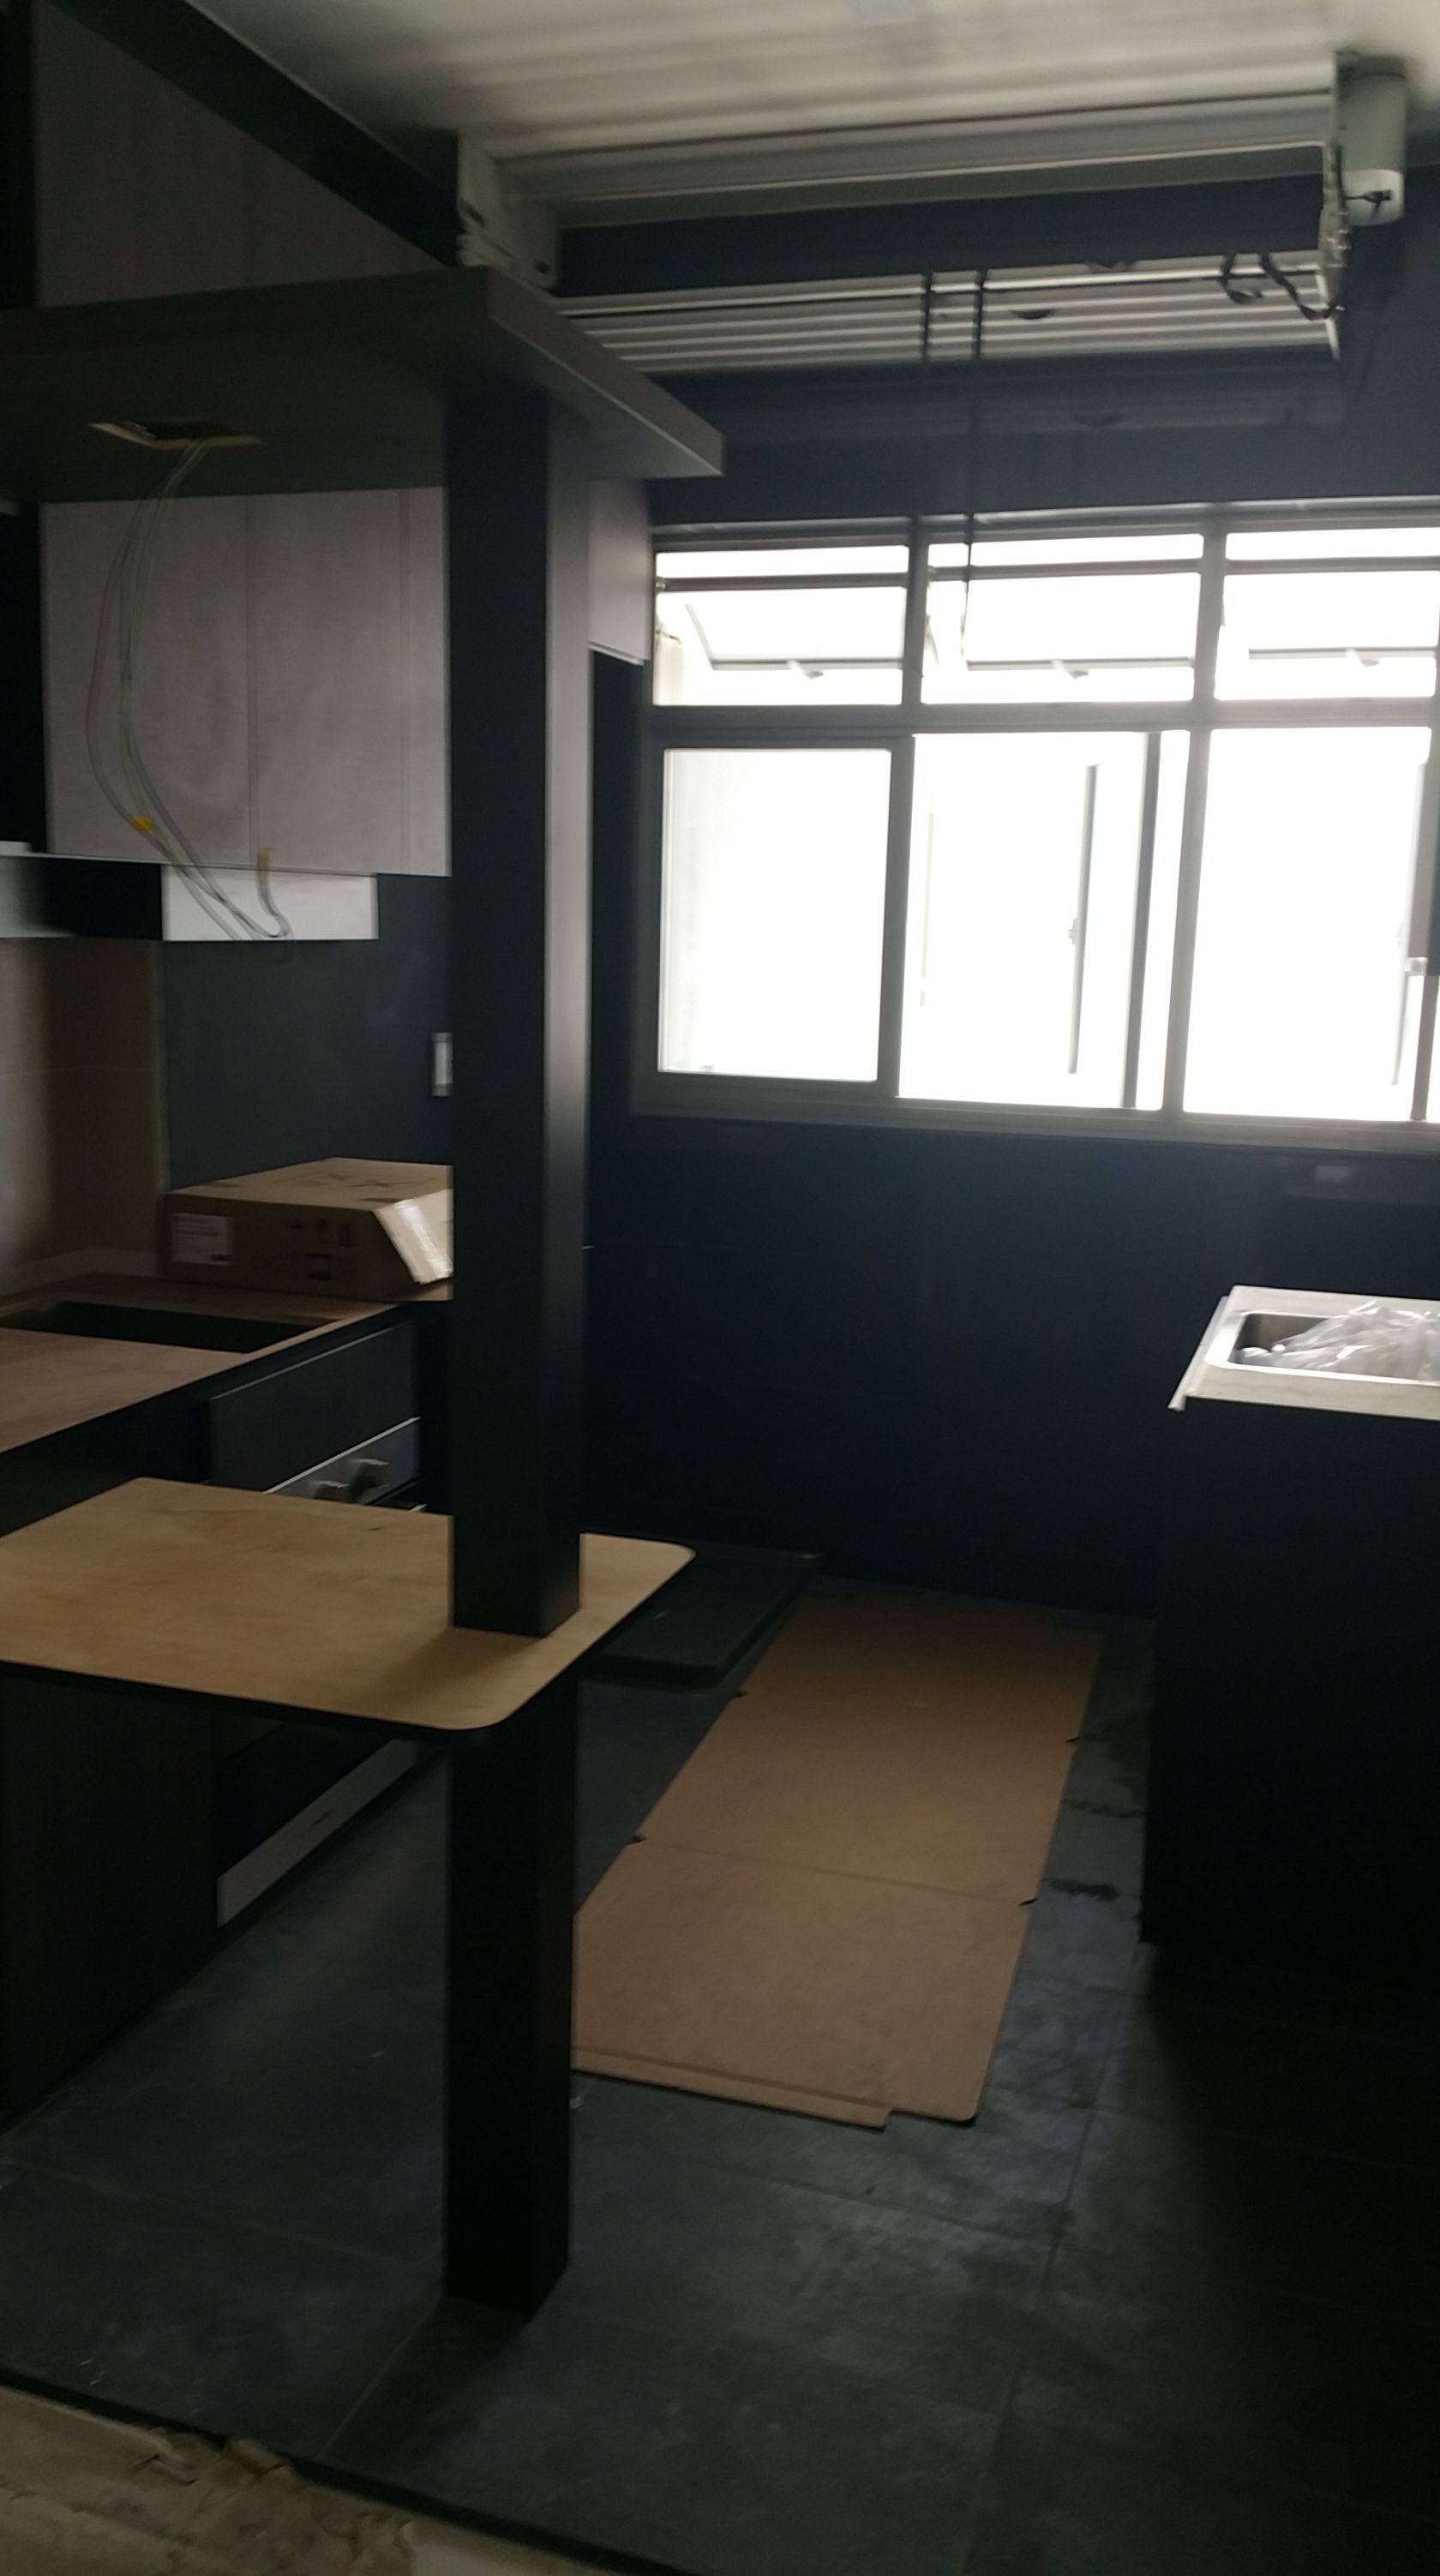
Kitchen side showing my Induction Cooktop + Oven + Microwave + Fridge Kerb.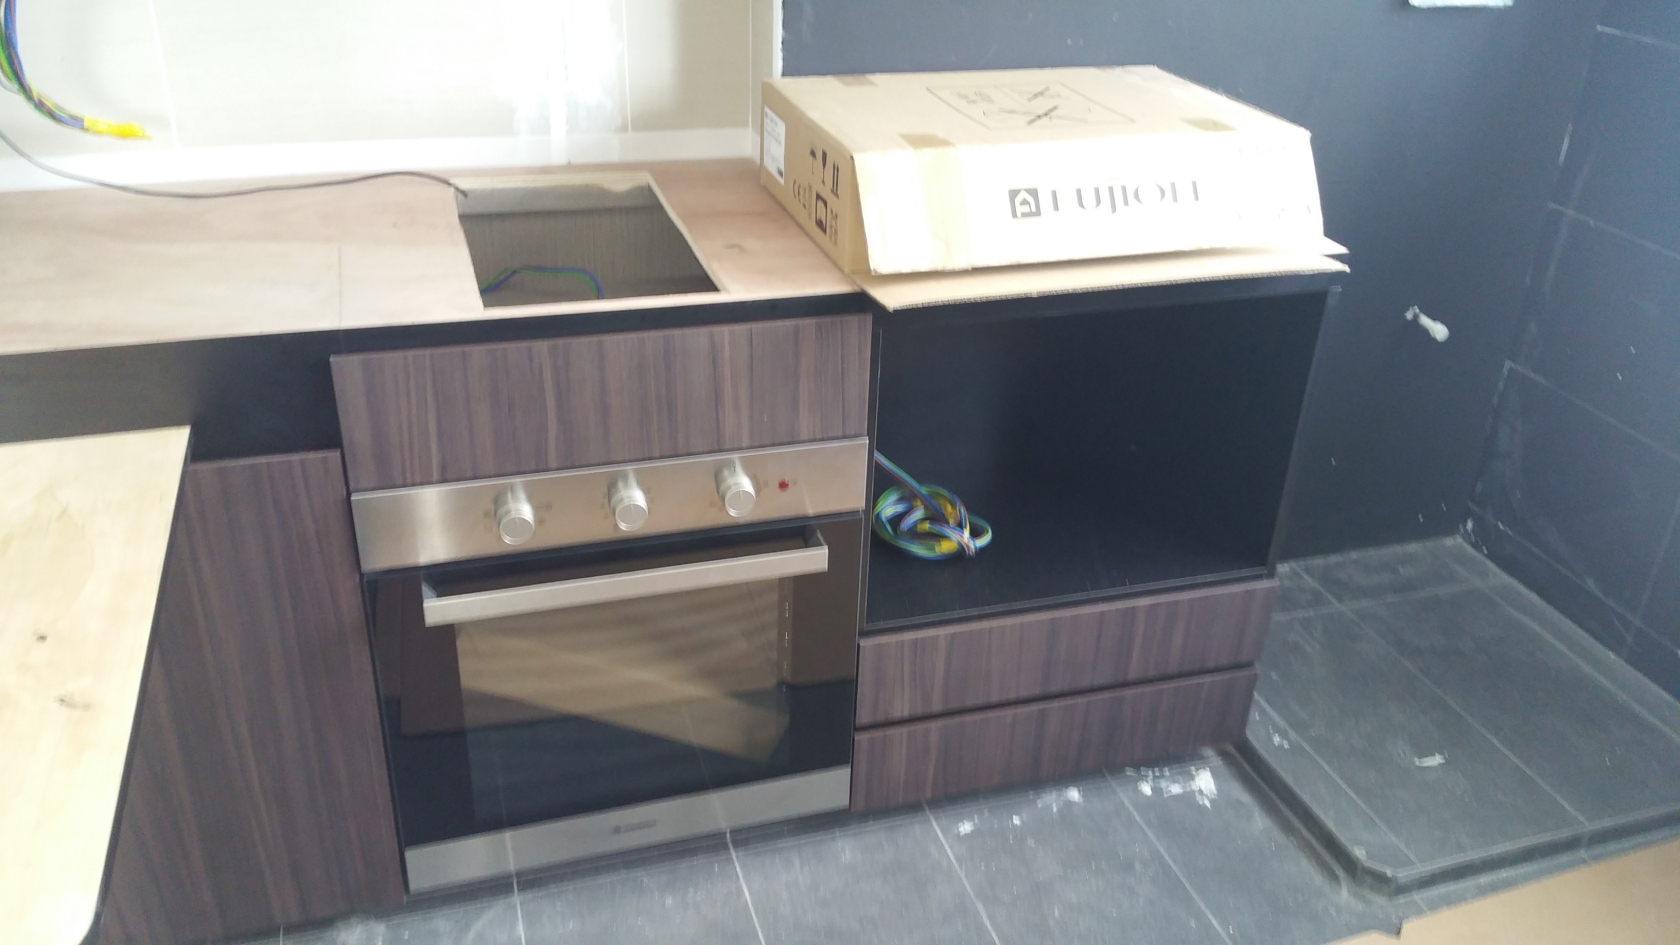
And here are the Cabinets above the area.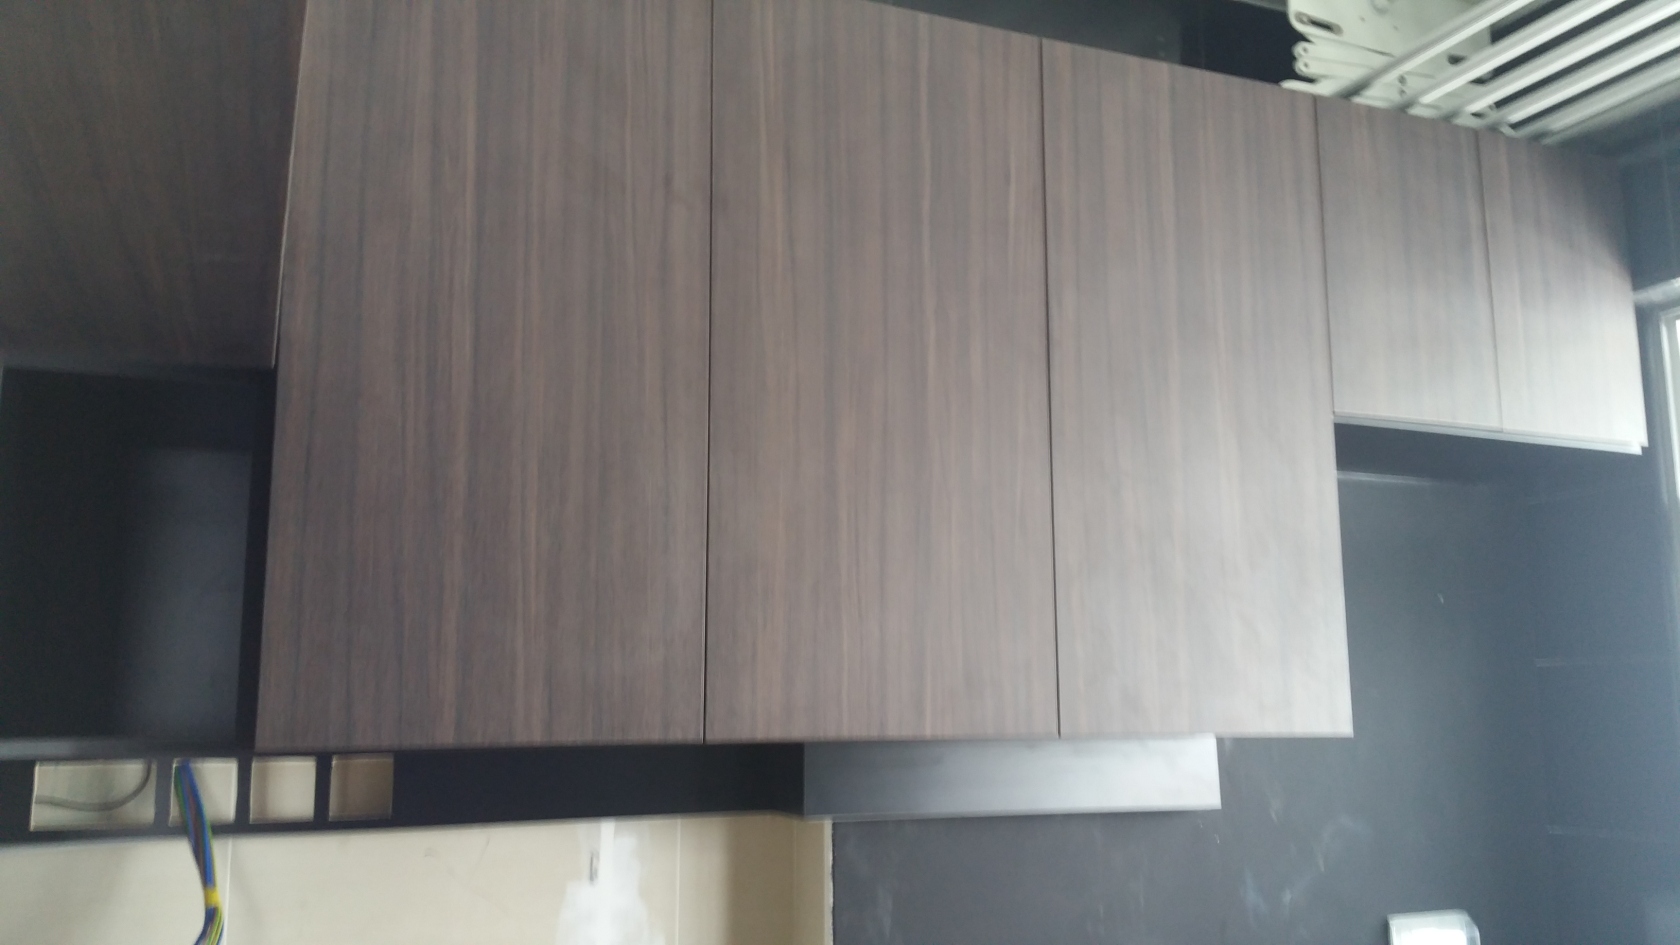
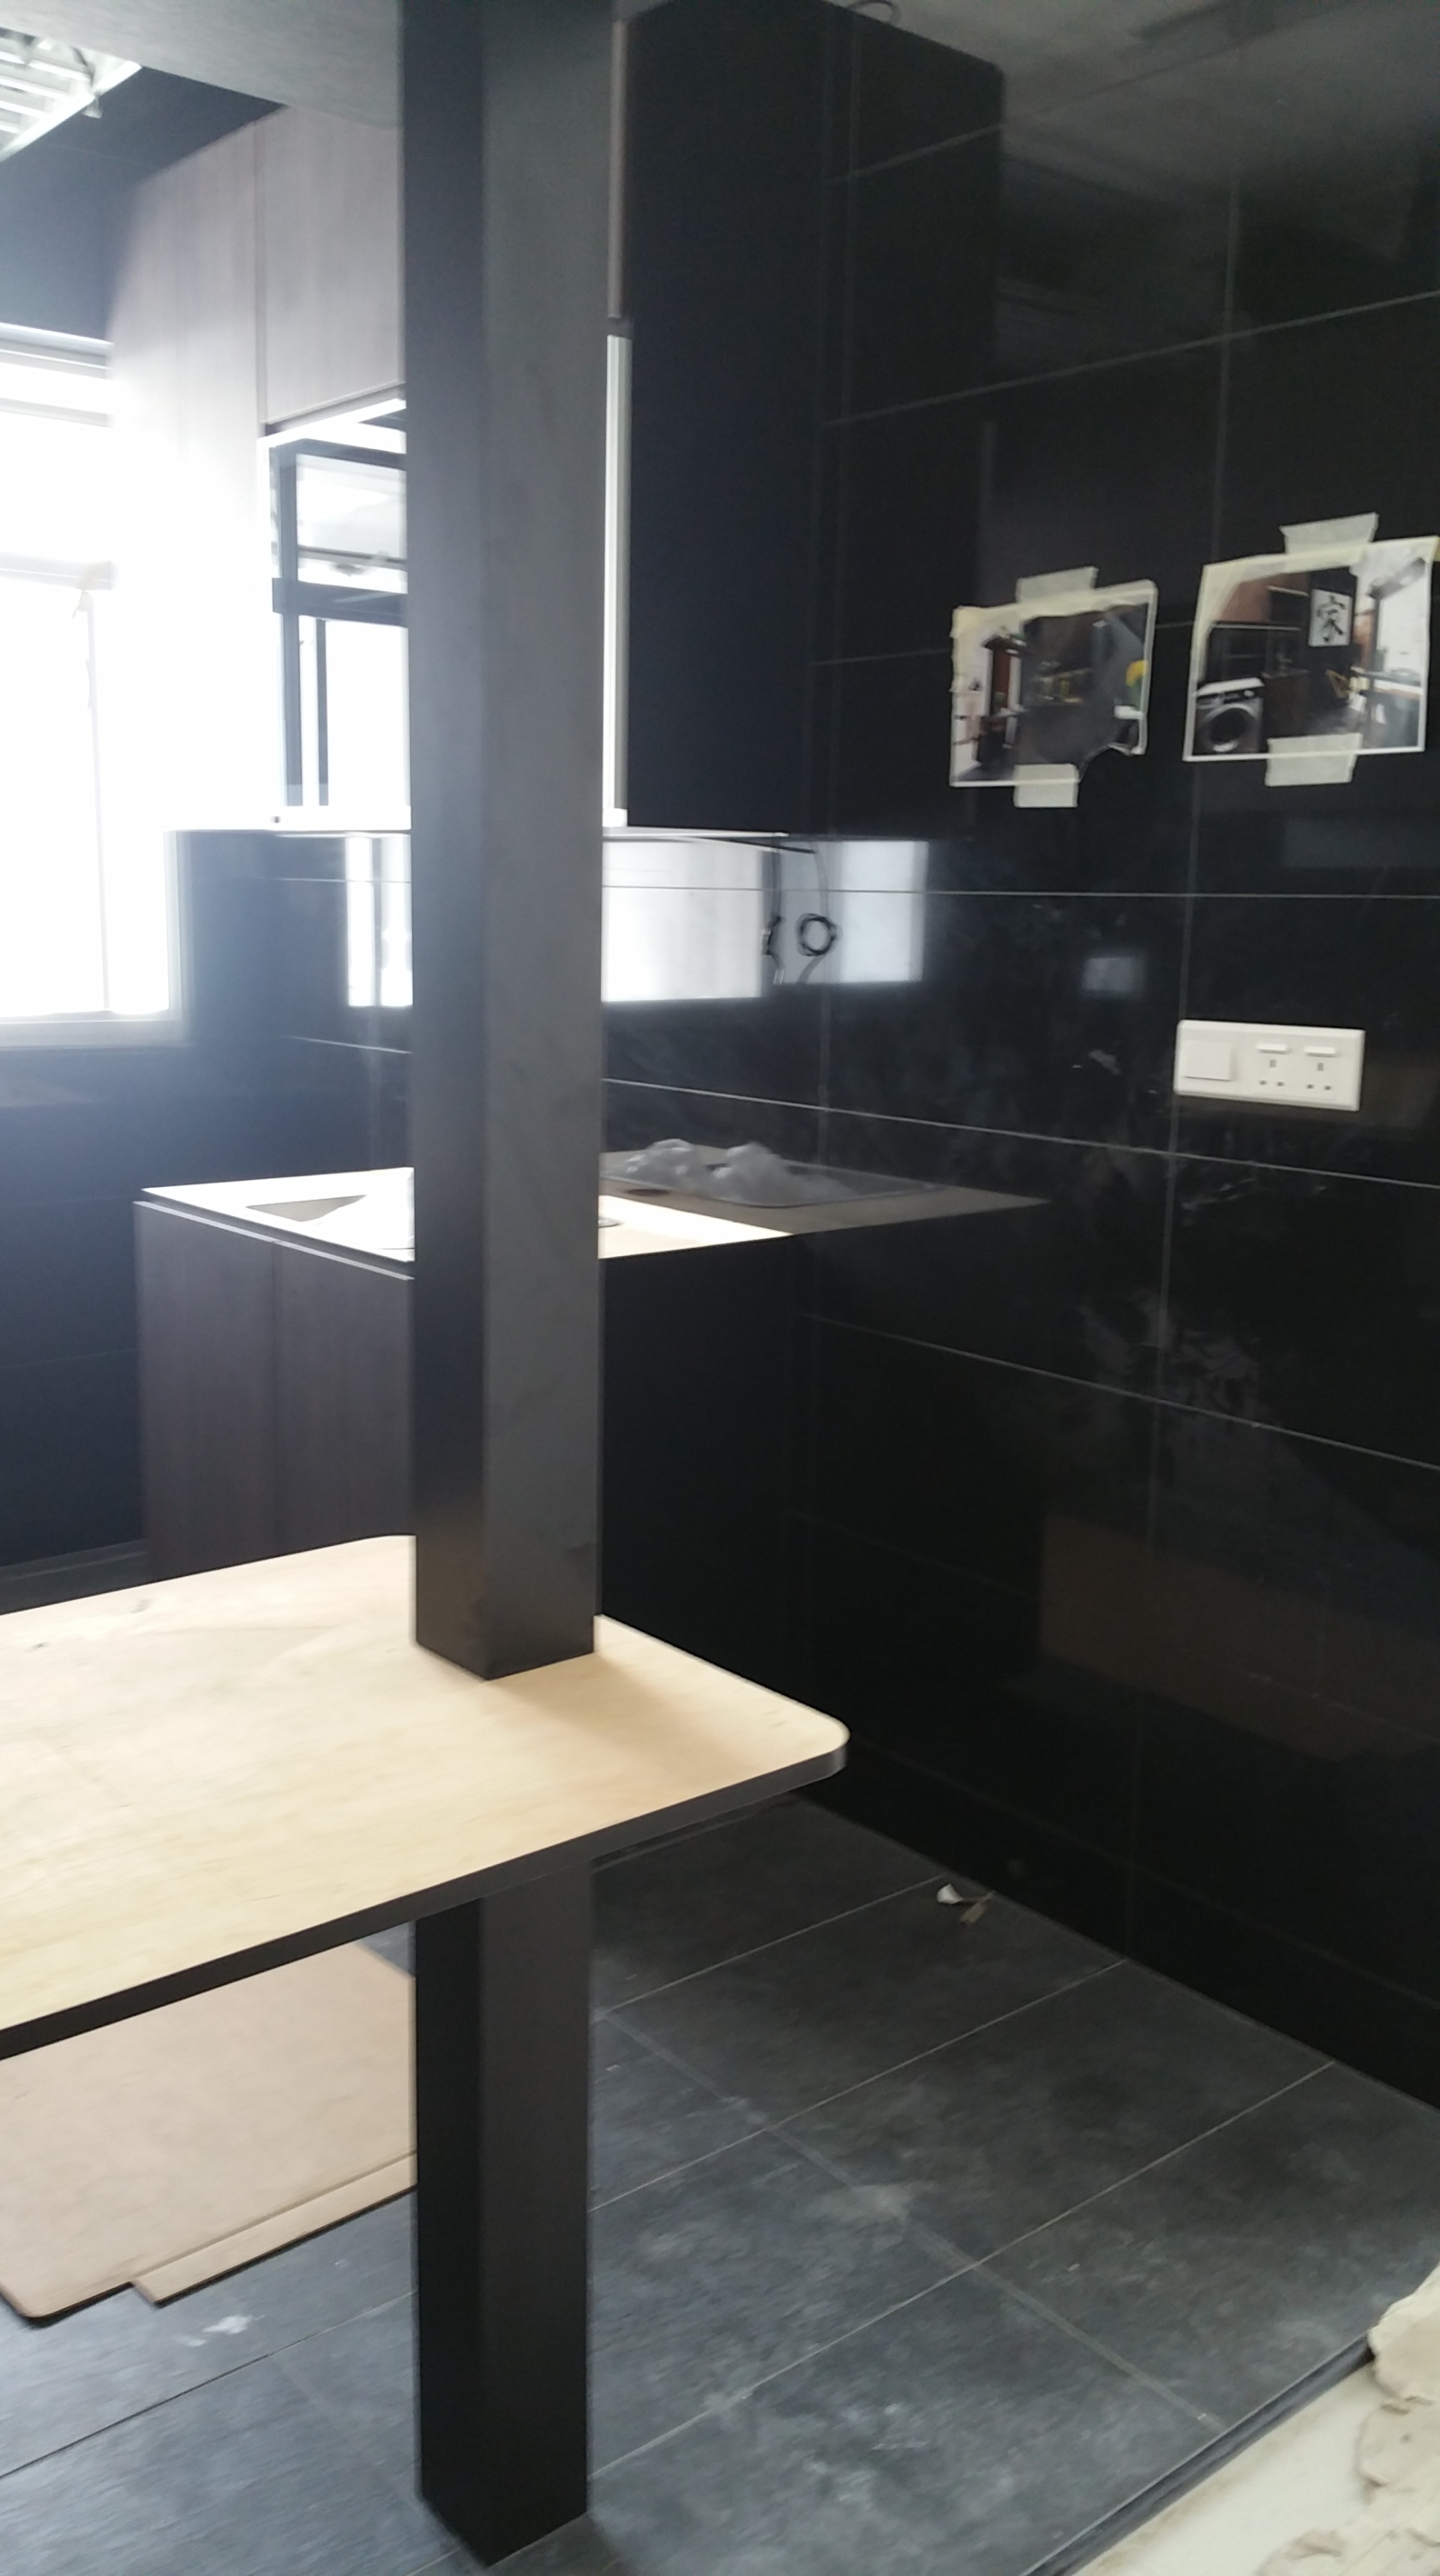
Here’s the Kitchen Side where I have my Kitchen Sink + Washing Machine Kerb.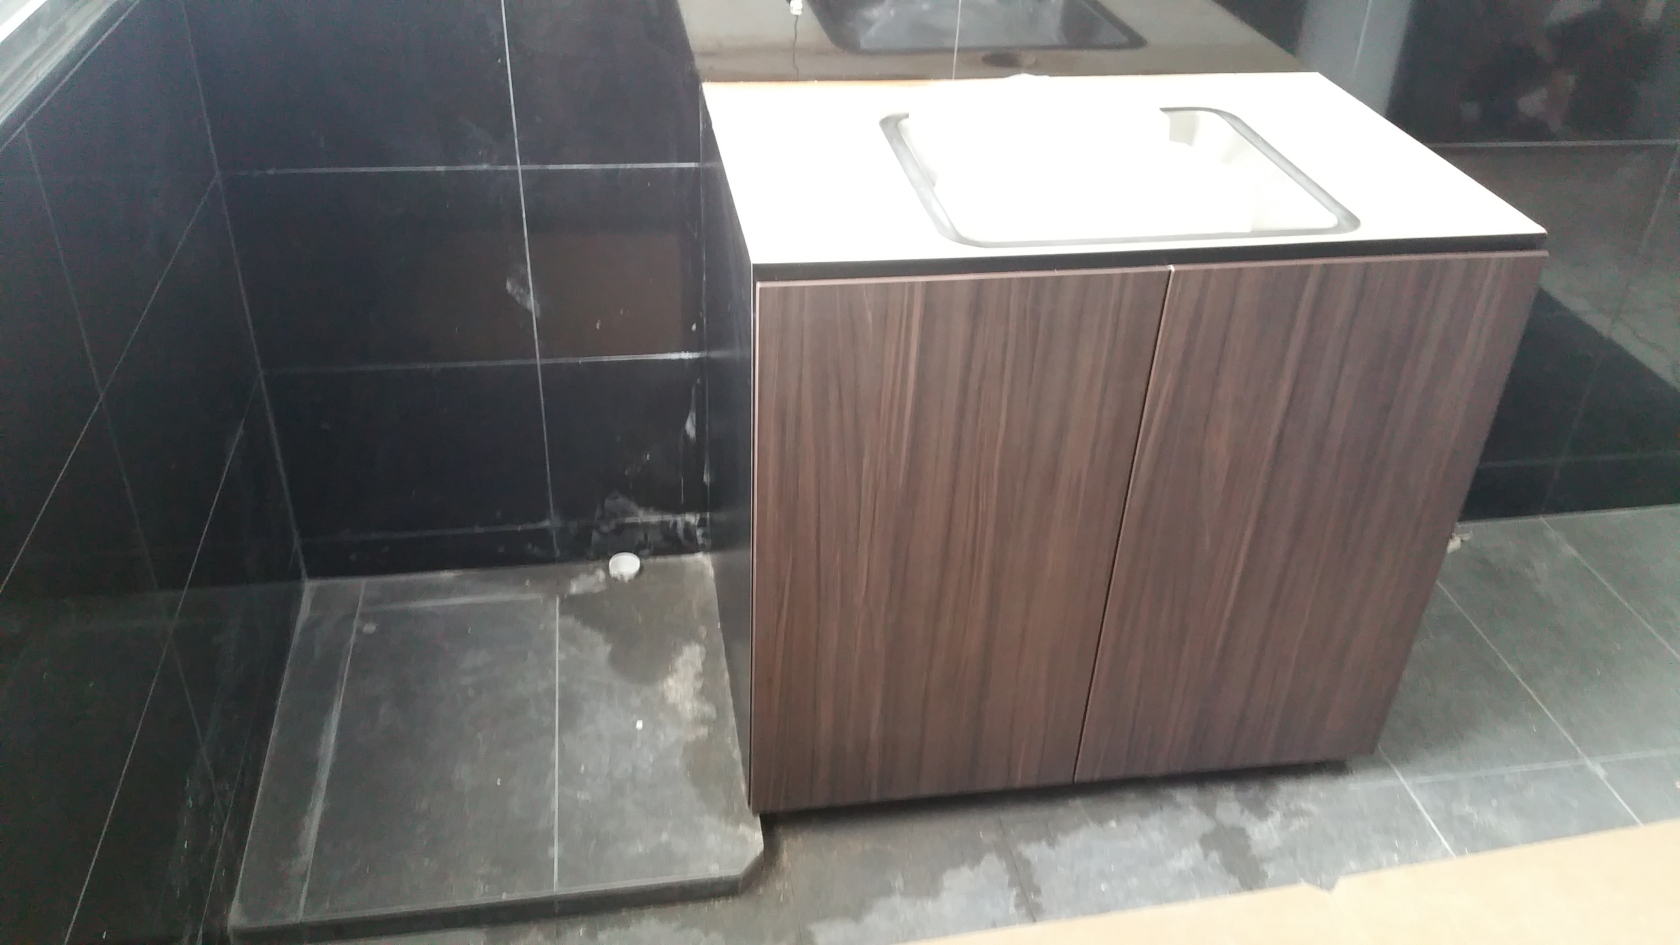
And here are the Cabinets above the area showing the Dishwasher Rack Cover.
My Bedroom Platform Storage Bed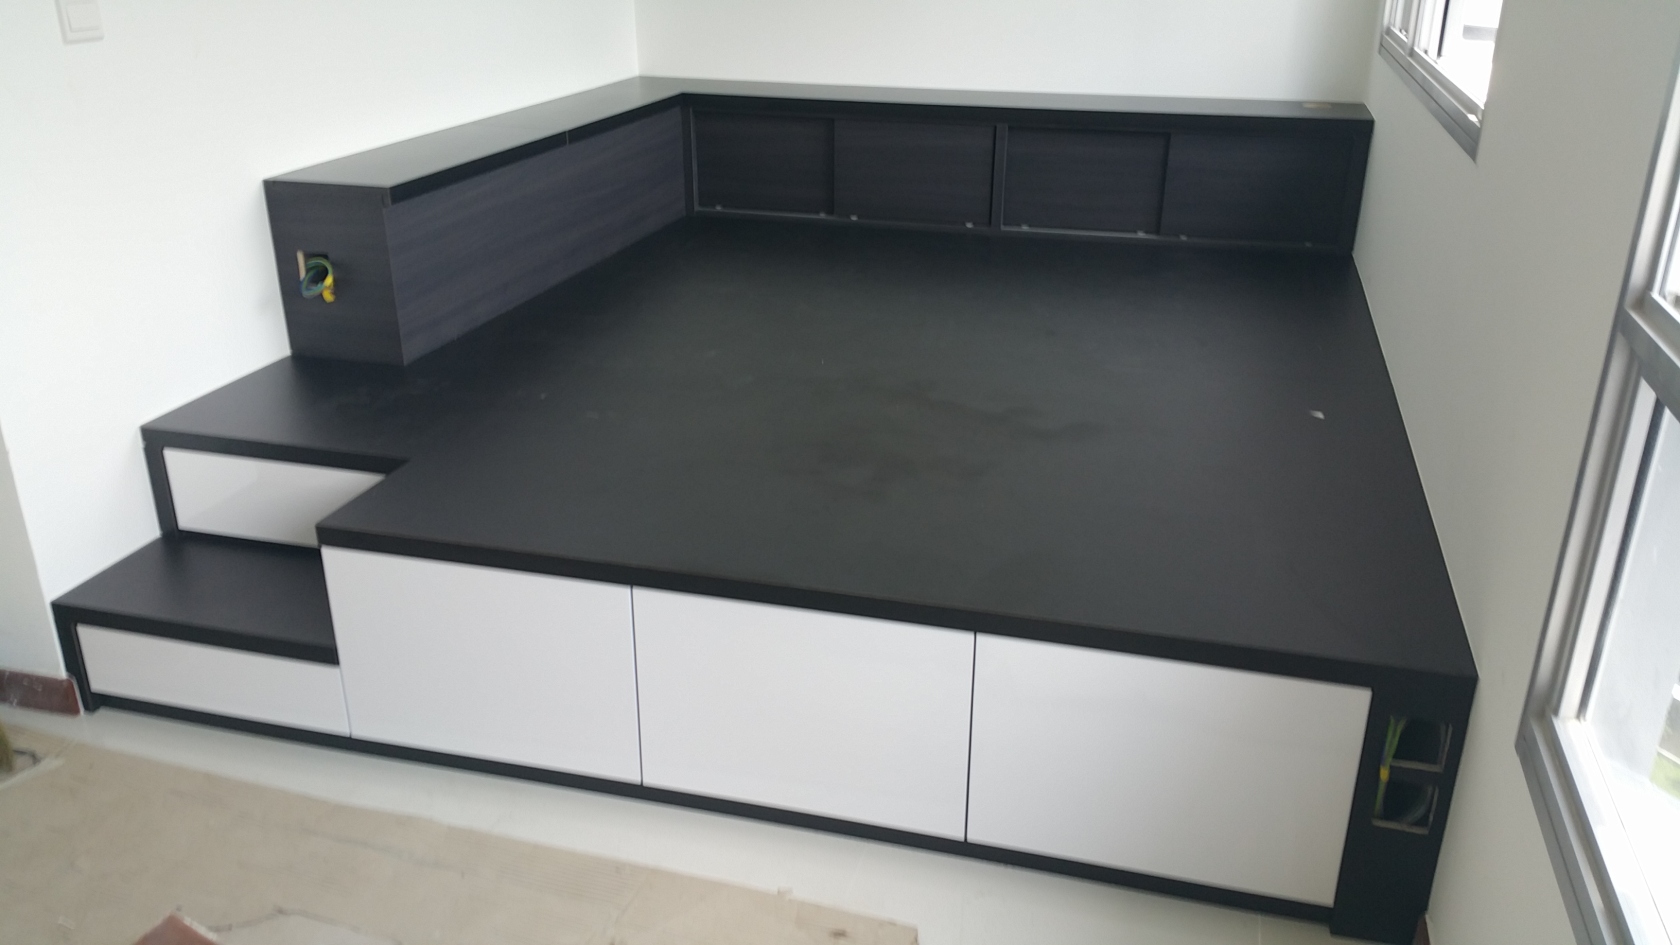
My Bedroom Platform Storage Bed (With Drawers Open)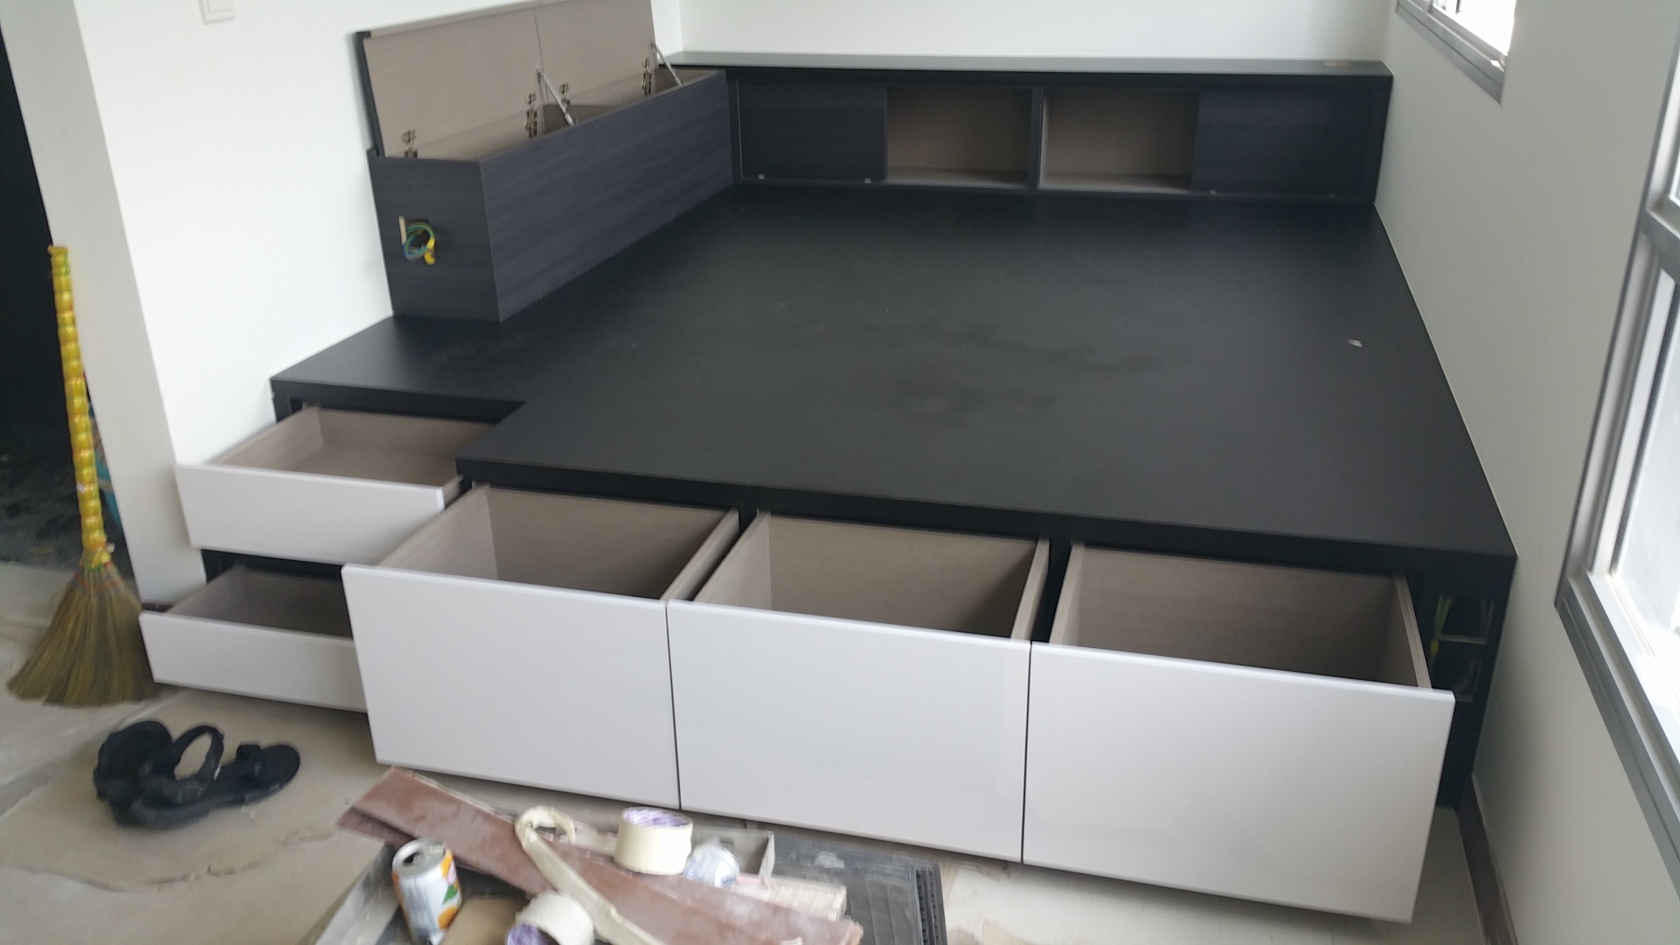
Waddya’ll think of the Carpentry Workmanship so far?
Personally i’m happy with it, and it seems that most of Carpentry is already completed.
All thats left is the Quartz Countertop Layer, a few LED lighting strips to install and some miscellaneous stuffs to touch up.
We’re now very close to the end of the Renovation.
All that’s left as far as I can see other then the above outstanding Carpentry work, is just
Air-Con Installation, Finishing Touchups, Chemical Washing, before Final Handover.I’ll have to see what Jason plans to do.
Just 1 or 2 weeks more folks! The end is near! Dun Dun Dun!!!I’ll see ya’ll in the next Blog Entry!
Click Here for the Next Blog Entry:
8th Week after Key Collection – My_Quartz_ Counter Tops are Up. Also Updated Schedule till End of RenovationClick Here to go back to Page 1 - Table of Contents
-
2
-
-
New Entry: Blog Entry Date: 4th November 2017 Saturday
Click Here to Access.
Updates: End of 7th week after Key Collection.
Carpentry Works - Part 2
Carpentry Works still going on.
Looks like things aren't as bad as I initially thought!! -
55 minutes ago, mmoh said:No, do not accept. then you db box cannot open how? or the bottom sliding door taller than table how? just tell them nicely that this is NOT acceptable. They have to bear they own cost of doing things wrongly.
Actually i just received update from Jason. Apparently he rush down onsite and checked the height is ok wo. Won't kena block by my desk.
Nevertheless, Thanks mmoh really appreciate it!! Hope the height is nice.
Initially i thought the upper casement door too long cannot open due to kena block by my desk. Hmmm...
The lower sliding door area sure didn't look like 73cm for me (the height of my study desk)
Maybe I cock eye lol, tomorrow i will go do re-measure and re-check.
Hopefully theres a happy ending somewhere.

My Modern Zen 2-Room 35sqm (Type 1) HDB BTO Apartment Renovation Journey
in Reno t-Blog Chat - HDB BTO Interior Design and Renovation
Posted
LOL for a moment I thought you were displaying your comic collection
Thanks for the photo! Will go Daiso hunt for some