

twinklecloud
-
Content Count
393 -
Joined
-
Last visited
Posts posted by twinklecloud
-
-
Think it is good to assign the powerpoint to each gadget to have a clearer picture as to how much you need here, provided you have no intention of getting extension plugs. Gadgets that I off-hand think of:
01. Modem
02. Terminal Point for Fiber
03. TV
04. (Will there be any media player?)
05. (How many PCs / laptops?)
06. (Will there be a printer?)
07. (Will there be any floor / side table lamps?)
Oh yes! I totally forgotten about the modem,media player and printer! Oh Gosh...so many gadgets! Hehe..thank u thank u for the reminder...
-
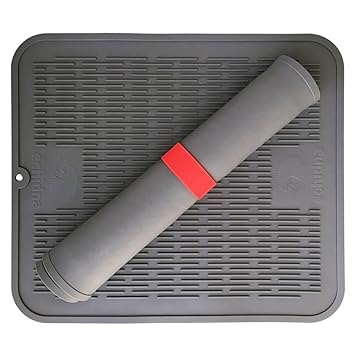
Twinklecloud, its the OXO silicone drying mat from Amazon.
thank you! i found it!! hehe.
-
Day 32
balcony and kitchen tiles have arrived.
balcony tiles
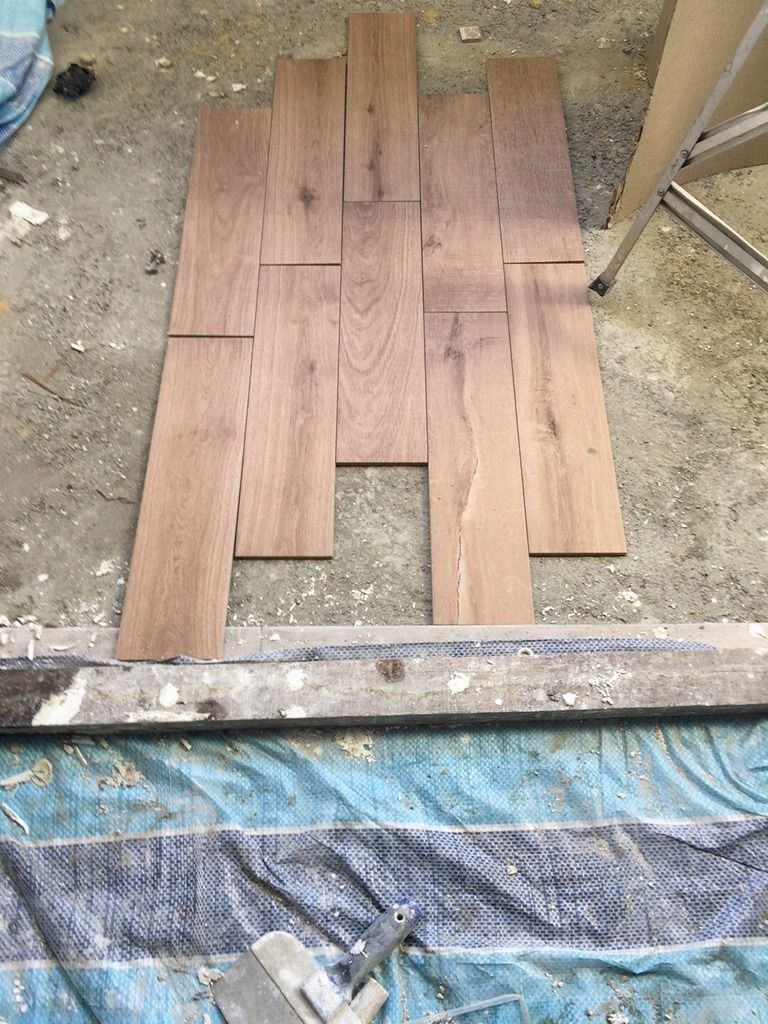
going to lay the tiles this way instead of the straight way as my living hall is done this way
kitchen tiles
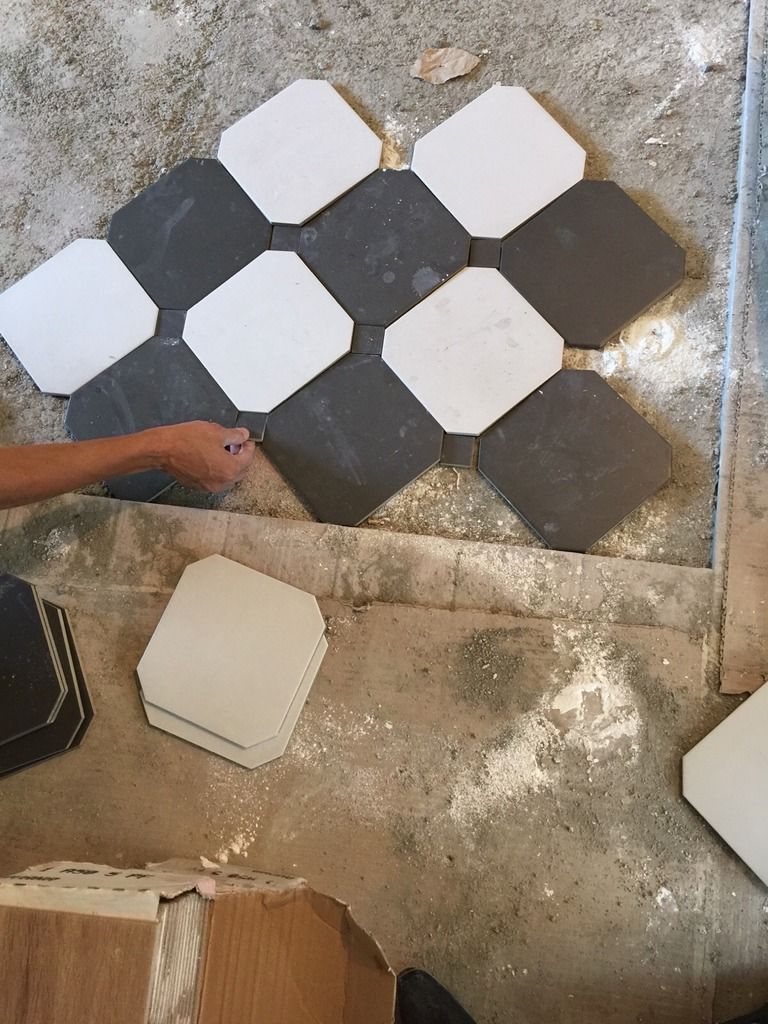
my mario floor tiles... see the resemblance.. lol

-
Powerpoint
Discussed powerpoint with ID yesterday.. have totally zero Idea how to go about..
this was what has been discussed:
main entrance - 1 point for the light
utility room - 1 light point and 2 powerpoint
dining area - 1 powerpoint at the shoe cabinet.. ??? mind blank
kitchen - track lights and 3 powerpoint ( hoob,oven and dish washer)
kitchen counter top - 4 powerpoint
yard - light
dining table - hanging light
balcony - 2 powerpoint at the side
living hall - cat 6 and 4 powerpoint for the TV, etc, 2 more for the computer table
along the stairway - 6 led bulbs
upstairs
corridor - 1 track lights
room - 2 each
master bedroom - 4 powerpoint
not sure if i missed out anything... i need to think about it..
would appreciate any input to help me decide.. thank you
-
Changing Letter Box Lock
I have no experience and have no idea how the letter box lock works. So I opened it and study the mechanism.
This is the original letter box lock from HDB.
The important thing here is the metal latch which is bended in the middle.Another view of the metal latch, you have to retain this latch instead of using the new one that comes with the new lock. You will need a adjustable spanner to unscrew the big gold nut in the picture.After you removed the old lock, you swap the metal latch to the new lock, the picture here show the latch that comes with my new lock which is not bended.Then just install the new lock using a adjustable spanner. Here you see is my completed installation using the old latch.Completed pic. You see the gap is because I used the new latch which is not bended, so will have a gap. By using back your old latch, it will be a perfect fit, or at most some slight adjustment using washer and plier you will make it seamless. I completed everything in 10 minutes being a first timer.I might as well mention how to change the main door cylinder too, all you need is to unscrew the screw as pointed by the red arrow.The screw is very long, you can see the hole on the cylinder that it locked into. After that you can install the new Duro lock which can easily buy from Homefix.Only the metal gate cylinder require some skill to remove as it involve inserting the key to turn the locking lever before pulling it out.thank u so much!
 it's very detailed and useful! i faced an issue yesterday when I tried to get the lock. it comes in different sizes..
  so i got to back and make measurement then back to the shop again. =(
 -
the both do the same thing, just that I think my dish rack will be a bit small for baking pan or some big pot, so I get this item,
when is done I can just roll it and store in the cabinet. (If I am not too lazy. hahaha!)
hey nextstep! i have been thinking about your dish drying mat.. may i have the link? i think i shld invest on one too! my washing area will be small too. it will be a good idea to have that! hehe.. i got your poison.. haha
-
Don't say that lah, we learn from each other mah.
I buy that because I was like thinking it will be good when I want to dry pots or pans.
is something different from dish rack? so this is meant to be put beside the sink to dry bigger pots n pans?
-
letter box lock
side track abit. May i know if anyone has done and how it can be done? i went to the locksmith and he said can DIY. we are still wondering.. would appreciate any input. thanks!
-
Hi 2Roomer, my ID uses her company padlock which is numbered on it, then she gave me 2 keys for me and my wife. The ID's tiler, plumber, painter, cleaner, electrician, carpenter all have keys to all the padlock my ID's company uses. This arrangement is very good as all her workers can access all renovation site without owners or ID's present. However we only lock the front gate, not the main door, throughout the whole renovation period only my main gate is locked, main door can still open to peep inside. Upon completion, I changed all my lock cylinder to duro for 1 master key access for main door, main gate and letter box. The original lock cylinder from HDB kept as spare. I did pass to ID my keys from HDB for her to put on her padlock and she returned me back after putting her company's padlock. If you meet ID onsite to put on their padlock then you no need pass your HDB keys to anyone. Hope this solve your doubt for your upcoming reno.
May I ask how u change the lock to the letter box?
-
Maybe I can tell you about my Philips hue bulb setup in my house and you see if it is what you wanted. All bulbs comes in E27 connectors and there is a bridge(device) you have to connect to your router. Once you turn on your bulb, it will link/talk to the bridge which allow you to control the lights thru your handphone. Thru the philips hue apps you can set your lights to any colour any intensity to your preference. I then bought a philips hue tap switch which allow me to save 4 preset on each tap switch. Example of the 4 settings is All Off/Blue/50% Brightness/90% Brightness. So when I reach home, I turn on the wall switch which light I want to on, then press the hue tap to change to the preset I want which is usually the 90% daylight. This totally eliminate the need to use my handphone to switch on my lights and it runs on kinetic power, no need battery. I would also advice you not to have 1 master switch to on all your lights as sometime u want only certain lights on for mood. I have a total of 12 bulbs in living room, using 1 switch for every 2 lights. I usually only turn on 4 to 6 lights and I rotate them to spread the lifespan.
As for the automated part, I can control my lights as long as I have access to internet on my PC or 4G on my handphone. Thru the philips hue apps on 4G, when i reaching home like downstairs, I would launch the apps and change to another scene, my wife at home would feel the change in light colors and she knows I am downstairs and open the door for me. The first time I used this feature it freaked her out cos I changed to red.
Costing depends on how many bulb you need, they are about $70 each. I bought my E27 downlight holder for $10 each, so about $80 per point and I have 12. Hue tap is $89. Starter kit about $280 including the bridge with 3 bulbs.
Maintenance is as good as not necessary as E27 holder hardly spoil, if your hue bulb spoil very easy to replace as it is E27 type, unlike those flat led downlight with drivers, you will have a hard time getting replacement especially if the shop you bought from closed for business. Not to mention the crumps that will fall off from the false ceiling while replacing and touching those wires. E27 is just screw on and that's it. No need drivers.
The only set back I would say is it takes some planning to install the E27 downlight or pendant lamp. You can see my tblog should have some pictures. And google philips hue light and hue tap for more information. HTH.
thank you for the comprehensive explanation!! will read up and explore more! going to read your Tblog too.. hehe..thanks for dropping by!
-
Electrical points
Going to discuss with ID as well as electrician on the points.. any tips anyone?
Was considering if we shld do a one master switch to control all the lights to save the trouble of switching one by one.. hehe
Hub wanted to automate the whole house.. wondering if anyone here has any experience/tips to share?
-
The 2nd item is actually a drying Dish Drying Mat can also work as heat resistant trivet.
I like it because with that I don't have to use the door stopper. And the main door will close like hotel room

cool!! thanks for sharing!! I din even know that's a drying dish mat.. (really mountain tortoise..)
thanks for the uniarm review.. i am seriously considering..
-
I loved this gate! I saw it at Siong Door and ordered it immediately... Installation next Monday

wow!! i am looking forward to your door installation! btw did u get the digital lock as well?
-
Metal gate and digital lock
saw this metal gate and fell in love with this.. looks so cool..
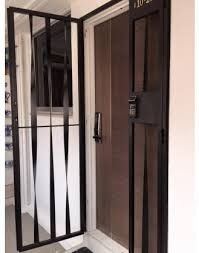
As for the wooden door, i havent decided. anyone has any idea or recommendation? mine is not fire-rated door. =)
-
May I ask u for review on your uniarm? is it really useful? =)
-
Day 94 - Amazon
Amazon is really became a very dangerous place especially they given you free shipping
Just ordered a couple of item, and should be getting all the item before I move over I think
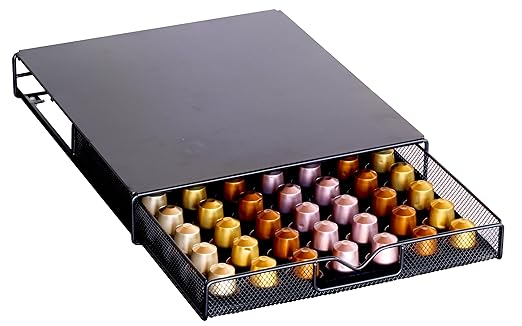

poison poison.. this looks so tempting..
May i know what is the second item? hehe
-
CNY while renovating
May I ask is it a requirement to give "red packets" to the workers as well as ID if the renovation continue after CNY?
anyone can advise on this please?
-
wow got dish washer ah??? See that on your 3D
Super Envy NOW!
hehe.. yeah. as i do alot of cooking since now have the space.. y not? u can put one too! =)
-
you might want to ask your id, which is more practical in cost savings.
Though if it's nice but end month bill...

sure! thanks for the tips!
-
I like B
I like B too! ID said only B can be done.. haha.. lucky is the one i like..
-
A Photo Gallery of Modern Bohemia
I realise it's a bit challenging to find the exact image that would describe my perfect home LOL. Here are a few images we like, sticking to the theme of modern bohemia. Think dark wood, brass and gold, deep dark reds and beautiful greens. I hope this vision is possible to be brought to life. Skali it just looks better in our head!
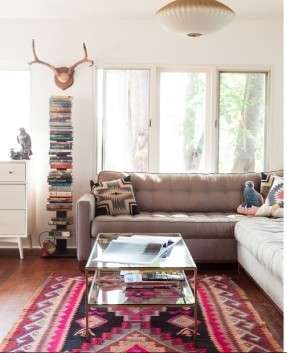
Love the coffee table here. We found a similar one from Scene Shang =)
The couch would be a brown leather one, though.
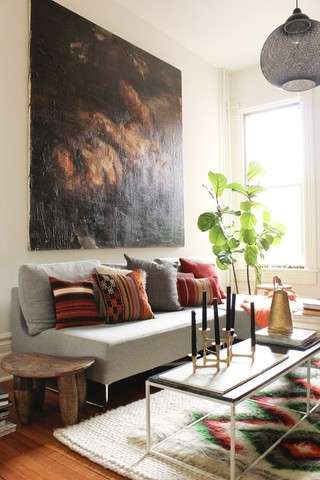
Yup, more coffee tables to fall in love with. The fig tree really ties up the whole place nicely.

My husband is a huge fan of Afghan rugs. Their colours are mainly deep reds and blues,
and patterns are more simple compared to the normally seen Persian rugs.
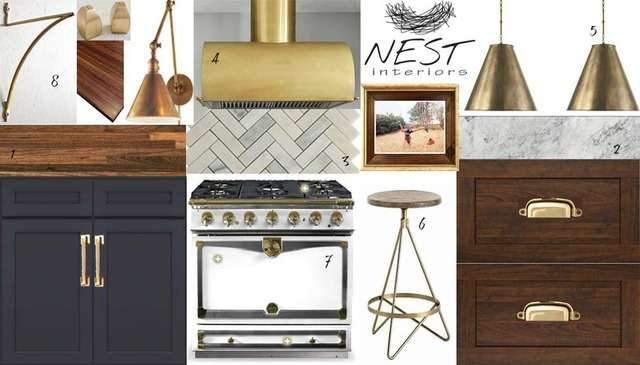
And our favourite part of the house: the kitchen! Here, we plan to go with
midnight blue bottom shelves, open top shelves, marble-patterned countertops (as marble itself is porous and not durable)
and classic brass handles.
Next up: My Idol, the ID
the kitchen looks so cool!! the combination is perfect!! very nice! i am going to stay till n see the outcome!i am not a fan of rugs.. hehe as i want as minimal maintenance as possible.. but the rugs look nice too!
my blog http://www.renotalk.com/forum/topic/72503-the-sky-parlour-an-executive-maisonette-journey/
-
kitchen 3D
We do not really have a theme to play with but somehow as we discuss and decide on the tiles and color.. it seems to be country, modern?
my kitchen would be black, white and grey.. these 3 colors.. not sure how it is going to turn out but based on 3D it's not bad..
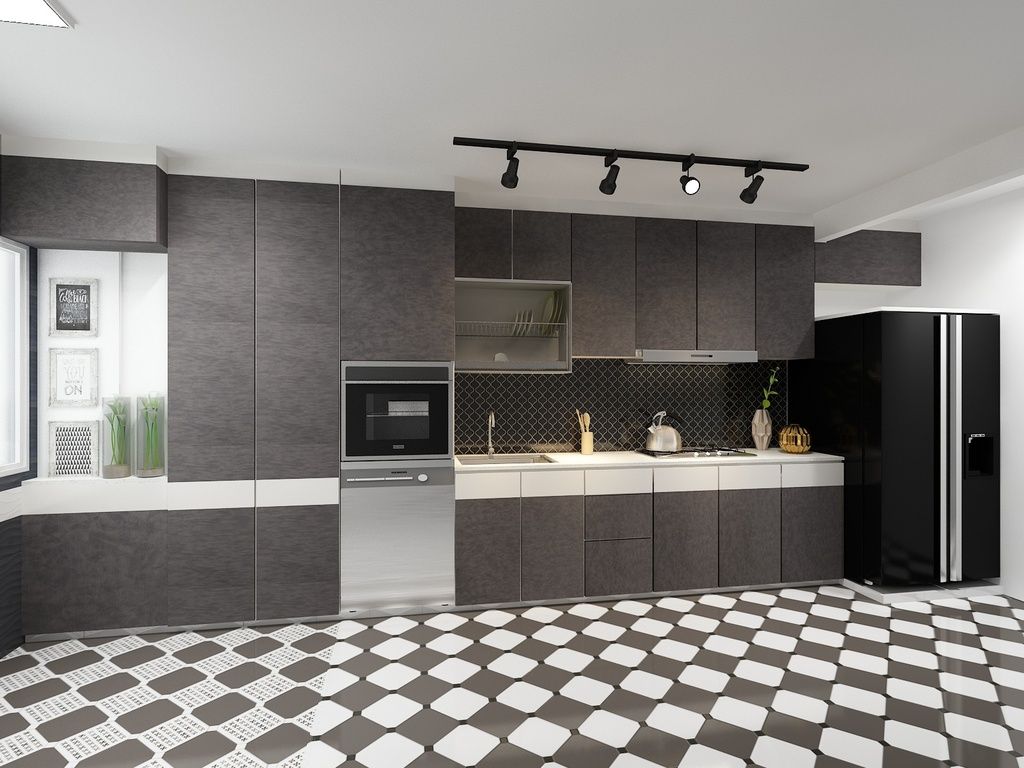
the flooring will be standard through.. initally wanted to separate the yard and the kitchen but find it too messy hence just the black and white combi all the way.. =)
-
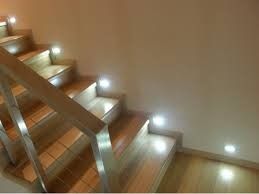
lights for staircase
saw these two options..which one looks nicer and not too overwhelming?
personally i prefer B..
A)
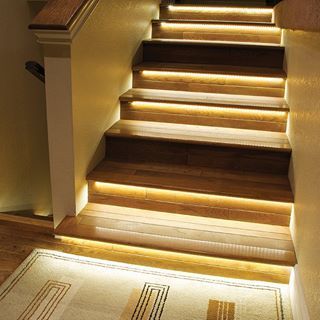
B)
-
Regarding staircase lights, depending on how the stairs is constructed you may like check out led strip lights lined under each flight of stairs. Something like cove light.
Google "cove lights under stairs" under images and you'll see what I'm referring to. If that is overwhelming than you could also consider just running the strip under the whole stretch of handrail
thank you for the idea! maybe i just lay a few led lights instead of the whole strip.. hehe..

The Sky Parlour - An Executive Maisonette Journey
in Reno t-Blog Chat - HDB Resale Renovation & Interior Design
Posted · Edited by twinklecloud
Some updates Day 33
Master toilet
view from entrance
Asked ID to do a seat for me so that i can sit down n shower or wash my feet..
the big hole is for the toilet bowl
ID boxed up the pipe n did a false ceiling to put cove light.. it was a surprised.. we din discuss it before hand and wanted to leave the pipes expose.. but it turn out super well..
Another thumbs up.. he did it! though just one but I am very happy.. it's soo soo nice..