


Leaderboard

Popular Content
Showing content with the highest reputation on 10/27/17 in all areas
-
I think should be homogeneous in my opinion4 points
-
I thought wax would be easy to remove, no?4 points
-
Hahaha, good one, that really made my day, lol4 points
-
Actually no wax can be rather difficult to remove from tiles as it sticks to the tile's enamel3 points
-
Can just use coloured silicone which i your case should be black2 points
-
2 pointsWas having some issues about the homogeneous tiles in my bedroom as the grouts had become blackened and the tiles were becoming dull and I had used the HCL89 from http://hcl89.byethost10.com and it really helped to clean my tiles, recommended.2 points
-
2 pointsThese coloured tile are rather nice, i am also planning at looking at some when i renovate my house again in the future2 points
-
2 points
-
1 pointHad a similar issue in the past so far the only thing that managed to work for me was something called HCL89. It had managed to clean my tiles and restore them to their original self One good thing i like about it is that creates a protection layer that helps prevent my tiles from getting too overly dirty I usually get it from http://hcl89.byethost10.com or http://hcl89.atwebpages.com Hope this helps you out1 point
-
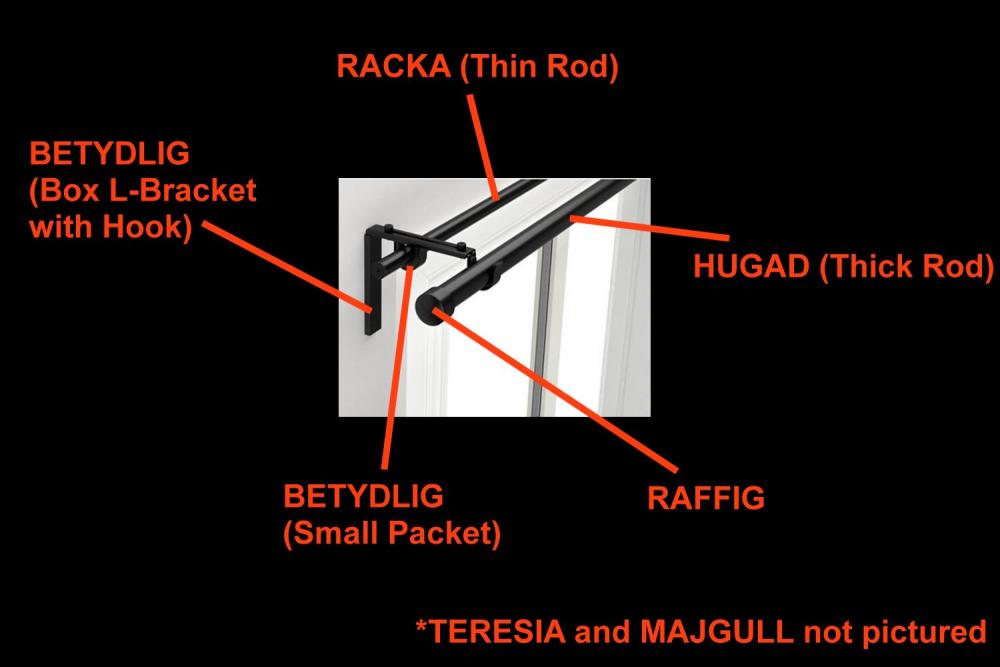
Blog Entry Date: 26th October 2017 Thursday Click Here to go back to Page 1 - Table of Contents A little Curtain Experiment - Part 2 / 3 Alrighty, lets continue with Part 2! In this section, I'm gonna list down a complete list of components I've bought and describe each function. Items are labelled Alphabetically, and I will list each one down with another close up image of the component. (Please don't mind my messy cardboard covered floor. Paiseh lah, renovation still in progress. ) ----------------------------------------------------------------------------------------------------- And now some close up shots: A is showing 2 x HUGAD rods B is showing 2 x RACKA rods Needless to say these are the long poles by which the cloth curtains would be mounted on. Please ensure that the length of poles you buy is 210-385cm. Other lengths are apparently not suitable. Both types of poles are extendable, so you can extend and adjust accordingly to how long you want, but MAKE SURE THEY MUST BE 210-385cm. HUGAD rods are thicker and are meant to hang the BLACKOUT Curtain. RACKA rods are thinner are are meant to hang the Inner Lighter Mesh Curtain. For each of the Window, you will need (1 x HUGAD + 1 x RACKA) ----------------------------------------------------------------------------------------------------- C is showing 6 x BETYDLIG Boxes This BETYDLIG BOX will be abit confusing, because there's another version of BETYDLIG that is NON-Box version. These are the L-Brackets you will need to mount on the wall, and they will have a holder to hold the poles. Each BETYDLIG BOX contains 1 hook which is used to hook the earlier THICK HUGAD pole. According to the IKEA sales person i encountered, while 2 BETYDLIG L-Brackets will be enough to hold up the poles, It is better to use 3 BETYDLIG L-Brackets (1 at extreme left, 1 at centre, 1 at the extreme right) so its more stable. For each Window, you will need (3 x BETYDLIG BOXES) ----------------------------------------------------------------------------------------------------- D is showing 6 x BETYDLIG Non-Box Packets Please don't confuse these BETYDLIG Non-Box Packets with the earlier BETYDLIG Boxes. These BETYDLIG Non-Box Packets only contains 1 hook which is used to hook the Thinner RACKA Pole. For each Window, you will need (3 x BETYDLIG Non-BOX Packets) ----------------------------------------------------------------------------------------------------- E is showing 4 x RAFFIG Packets Nothing special about this RAFFIG. Each packet contains a pair of Plastic Caps. This is used to cover the tip of either the HUGAD or RACKA poles so they won't slip out and fall out the BETYDLIG L-Brackets when mounted. There are however different types of such Plastic Caps, with some having elaborate designs. They were unavailable when I was there however, but it doesn't matter because this one works well enough for me. For each Window, you will need (2 x RAFFIG Packets) ----------------------------------------------------------------------------------------------------- F is showing 2 x MAJGULL Packets MAJGULL is the BLACKOUT Curtain that I'll be using. By default, it will come with little cloth loops for you to be able to poke your THICK HUGAD pole to hang it. There is an alternative RING like accessory for sale in IKEA but I didn't buy it because I felt the default Cloth loops will be sufficient. Each packet contains 1 pair of such curtains. Standard Size 140cm x 250cm This length is suitable for hanging for my Living Room Window, but I may need to get a Seamstress to trim it shorter for my Bedroom Window because I have a Platform Bed there. IKEA has this Seamstress service available, but as my Renovation is still going on, i didn't need to engage them. I can alternatively just let it drape down see how it goes, it may even look nice lol. For each Window, you will need (1 x MAJGULL Packet) ----------------------------------------------------------------------------------------------------- G is showing 2 x TERESIA Packets TERESIA is the translucent thin mesh Inner Curtain that I'll be using. By default, it will come with little cloth loops for you to be able to poke your THIN RACKA pole to hang it. There is an alternative RING like accessory for sale in IKEA but I didn't buy it because I felt the default Cloth loops will be sufficient. Each packet contains 1 pair of such curtains. Standard Size same as MAJGUL 140cm x 250cm This length is suitable for hanging for my Living Room Window, but I may need to get a Seamstress to trim it shorter for my Bedroom Window because I have a Platform Bed there. IKEA has this Seamstress service available, but as my Renovation is still going on, i didn't need to engage them. I can alternatively just let it drape down see how it goes, it may even look nice lol. For each Window, you will need (1 x TERESIA Packet) Abit of Deja Vu right? LOL!! But thats because TERESIA is basically also a curtain same as MAJGULL except its a different type thats all. And thats all for the individual Components. ----------------------------------------------------------------------------------------------------- To further understand how the Rod Extension function, please refer to the below picture. I hope it is abit more clear when showing which component will go where. (TERESIA and MAJGULL are not pictured of course) ----------------------------------------------------------------------------------------------------- Component Pricing and Grand Total Calculation: So in summary, for 1 Window, the components and prices will be: 1 x HUGAD (210-385cm) Price: 1 Rod is $9.90 1 x RACKA (210-385cm) Price: 1 Rod is $9.90 3 x BETYDLIG Boxes (L-Brackets) Price - 1 Box is $2.90 (Therefore 3 of them is $2.90 x 3 = $8.70 total) 3 x BETYDLIG Non-Box Packets (Hook Only) Price - 1 Packet is $1.90 (Therefore 3 of them is $1.90 x 3 = $5.70 total) 2 x RAFFIG Packets Price - 1 Packet is $3.90 (Therefore 2 of them is $3.90 x 2 = $7.80 total) 1 x MAJGULL Packet (140cm x 250cm) Price: 1 Packet is $49.90 1 x TERESIA Packet (140cm x 250cm) Price: 1 Packet is $15.90 In total, for 1 Window, the Curtain Cost works out to be: $9.90 + $9.90 + $8.70 + $5.70 + $7.80 + $49.90 + $15.90 = $107.80 Therefore, 2 Windows (Both Living Room and Bedroom Windows) for me works out to be $107.80 x 2 = $215.60 (not including GST) ----------------------------------------------------------------------------------------------------- And so with that Price Calculation done, we come to the end of Part 2 of this Curtain Experiment. Instead of paying $500+ for a pair of curtains, I pay $215.60 which is more than 50% savings. Of course, if you use a different curtain, the price might go higher or lower. But yea there we go. But do stay tuned, because this Experiment is still not over. There will be a Part 3 of this Experiment where I install everything. (Of course i'm gonna get Jason's contractors to install it. ) But that will be much later at the end of the Renovation, so do stay tuned if you're still interested in how it all turned out. And so thats it. For now. I'll see you in the next Blog Entry!! Click Here for the Next Blog Entry: End of 6th week after Key Collection. Lightings still being worked on, Bathroom Door is Replaced. If you are only interested in accessing the conclusion of this Curtain Guide, Click here to directly jump to the Final Part of this Guide: A Little Curtain Experiment Part 3/3 Click Here to go back to Page 1 - Table of Content


 1 point
-
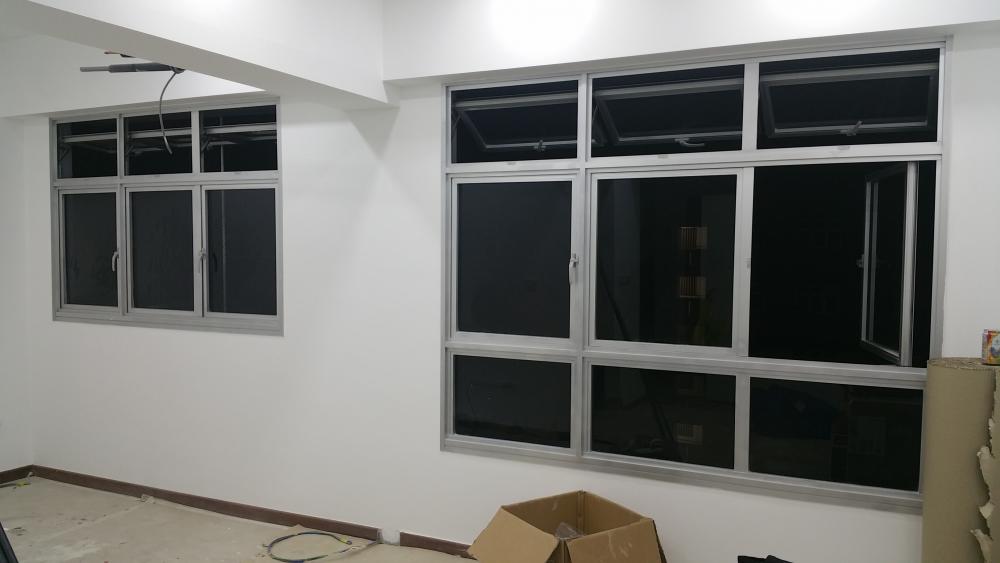
Blog Entry Date: 25th October 2017 Wednesday Click Here to go back to Page 1 - Table of Contents A little Curtain Experiment - Part 1 / 3 So, while my lighting situation is underway, lets talk about another topic: Curtains Love em or hate em, every home just seems to need em. Below photo are my windows that I intend to do curtains for. Left window is my Bedroom, Right Window is for my Living Room. Nothing special right? Just 2 pairs of cloth to cover it up nicely. Now the problem is price. Almost all curtain vendors i've spoken to are quoting curtains for 2 room starting from $500, with some even asking as high as $780!! *faints* And the price goes up even higher for Specialized Curtains like (Night Curtains, Blackout Curtains etc etc) I don't know about how ya'll feel, but personally for me, I really feel paying over $500 upwards for mere pieces of cloth isn't really worth it. What to do? What to do? --------------------------------------------------------------------------- It so happens that there's this lady in my Estate's Facebook Group (Ms Eka), who's also a 2 roomer. Her renovation is about to end, and she was nice enough to share her living room picture below: Looks not bad right? Imagine my surprise, when she revealed that her curtains were from IKEA. She even shared what she bought and how it drastically reduced her curtain bills to an unbelievably low price of just $73.90!! That said, she had someone help her install the curtains, which was a contributing factor, but still, its a good deal!!! To achieve the look of her curtains, she posted these below items she bought: With that said, I'm sure ya'll know the word on the street is that IKEA items aren't very durable. Sure, they're cheap, but they're usually made of very cheap materials that'll either break or give way in a few months time. As i mentioned in a previous forum comment, i believe in "一分钱, 一分货" that is: "Good things don't come cheap, Cheap things are seldom good." So i was really hesitating whether if I should spend over $500 on curtains, or go for IKEA curtains. And hence we arrive at this Blog Entry. --------------------------------------------------------------------------- I am going to do an experiment. With the guides kindly provided by Ms Eka, I think i'll go to IKEA for a shopping trip and see if I can get a good deal on this. I really really don't feel like spending over $500 for curtains. If the experiment succeeds, hey i've got a good deal. If it fails, well i'll just treat it as a learning experience I guess. So, if you're interested in how to get curtains installed cheaper, this guide is for you --------------------------------------------------------------------------- Pre-planning Stage: As with any undertaking, I've thought thru about a few things I want for my curtains. 1) While Ms Eka's curtains are nice, they are more for a Woody Scandinavian feel, and don't fit into my Modern Black and White theme. 2) I like my living room to be a home theatre, and as such would prefer ZERO light to seep in when i'm enjoying a movie night, so i'm going for a BLACKOUT curtain for the Living Room. 3) Since my Living Room is already using BLACKOUT curtain, it would look wierd if my Bedroom doesn't use it, so it will ALSO use BLACKOUT curtain. 4) While my curtains are BLACKOUT type, i'd still like to have a 2nd layer translucent mesh curtain to allow some light to filter thru when I do open my curtains. (Also i think having a 2nd layer mesh curtain looks Classy) --------------------------------------------------------------------------- And so i begin my Curtain Hunt at IKEA. IKEA Alexandria to be specific. WHAT A HAUL!! Here's where i realized about the mistakes I made: Mistake 1: Take this picture for instance of the Rod Assembly Ms Eka posted earlier. IKEA doesn't sell them prepackaged nicely like this. You have to buy each and every individual components. While each component aren't expensive, I feel this is something you should be aware of. I will list out the individual components later. Mistake 2: There are 4 poles to buy, and each of them are at least 2 metres long. This is when I found out, that Taxis won't be able to help haul these long poles. (They don't want your poles scratching or breaking anything) I looked for Maxi Cab (A longer type of Cab) and they quoted me $55 just to deliver everything back to my place!! Crazy. This experiment is to save money, not spend more money lol. End up what happened? I lugged EVERYTHING back home via Public Transport. Dear Readers, don't be stupid like me. If you are going to do this, MAKE SURE you have someone who can help carry or a vehicle ready to carry the items back. On the plus side, I probably burnt a few hundred calories at least, although everyone was probably looking at me like I was crazy. I was lucky I wasn't stopped by the MRT staff at the gantry tho. What a fantastic workout! .....Yea right....Abit tired now. (I'm already starting to regret this experiment already) To be continued....in Part 2.. Click Here for the Next Blog Entry: A little Curtain Experiment - Part 2 / 3 Click Here to go back to Page 1 - Table of Contents


 1 point
-
This kind of issue with plastering is common and nothing to worry about1 point

This leaderboard is set to Singapore/GMT+08:00